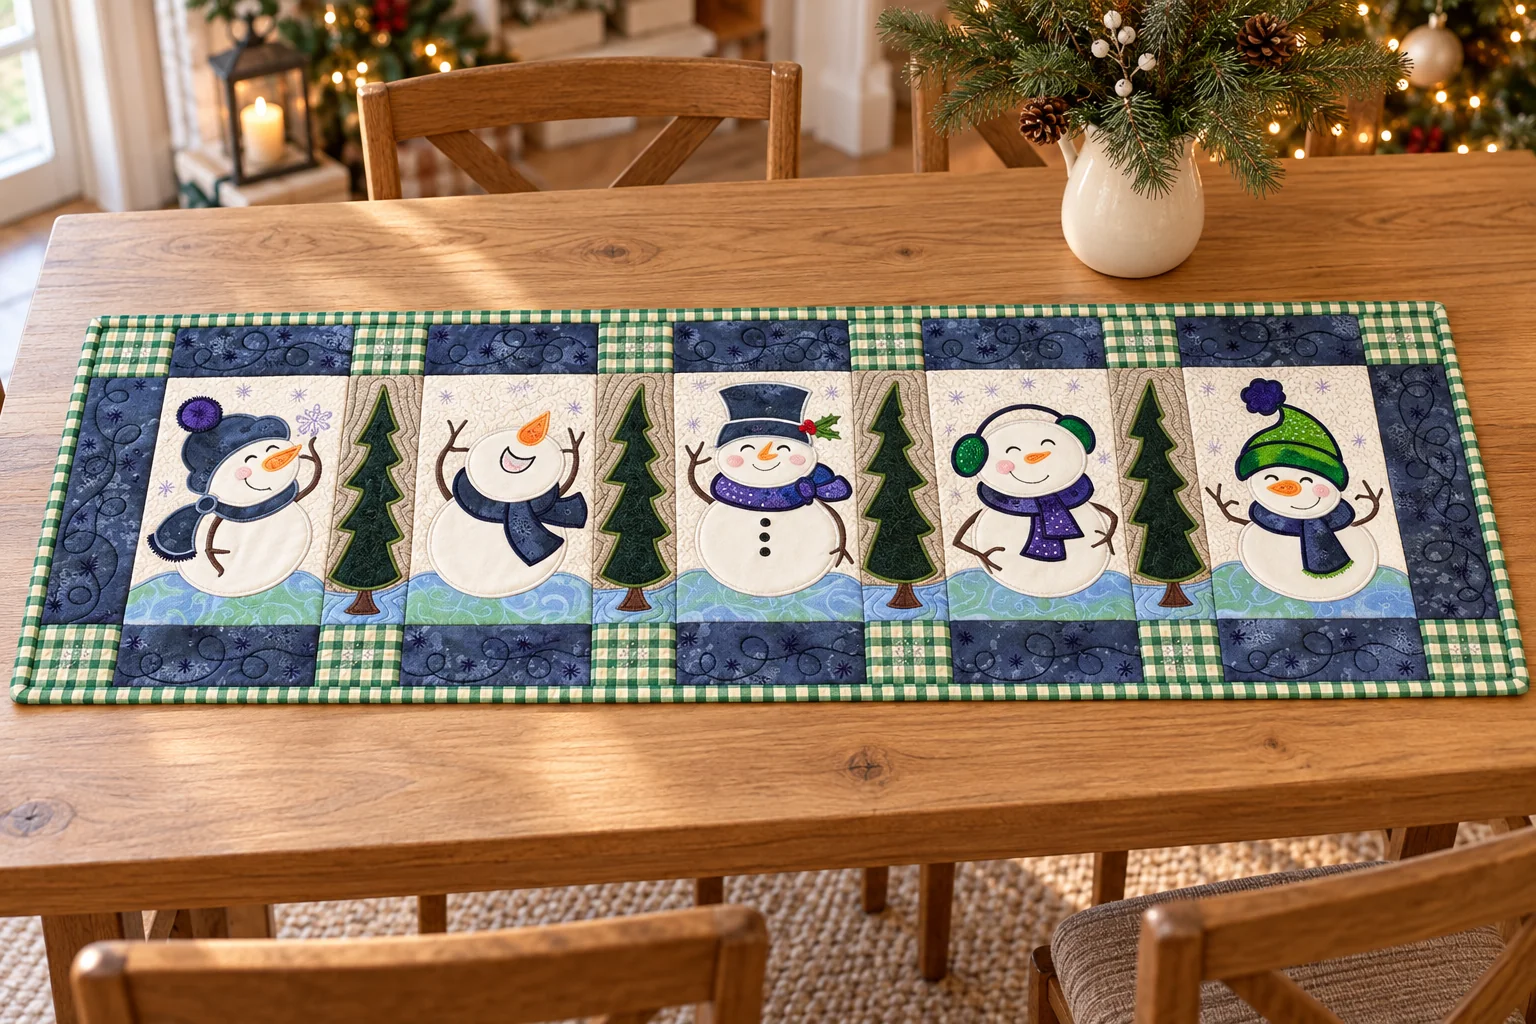
Five cheerful snowmen and a row of little evergreen trees make this snowman table runner pattern a lovely project for the winter season. Frosty Parade combines cream applique, rich navy borders, purple scarves, bright green accessories, and green gingham accents. A soft aqua ground connects the characters and gives the whole arrangement a coordinated look.
The patchwork background uses straight seams, while the hats, scarves, faces, and twig arms give each snowman a personality of his own. Display the runner on a dining table, a sideboard, or a console where the full row of winter friends can be enjoyed. The free PDF at the end of this article includes the measured cutting chart, complete assembly instructions, full-size placement guides, and mirrored applique templates.
This project is a photo-based reconstruction with newly calculated measurements and redrawn shapes. The original dimensions and embroidery files were not available, so the sewing version interprets the reference rather than reproducing a verified original pattern. Its cutting arithmetic and print scale have been checked digitally, but it has not been sample-sewn.
A Winter Parade Full of Personality
The first snowman wears a floppy blue hat with a purple pom-pom. Next comes a laughing snowman with an upward-pointing carrot and a navy scarf. The center character has a top hat, a little holly decoration, and three dark buttons. A snowman in green earmuffs follows, and the final character wears a pointed green hat with a purple pom-pom.
Four narrow tree panels separate the five characters. Each tree has a slightly different lean, a brown trunk, and a light green outline around its darker foliage. The cream background keeps these silhouettes visible, while the aqua and pale green ground adds a softer color beneath them.
The border is part of the design, too. Navy rectangles sit above and below the snowmen, and green gingham connectors align with the trees. Gingham corner squares meet the navy end bars, then matching binding finishes the perimeter. Taking the time to align those intersections gives the runner a tidy, balanced finish.
Finished Size and Skill Level
| Detail | Project information |
|---|---|
| Target size | Approximately 34 1/2 x 11 1/2 inches |
| Metric reference | Approximately 87.6 x 29.2 cm |
| Raw pieced top checkpoint | 34 1/2 x 11 1/2 inches before quilting |
| Skill level | Confident beginner to intermediate |
| Techniques | Patchwork, fusible raw-edge applique, embroidery, quilting, and binding |
| Seam allowance | 1/4 inch for piecing |
| Snowman panels | Five finished windows, each 4 1/2 x 7 1/2 inches |
| Tree panels | Four finished windows, each 2 x 7 1/2 inches |
Quilting and washing may reduce the final size slightly. The binding wraps the edge of the existing top; no additional gingham border is added after quilting. This version can be made with a regular sewing machine, with hand embroidery or free-motion stitching for the smaller details.
Materials for One Table Runner
Choose quilting cottons with small prints or subtle textures so the faces and clothing remain easy to see. A cream tone-on-tone background, a soft wave print for the ground, and a fine gingham check will keep the project close to the reference palette.
| Fabric or supply | Amount |
|---|---|
| Cream cotton | 3/4 yard |
| Navy cotton | 1/2 yard |
| Green and cream gingham | 3/8 yard |
| Aqua and pale green wave print | 1/4 yard |
| Dark evergreen green | 8 x 10-inch piece |
| Light moss green | 9 x 10-inch piece |
| Medium or bright green | 8 x 10-inch piece |
| Purple | 10 x 12-inch piece |
| Blue accent fabric | 8 x 10-inch piece |
| Brown, orange, pink, and pale gray-lilac | Small scraps |
| Backing | 1/2 yard with at least 40 inches of usable width |
| Low-loft batting | 38 1/2 x 15 1/2 inches |
| Sewable paper-backed fusible web | At least 18 x 40 inches |
You will also need matching applique thread, dark thread for the arms and faces, and optional pale lavender thread for little snow stars. Gather a rotary cutter, ruler, mat, fine scissors, iron, removable marking pen, and basting supplies. A walking foot helps secure the quilt sandwich, and a free-motion foot is useful if you choose to quilt swirls in the navy borders.
The yardage assumes at least 40 inches of usable fabric width after removing selvages. Test dark, purple, and green fabrics for color transfer before combining them with cream. Follow the fusible manufacturer’s instructions for temperature, pressing time, and steam.
Pattern Abbreviations
| Abbreviation | Meaning |
|---|---|
| WOF | Usable width of fabric after selvages are removed |
| RST | Right sides together |
| RS / WS | Right side / wrong side |
| SA | Seam allowance |
| W x H | Width from left to right x height from top to bottom |
Cut the Patchwork Background
These measurements include the seam allowances. Keep the pieces labeled, especially the two types of gingham rectangles. The applique shapes are cut separately from the PDF templates.
| ID | Piece | Quantity | Cut size, W x H |
|---|---|---|---|
| S | Cream snowman background | 5 | 5 x 8 inches |
| T | Cream tree background | 4 | 2 1/2 x 8 inches |
| N | Navy long-border rectangle | 10 | 5 x 2 1/4 inches |
| J | Gingham tree-aligned connector | 8 | 2 1/2 x 2 1/4 inches |
| K | Gingham corner square | 4 | 2 1/4 x 2 1/4 inches |
| L | Navy end bar | 2 | 2 1/4 x 8 inches |
| Binding | Gingham strip | 3 | 2 1/4 inches x at least 40 usable inches |
| Backing | Backing rectangle | 1 | 38 1/2 x 15 1/2 inches |
Cut the batting to the same size as the backing. For the cream backgrounds, one 8-inch-wide WOF strip supplies all nine panels: the five snowman rectangles and four tree rectangles use 35 inches of its length. Reserve the remaining cream fabric for the snowmen.
For the navy pieces, two 2 1/4-inch WOF strips supply the ten long-border rectangles and two end bars. For the gingham, cut four 2 1/4-inch WOF strips. Reserve three for binding and subcut the fourth into the eight connectors and four corner squares.
Step 1: Print and Prepare the Applique Templates
Print the placement and cutting pages at Actual Size or 100%, with Fit and Shrink turned off. Measure the calibration square in both directions before tracing. It must measure exactly 1 inch. The PDF uses US Letter pages, and its content also fits on A4 when printed at 100%.
The cutting sheets are already mirrored for paper-backed fusible web. Trace the shapes onto the paper side without reversing them again. The placement sheets show the front-facing design and are used to arrange the pieces on the fabric.
Trace the snowman ground strip, GS, five times and the tree ground strip, GT, four times. Trace every other template ID once. Rough-cut the fusible shapes with a little handling space outside the lines, fuse them to the wrong side of the correct fabrics, and let them cool. Then cut precisely on the traced outlines. Do not add a turn-under allowance.
Step 2: Add the Ground Strips
Before joining any background panels, attach one GS piece to each snowman rectangle and one GT piece to each tree rectangle. Align the straight side and bottom edges with the raw fabric edges. The wavy edge belongs at the top.
Fuse the ground strips and stitch only along their curved upper edges. The straight sides and bottoms will be secured in the patchwork seams. This order keeps the ground neatly enclosed at the panel joins and avoids trying to position extra seam allowance over an already-sewn intersection.
Step 3: Build the Five Snowmen
Work on the five separate background panels, using their full-size placement sheets. Add bodies and heads first, followed by clothing and facial applique. Keep the complete shapes underneath overlapping pieces; trimming away the hidden sections can leave gaps around the necks and scarves.
For snowman A, add the left-hanging scarf, blue hat, purple pom-pom, carrot, cheek, and small scarf knot. Snowman B has no hat: his upward carrot, open mouth, raised arms, and two scarf tails create the laughing pose.
For snowman C, place the scarf tail before the collar, then add the knot, top hat, hat band, carrot, cheeks, and holly leaf. Embroider the red holly berries and the three body buttons as flat stitched details.
For snowman D, stitch the curved earmuff headband onto the background before adding the head and earmuffs, which cover its lower ends. Layer the two scarf tails beneath the collar, then add the nose, cheeks, and bent twig arms.
For snowman E, place the green scarf backing beneath the purple scarf pieces so a narrow green outline remains visible. The purple tail goes under the purple collar. Add the pointed green hat, hat band, purple pom-pom, carrot, and cheek to complete the last character.
Secure the exposed raw edges with a small blanket stitch or a narrow zigzag. Test the stitch on scraps of the same fabric and fusible combination. Removable stabilizer can help prevent puckering around dense stitches and small curves.
Step 4: Make the Four Tree Panels
Keep the tree panels labeled T1 through T4. Each tree has three applique layers: a brown trunk, a larger light green underlay, and a smaller dark green foliage shape. Position them in that order over the attached aqua ground.
Use the matching template number for all three layers so the branches and lean agree. A narrow strip of light green should remain visible around the dark tree. Stitch the exposed outlines, then check that the decorated background still measures 2 1/2 x 8 inches before joining it to a snowman panel.
Step 5: Join the Center Row
Arrange the panels in this order:
A – T1 – B – T2 – C – T3 – D – T4 – E
All snowman hats and tree tips point toward the same long upper edge. Join the adjacent 8-inch sides with right sides together and a consistent 1/4-inch seam allowance. Pin carefully where the aqua ground crosses each seam, then add more pins along the remaining edge.
Press the seams open without stretching the panels. The completed nine-panel center should measure 31 x 8 inches. Add one navy L bar to each short end, then press toward the navy. This larger unit should measure 34 1/2 x 8 inches.
Step 6: Assemble the Gingham and Navy Borders
Make two identical long-border rows. Each row uses five navy N rectangles, four gingham J connectors, and two gingham K corner squares. Keep every piece 2 1/4 inches tall and sew the short sides together in this order:
K – N – J – N – J – N – J – N – J – N – K
Each completed row should measure 34 1/2 x 2 1/4 inches. When attaching the top border, match the gingham connectors to the tree panels and the corner squares to the navy end bars. Pin every intersection before sewing. Repeat along the bottom edge.
The completed raw top should now measure 34 1/2 x 11 1/2 inches. Keeping the small gingham sections in place is essential to the layout; replacing them with a continuous navy border changes the design.
Step 7: Embroider, Quilt, and Bind
Use the full-size line guides for the faces, twig arms, and other details. Hand backstitch or stem stitch works well, or you can use a controlled machine straight stitch. Complete the panel embroidery before adding the backing so thread ends stay hidden inside the runner.
Center the top over the batting and backing, smooth the layers, and baste from the center outward. Begin quilting along the long border seams and vertical panel seams. Add gentle echoes around the snowmen and trees, then looping swirls in the navy sections if desired. Keep the quilting within the batting manufacturer’s recommended spacing.
Square the runner without pulling it back to size if quilting has caused a little shrinkage. Trim the excess batting and backing even with the top. Join the three gingham binding strips with diagonal seams, press the strip in half lengthwise, and attach it with a 1/4-inch seam. Miter the corners, join the tails, and wrap the binding to the back. The PDF includes the full binding sequence and measurements.
Enjoy a Handmade Winter Table Setting
The navy, green, cream, and purple palette works beautifully with simple wood furniture and soft Christmas greenery. A few decorations beside the runner allow the applique to remain the focus. Keep the five characters visible rather than covering the center with a large arrangement.
This is also a useful project for practicing small applique shapes and consistent border intersections. Working one character at a time makes the process easier to organize, and preparing the shared ground strips together helps the row feel coordinated. Make one snowman panel first to check your stitching before continuing with the full set.
Snowman Table Runner Pattern Christmas PDF
Frosty Parade brings five individual winter characters together in a compact quilted runner. The combination of straight-seam patchwork, layered trees, and expressive snowmen offers plenty of enjoyable detail without requiring curved background piecing.
The 30-page English PDF includes fabric requirements, exact background cutting sizes, a measured layout, assembly instructions, seven full-size placement pages, and seven mirrored cutting sheets. There are 62 unique applique templates, producing 69 fabric cuts when the shared ground strips are repeated as directed.