A cheerful table setting can begin with a few favorite fabrics and a small project that is full of personality. This Christmas snowman placemat pattern combines three smiling snowmen, little evergreen trees, and delicate snowflakes in a patchwork arrangement of icy aqua, deep teal, cream, and red. The contrasting colors give each character a place to shine while keeping the finished piece beautifully coordinated.
Snowy Friends is a lovely project for a holiday breakfast table, a winter centerpiece, or a handmade gift. Make one placemat as a decorative accent, or sew a matching pair for a seasonal table setting. The free PDF at the end of this article includes the cutting chart, assembly instructions, full-size placement guides, and mirrored applique templates.
The layout is built from eight background rectangles arranged in three columns. A narrow cream label and a teal snowflake panel sit above the snowman on the left. In the center, a tall snowman scene sits above a smaller snowflake panel. On the right, a large snowflake, a slender tree, and a laughing snowman complete the arrangement.
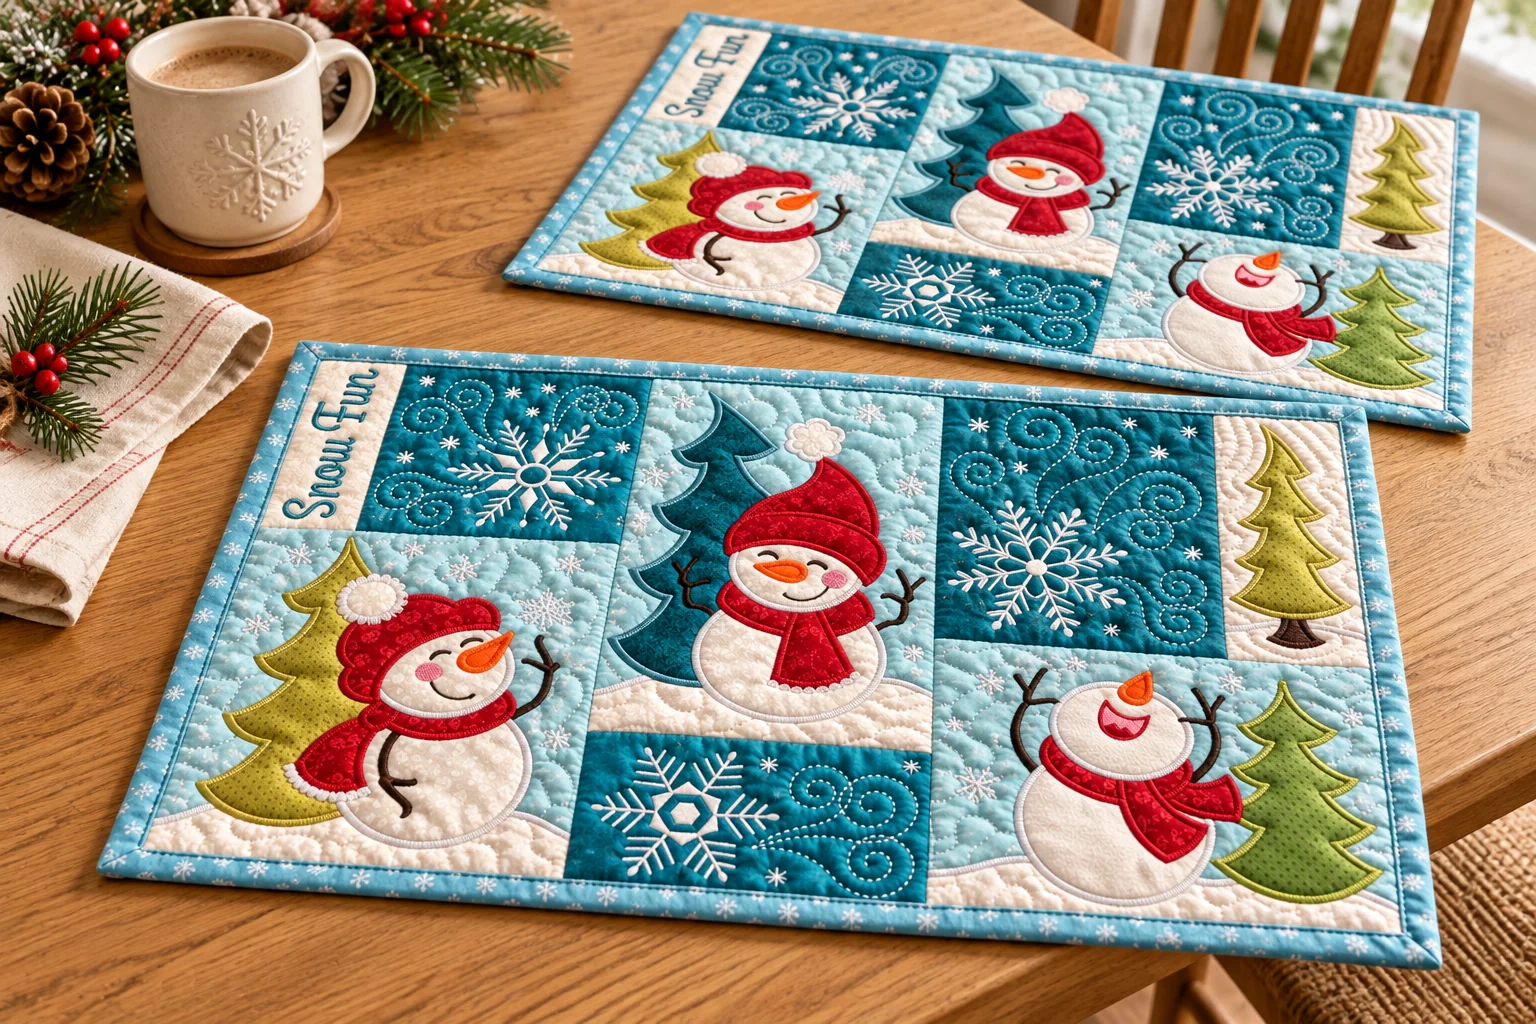
Each character has a different expression. One wears a floppy red hat, another has a pointed hat and a long scarf, and the third lifts both twig arms into the air. Small changes in the carrots, scarves, and faces create movement without requiring complicated patchwork. The background uses straight seams; the character comes from the applique and embroidery.
Project Size and Skill Level
| Detail | Project information |
|---|---|
| Target size | Approximately 18 x 11 inches per placemat |
| Metric reference | Approximately 45.7 x 27.9 cm |
| Pieced top checkpoint | 18 x 11 inches before quilting |
| Skill level | Confident beginner to intermediate |
| Techniques | Patchwork, fusible raw-edge applique, embroidery, quilting, and binding |
| Seam allowance | 1/4 inch for the background seams |
| Equipment | A regular sewing machine; hand embroidery is optional |
Quilting and washing can reduce the finished size slightly. The binding encloses the edge of the pieced top; there is no separate outer border to add. The pattern provides quantities for one placemat and a matching pair.
Materials for One Placemat
- One fat quarter of pale aqua fabric for the snowman backgrounds.
- One fat quarter of dark teal fabric for the snowflake panels.
- One fat quarter of cream fabric for the label, narrow tree background, snowmen, and snowbanks.
- A 10 x 14-inch piece of red fabric for hats and scarves.
- An 8 x 10-inch piece of lime or light green fabric.
- A 5 x 6-inch piece of medium green fabric.
- A 5 x 8-inch piece of dark teal fabric for the tall tree.
- Small orange, pink, burgundy, and brown scraps.
- One 22 x 15-inch piece each of backing and low-loft batting.
- At least 18 x 24 inches of sewable paper-backed fusible web.
- Two binding strips, each 2 1/4 inches x at least 40 usable inches; a 1/4 yard is sufficient.
- Matching applique threads, white snowflake thread, and dark thread for the faces and twig arms.
You will also need a rotary cutter, ruler, cutting mat, fine scissors, iron, marking pen, and basting supplies. A walking foot helps with the background quilting. A free-motion foot is useful for swirls, but hand embroidery offers another way to stitch the snowflakes and facial details.
Choose small prints that keep the applique outlines easy to see. A red tone-on-tone print can suggest the texture of a knitted hat, while a subtle cream print adds interest to the snowmen. Save large, busy prints for the backing, where they will not compete with the faces.
Helpful Abbreviations
| Abbreviation | Meaning |
|---|---|
| WOF | Usable width of fabric after removing selvages |
| RST | Right sides together |
| RS / WS | Right side / wrong side |
| SA | Seam allowance |
| W x H | Width across the placemat x height from top to bottom |
Cut the Background Pieces
The following measurements include the 1/4-inch seam allowances. Cut one of each piece for one placemat, or two of each for a pair. Keep the labels with the pieces until the background is assembled.
| ID | Fabric and position | Cut size, W x H |
|---|---|---|
| A | Cream, upper-left label | 1 3/4 x 4 1/4 inches |
| B | Teal, upper-left snowflake | 4 3/4 x 4 1/4 inches |
| C | Aqua, lower-left snowman | 6 x 7 1/4 inches |
| D | Aqua, tall center snowman | 5 1/2 x 8 inches |
| E | Teal, lower-center snowflake | 5 1/2 x 3 1/2 inches |
| F | Teal, upper-right snowflake | 5 3/4 x 5 3/4 inches |
| G | Cream, upper-right tree | 2 1/4 x 5 3/4 inches |
| H | Aqua, lower-right snowman | 7 1/2 x 5 3/4 inches |
Cut the larger aqua rectangles first. Press the fabric flat before measuring, and check that each rectangle is square. Accurate background cutting makes it much easier to position the applique later.
Step 1: Print and Prepare the Applique
Print the template pages at Actual Size or 100%. Turn off Fit and Shrink settings, then measure the calibration square in both directions. It must measure exactly 1 inch before you trace or cut anything. The PDF uses US Letter pages, and its content also fits on A4 when printed at 100%.
The separate cutting templates are already mirrored for paper-backed fusible web. Trace them onto the paper side without reversing them again. Fuse the rough-cut pieces to the wrong side of the appropriate fabrics, following the product instructions. Let them cool and cut precisely on the traced lines. Do not add a turn-under allowance.
The placement sheets show the front-facing design. Use them to position the snowbanks on the raw panels first; after piecing, align their seam lines with the assembled top to position the remaining shapes. Keep the full shapes even where one layer will cover another; these overlaps help prevent gaps around the necks and scarves.
Step 2: Attach the Snowbanks and Assemble the Background
Before joining the background, position snowbanks C1, D1, and H1 on raw rectangles C, D, and H. Align their straight side and bottom edges with the raw fabric edges, fuse them, and stitch only the curved top edges. The straight edges will be secured in the piecing seams or enclosed by the binding.
Start with the left column. Sew A to the left side of B, joining their 4 1/4-inch edges with right sides together. Press toward the teal fabric. This unit should measure 6 x 4 1/4 inches. Sew C underneath it to complete a column measuring 6 x 11 inches.
For the center column, sew D above E along their 5 1/2-inch edges. Press the seam open. The column should measure 5 1/2 x 11 inches.
For the right column, sew F to the left of G along their 5 3/4-inch edges. The resulting unit should measure 7 1/2 x 5 3/4 inches. Add H underneath to make a 7 1/2 x 11-inch column.
Join the three columns in order: left, center, and right. Press the long seams open and check the top before continuing. It should measure 18 x 11 inches. The horizontal seams fall at different heights by design, so there is no need to make them line up across the entire placemat.
Step 3: Arrange the Snowmen and Trees
Work from the background toward the foreground. With the snowbanks already secured in the pieced top, add the tree trunks and foliage. Add the snowman bodies and heads, then the scarf tails and collars. Finish with the hats, pom-poms, carrots, cheeks, and the laughing snowman’s mouth.
The left snowman has a lime tree behind him and a carrot that points up and to the right. The center character stands in front of the tall teal tree, with a red scarf hanging down his chest. The right snowman has no hat, an upward-pointing carrot, and two scarf tails. A separate narrow tree fills the cream panel at the upper right.
Check the entire arrangement before pressing. Once the shapes are fused, stitch their exposed edges with a small blanket stitch or a narrow zigzag. Test the stitch on scraps first, using the same fabric and fusible combination. If the edges begin to ripple, adjust the stitch density or add removable stabilizer.
Step 4: Add the Faces and Snowflakes
Use the full-size embroidery guides to transfer the eyes, smiles, twig arms, and snowflakes. A removable marker is helpful, but test it on a fabric scrap before marking the project. Work the facial details before adding the backing so thread ends can remain hidden inside the placemat.
White backstitch or stem stitch looks lovely against the teal panels. If you prefer machine stitching, follow the snowflake lines with a small straight stitch and a free-motion foot. The larger snowflakes have fixed positions in the guides; extra swirls and tiny snow stars are optional quilting details.
Add the “Snow Fun” lettering to the narrow cream panel at the left. Check the orientation carefully: the words read upward when the placemat lies horizontally. The PDF includes a front-facing lettering guide so you can transfer it without guessing the spacing.
Step 5: Quilt and Bind
Center the completed top over the batting and backing, smooth the layers, and baste from the center outward. Start by stitching in the ditch along the patchwork seams. Then add gentle echo quilting around the snowmen and trees, curved lines through the snowy ground, and loose swirls in the open background areas.
Follow the batting manufacturer’s recommended quilting spacing. Dense stitching can draw the piece inward, so aim for a similar amount of quilting across the whole placemat. If you are making a pair, use the same approach on both to help their final sizes match.
Trim the excess batting and backing even with the squared top. Join the two binding strips with a diagonal seam, press the long strip in half, and attach it with a 1/4-inch seam. Miter the corners, join the ends, and wrap the binding to the back. The PDF includes the complete finishing sequence and measurements for the binding overlap.
Make a Coordinated Holiday Pair
For a matching set, cut and label both backgrounds at the same time. Prepare two of every applique shape, then complete each stage on both placemats before moving to the next. This makes it easier to keep the character positions and thread colors consistent.
You can use the same fabrics throughout or introduce a second red print for the hats and scarves. Keep the background values similar so both pieces feel like part of one collection. Small differences in hand stitching add character without changing the overall arrangement.
Snowy Friends brings together simple patchwork and expressive applique in a project that can brighten the table throughout the winter season. The three little characters offer plenty of room to enjoy fabric choices, embroidery, and quilting details at a manageable scale.
Christmas Snowman Placemat Pattern – Free PDF
The free PDF includes the complete English tutorial, fabric requirements for one or two placemats, background cutting measurements, assembly diagrams, five full-size placement pages, and four sheets containing all 37 mirrored applique shapes. Print the calibration guide first, gather your favorite winter fabrics, and work through the project one step at a time.