The snowmen get the best spot in the Snow Place Like Home quilt, but look closely at what gives the center panel its picture-book feel. A narrow red frame outlines the scene, little birdhouses fill the space on either side, and six smaller winter pictures sit in rows above and below. The same red circles back around the binding, tying the whole quilt together.
Designed by Heidi Pridemore for Studio e Fabrics, this 46″ × 65½″ quilt features the Snow Place Like Home fabric collection by Sharla Fults. It’s an advanced-beginner project and a comfortable size for a winter throw. Hung on a wall, it also gives everyone a chance to see the details in those small printed scenes.
The first cut is worth taking slowly. The pattern calls for a 22″ × 31″ rectangle centered on the main panel. Before picking up the rotary cutter, try laying four strips of scrap paper over the print to make a window that size. Slide the window until you like the balance of the scene, keeping in mind that a quarter inch along each cut edge will disappear into the seam.
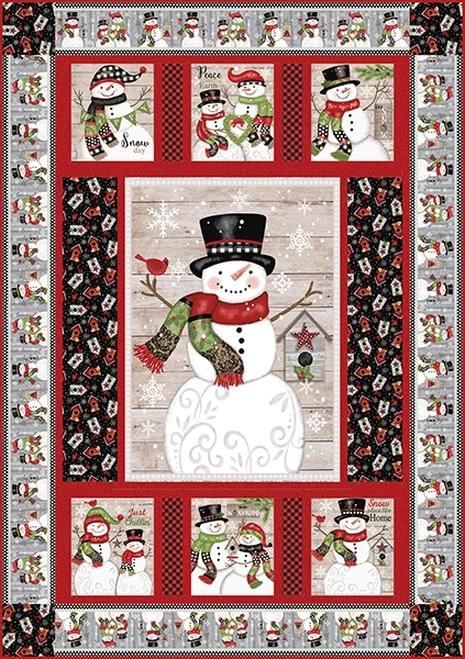
Use the same trick for the six smaller pictures, which start at 8¾″ × 10½″ each. If you’re using a different winter collection, check these smaller motifs as well as the main panel before buying fabric. A snowman that fits beautifully in the big window may lose the top of his hat in a smaller one.
Frame the pictures before trimming
One thoughtful detail in this pattern is the order of the trimming. First, sew the red strips around the center panel. Then trim the framed unit to 23½″ × 32½″, taking a little from opposite edges to keep the red frame even. The six smaller pictures follow the same sequence, with each framed rectangle trimmed to 10½″ × 12″. These are measurements for the assembled units and include the seam allowances for the next step.
Lay out the smaller pictures in two rows of three, with a buffalo plaid spacer between neighboring pictures. This is a good moment to step back and look at the prints together. Try moving a picture with a strong splash of red to the opposite end of its row, or placing two snowmen so they face toward the center. Once the arrangement feels right, a quick phone photo makes it easy to carry the pieces to the machine in order.
For quilting, a few gently curving lines through the snowy background would suggest drifting snow. A line of quilting just inside each red frame would give the smaller pictures a crisp outline. Choose a thread that blends into the light areas and check the recommended quilting distance for your batting before spacing the lines.
To preview the stitching on the center panel, lay a sheet of tracing paper over a snowman and sketch a few curves in pencil. Lift the paper, shift it to another part of the scene, and see where a curve would cross an eye or the tip of a carrot nose. A small change in the sweep can carry the stitching around those details and into the open snow.
Let the border stripe turn the corner
The outer border gets much of its character from the way the stripe is cut. The pattern uses strips cut along the length of the fabric, so check the cutting instructions and identify the band you want before trimming your yardage. Choose the same part of the printed repeat for opposite sides. Birdhouse-print squares finish the four corners, giving each stripe a clean stopping point without a mitered seam.
For quilting, a few gently curving lines through the snowy background would suggest drifting snow. A line of quilting just inside each red frame would give the smaller pictures a crisp outline. Choose a thread that blends into the light areas and check the recommended quilting distance for your batting before spacing the lines.
Ready to choose your six winter scenes? The free five-page project sheet from Studio e Fabrics includes fabric requirements, cutting dimensions, illustrated units, and a full quilt layout. Keep pages 3 and 4 together as you work. For Unit 1, the cutting list and Figure 2 identify the short end pieces as red Fabric B. For Unit 3, Step 4 uses a 10¼″ plaid strip, which brings the spacer to the same 12″ height as its neighboring framed blocks after the end pieces are sewn on.
Download the free quilt pattern
The outer border gets much of its character from the way the stripe is cut. The pattern uses strips cut along the length of the fabric, so check the cutting instructions and identify the band you want before trimming your yardage. Choose the same part of the printed repeat for opposite sides. Birdhouse-print squares finish the four corners, giving each stripe a clean stopping point without a mitered seam.