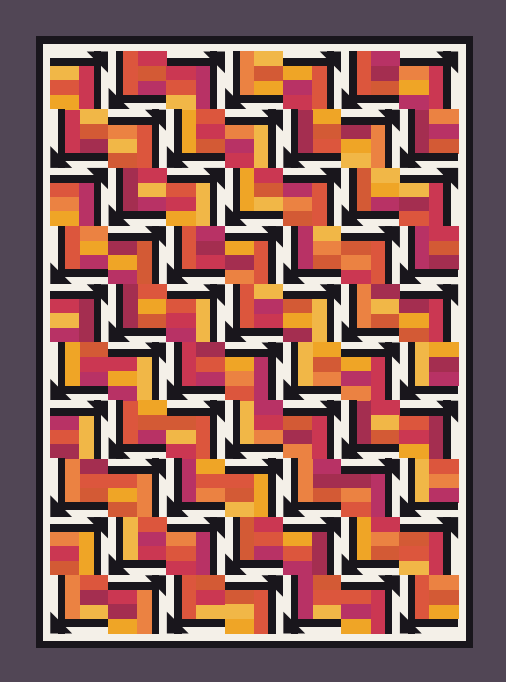
Follow a black line across the Hot Flashes quilt and watch what happens at the corner of a block. The line widens into a point, turns, and sends your eye toward the next patch of gold or raspberry. Up close, you can pick out the individual rectangles. From the other side of the room, those same pieces look like a staircase running through the quilt.
Hot Flashes is a design by Cozy Quilt Designs. For this Quilt Missouri project, we used the cover photograph and finished-size chart to develop an independent sewing guide. Our version builds the blocks from strips and uses a small appliquéd triangle for each black flash. You’ll find the free illustrated PDF at the end of this article.
Start with four 2½-inch strips and lay them beside a strip of black and a strip of ivory. Try marigold, burnt orange, tomato red, and raspberry for a palette close to the quilt pictured. Fold each print until only a few inches show. A large floral can look mostly green when a short rectangle lands on its leaves, while a tiny gold dot will read much the same wherever you cut it.
Pay particular attention to your deepest print. If a plum strip disappears beside the black, use it in the middle of a stack of brighter prints. Let a gold or orange rectangle touch the black rail. You can keep a favorite dark fabric in the quilt and still see exactly where the flash turns.
How one block makes the staircase
The colored center begins with three short rectangles stacked horizontally. A fourth, longer rectangle runs down their right side. Frame the top and right edges with narrow black and ivory strips, keeping black closest to the prints. The final detail is the black triangle. Fused over the upper-right corner and stitched along its diagonal, it connects the two black strips into a single pointed shape.
Sew one complete block before cutting the whole quilt. With a ¼-inch seam allowance, it should measure 8½ inches square before joining and finish at 8 inches square in the quilt. If the first block comes up short, measure the print center first. It should be 6½ inches square before you add the rails. That check tells you whether to revisit the center seams or the framing strips.
Try the layout with four blocks
Lay four finished blocks on a table in two rows of two, all with their black points at the upper right. Now give the upper-right block and the lower-left block a half-turn. Their points should face the lower left. Step back and look at the warm prints between the black lines. Those four blocks show the repeat you’ll carry across the whole top.
For the twin quilt pictured, lay out seven blocks across and ten down. A quick way to check the layout is to look only at the first point in each row. It should face upper right in the first row, lower left in the second, and continue alternating to the bottom. Take a photo before gathering the rows for sewing.
Choose your finished quilt size
| Size | Blocks across × down | Finished quilt |
|---|---|---|
| Baby | 3 × 4 | 38″ × 46″ |
| Throw | 5 × 6 | 54″ × 62″ |
| Twin | 7 × 10 | 70″ × 94″ |
| Queen | 10 × 11 | 94″ × 102″ |
| King | 11 × 12 | 102″ × 110″ |
Each size has the same three borders. A narrow ivory strip gives the outermost black points a little breathing room. A second, black strip outlines the patchwork before the wider outer border goes on. To audition that last fabric, fold it into a five-inch band and lay it alongside several blocks. That’s how much of its color and print you’ll see in the finished quilt.
Download the free illustrated quilt guide
Keep the block diagram beside your machine and save the full layout for your design wall. The printable guide includes fabric quantities for all five sizes, cutting measurements, color diagrams, border lengths, and binding instructions.
Before you sew the rows together, look for places where two neighboring blocks bring the same print up against a black flash. Two tomato-red rectangles on either side of a point can look like a single ribbon with a bend in it. If you like that effect, repeat it in a few spots across the top. To try a different pairing, swap two blocks that already face the same direction.
When you’re ready to join the blocks, clip a numbered scrap of paper to the left edge of the first block in each row. Keep the clip there until that row is sewn. It marks both the row number and the end that belongs on the left, which is handy when you carry a long strip of patchwork from the ironing board back to the machine.
Download the free illustrated quilt guide
Before attaching the borders, spread the pieced top on a flat surface and measure its length through the center. Cut both side borders to that measurement and pin the ends and midpoints first. After sewing the sides, measure across the center again for the top and bottom strips. Repeat this process for each border, especially the narrow ivory one, where a ripple will show against the black.
Save a few black, ivory, and printed scraps to make a small quilting sample. Try a warm gray thread across all three fabrics, then quilt a second line in the gold or raspberry you used in the blocks. Look at the stitches where they cross the black rail. That little stretch will tell you which thread lets the pieced staircase catch your eye first and which one gives the quilting a stronger voice.