The Sisterhood Quilt Pattern pairs bright printed fabrics with a deep navy background, creating a lively arrangement of diagonal shapes and broad rectangular strips. Florals, dots, paisley and graphic prints share the same space, while the consistent background gives the whole quilt a clear structure.
The version shown in the reference image has plenty of color, but its construction follows a manageable rhythm. Two block layouts alternate across the quilt, and small pieced bands at the top and bottom repeat the prints used in the center. Once you understand how those blocks work, the larger design becomes much easier to read.
This article introduces the fabric choices, measurements and construction approach used in the accompanying photo-based guide. You will find the PDF download section near the end, before the conclusion.
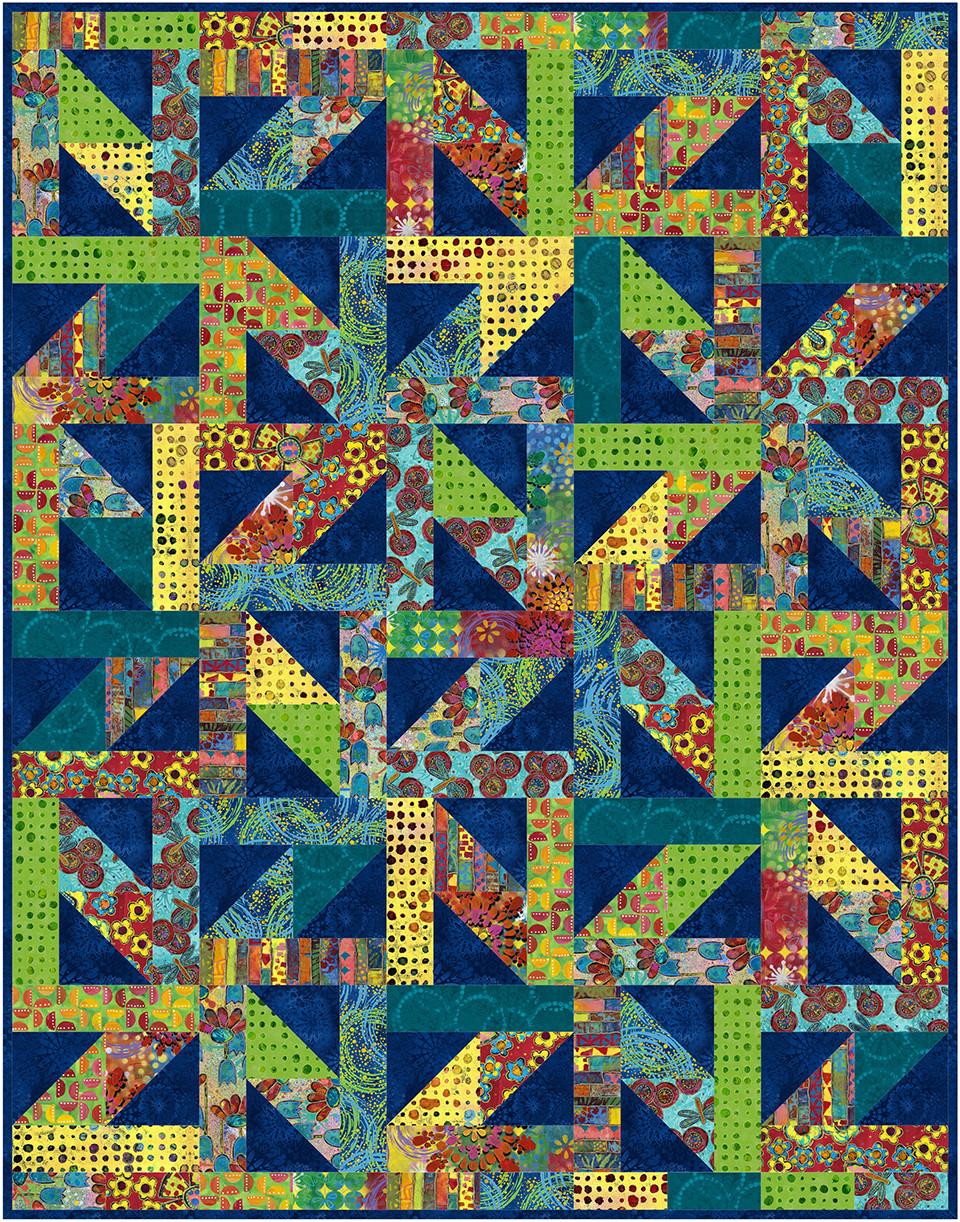
Each block combines two half-square-triangle units with two rectangular rails. A half-square triangle, often shortened to HST, is a square made from two fabric triangles joined along a diagonal seam. Here, one triangle is navy and the other is a colorful print.
Some blocks have rails running vertically along their sides. Others have rails running horizontally across the top and bottom. Alternating those layouts changes the direction of the diagonal shapes and creates the movement visible throughout the quilt.
The narrow top and bottom borders bring the colors together again. Their short segments continue the varied arrangement without adding another block type to the center.
Quilt Size and Block Measurements
The construction guide develops the reference layout as a 50-inch by 64-inch quilt, approximately 127 by 163 cm. It contains thirty blocks arranged five across and six down.
| Component | Unfinished measurement | Finished measurement |
|---|---|---|
| Half-square-triangle unit | 5½″ square | 5″ square |
| Each V or H block | 10½″ square | 10″ square |
| Thirty-block center | 50½″ × 60½″ | 50″ × 60″ |
| Complete top with borders | 50½″ × 64½″ before quilting and binding | Nominal quilt size: 50″ × 64″ |
Keeping these measurements separate matters. The unfinished units retain the seam allowances needed for the next stage. Trimming a block to its finished size before joining it to its neighbors would remove those allowances.
Choosing Ten Prints That Work Together
Begin with a palette you enjoy, then look for variety within it. The reference combines lime green, yellow, teal, aqua, blue, red and orange. Small dots sit beside larger flowers, swirling designs and multicolor stripes, giving the eye different details to explore.
You can follow that bright palette or choose another coordinated collection. Look for a mix of lighter, medium and darker prints so the individual pieces remain visible. Include a few quieter fabrics alongside the busiest patterns to give the arrangement places to pause.
The background needs enough contrast to define the triangles. Before cutting, place your darkest prints beside the navy and check whether their edges are still easy to see. A quick grayscale photograph can help you judge the value difference.
For directional prints, consider how the fabric will look in both block layouts. A stripe may run differently after a unit is rotated, so preview its position before committing to the seams.
Materials for the Accompanying Guide
The downloadable guide uses the following quantities for this reconstruction:
| Fabric or supply | Quantity |
|---|---|
| Assorted prints | Ten fat quarters, each with at least 18″ × 19″ of usable fabric |
| Navy HST background | 1 yard, with at least 40″ usable width |
| Additional binding fabric | ½ yard |
| Backing with 40″ usable width | 4¼ yards |
| Batting | At least 59″ × 73″ |
The backing and batting include extra room around the unquilted top for basting and quilting. Binding fabric is additional to the navy used for the triangles.
Measure the usable area of each fat quarter before cutting. The supplied cutting plan uses the full 18-inch width, so a piece that has become smaller after washing or squaring may need additional matching fabric.
A Cutting Plan That Keeps the Prints Organized
Each print contributes six rails, six print triangles and two border segments to the photographed arrangement. The PDF labels the fabrics F1 through F10, making it easier to track those repeated appearances.
The print triangles begin as three 6-inch squares from each fabric. Pairing each square with a navy square and using the two-at-a-time method produces six HST units from that print.
Keep the rails, starting squares and border pieces grouped by fabric as you cut. A small label beside each stack saves time when you begin following the block charts. It also makes counting straightforward before the sewing machine is covered with similar-looking pieces.
Understanding the Two Block Layouts
For a V block, the two HST units sit one above the other, with a rail on each side. Their diagonal seams and print halves need to follow the orientation shown in the guide.
For an H block, the two HST units sit side by side, with a rail above and another below. The diagonal direction changes, so check the illustration as you place each unit.
The quilt uses fifteen blocks of each type. Make one V block and one H block first, press them and check that both measure 10½ inches square. This gives you a useful opportunity to check your seam allowance and unit trimming before assembling the remaining blocks.
Arrange the Whole Quilt Before Joining Rows
A design wall or clean floor helps you see the arrangement at its full scale. Place all thirty blocks in their intended positions, then compare the layout with the row charts.
If you want to follow the reference closely, keep the fabric labels in place until the rows are sewn. The same print appears in rails, triangles and borders, so its location affects the balance of the surrounding colors.
Take a photograph before carrying the blocks to your sewing machine. Label each row and preserve its left-to-right order. After joining the blocks, check the row measurement before attaching it to the next one.
Quilting and Binding Ideas
The piecing already provides strong diagonal lines, so an all-over quilting design can work well. Gentle curves add a softer texture, while evenly spaced straight lines can emphasize the geometric structure. Choose a spacing that meets your batting manufacturer’s requirements.
A navy binding continues the background color around the outside edge. Before binding, check the quilt for loose threads and square it carefully while preserving the outside block seams.
Download the Sisterhood Quilt Pattern Construction Guide
The free accompanying PDF contains fourteen pages of preparation and assembly information. It includes:
- Fabric identification swatches and a fat-quarter cutting plan.
- Cutting measurements and HST instructions.
- Diagrams for the V and H blocks.
- A complete color-placement map and individual row charts.
- Border sequences, backing and binding guidance.
- An optional full-size HST checking diagram.
If you use the final checking page, print it at 100% or Actual size and measure its 1-inch calibration square. Use an accurate quilting ruler to trim the HST units to 5½ inches.
Download the Sisterhood Quilt Pattern
Design credit: Sisterhood is an Orphan Quilts / Villa Rosa Designs reference pattern. The PDF accompanying this article is an independently reconstructed guide based on the supplied image, with newly calculated cuts and diagrams. It has not been sewn as a physical test quilt; make the first V and H blocks before cutting or assembling a larger batch.
The Sisterhood Quilt Pattern gives a varied collection of prints a shared structure through navy triangles, repeated rails and an alternating block layout. Careful fabric labeling and consistent unit sizes help preserve the movement that makes the reference so appealing.
Choose the prints you want to feature, begin with the two test blocks and build the layout one row at a time. The result offers room for both an organized construction process and plenty of personal color choices.