Stand at the foot of the bed and the first thing you see is an olive-green diamond framing a single star. Come closer and its edges resolve into little fabric steps. Farther out, a line of cream squares winds around the quilt, taking a turn each time it meets the next border block. Those two details give the Garden Medallion its character, and both begin with straight strips of fabric.
This Quilting Wonders pattern is a bed-size interpretation of the green-and-coral simple version of Monterrey Medallions by Atkinson Designs. We drafted the measurements from the proportions in the reference photograph for an 84 × 105-inch finished quilt. The free PDF at the end includes the cutting tables, a color grid for the center star and a row-by-row placement map.
When you lay out your fabrics, start with the cream and the lightest olive. Place a small square of cream against that green and look at the pair from across the room. If you can still pick out the square, the cream chain should read clearly along the border. If the two melt together, reserve that pale green for the sage frame in the center star and choose a deeper olive for the border.
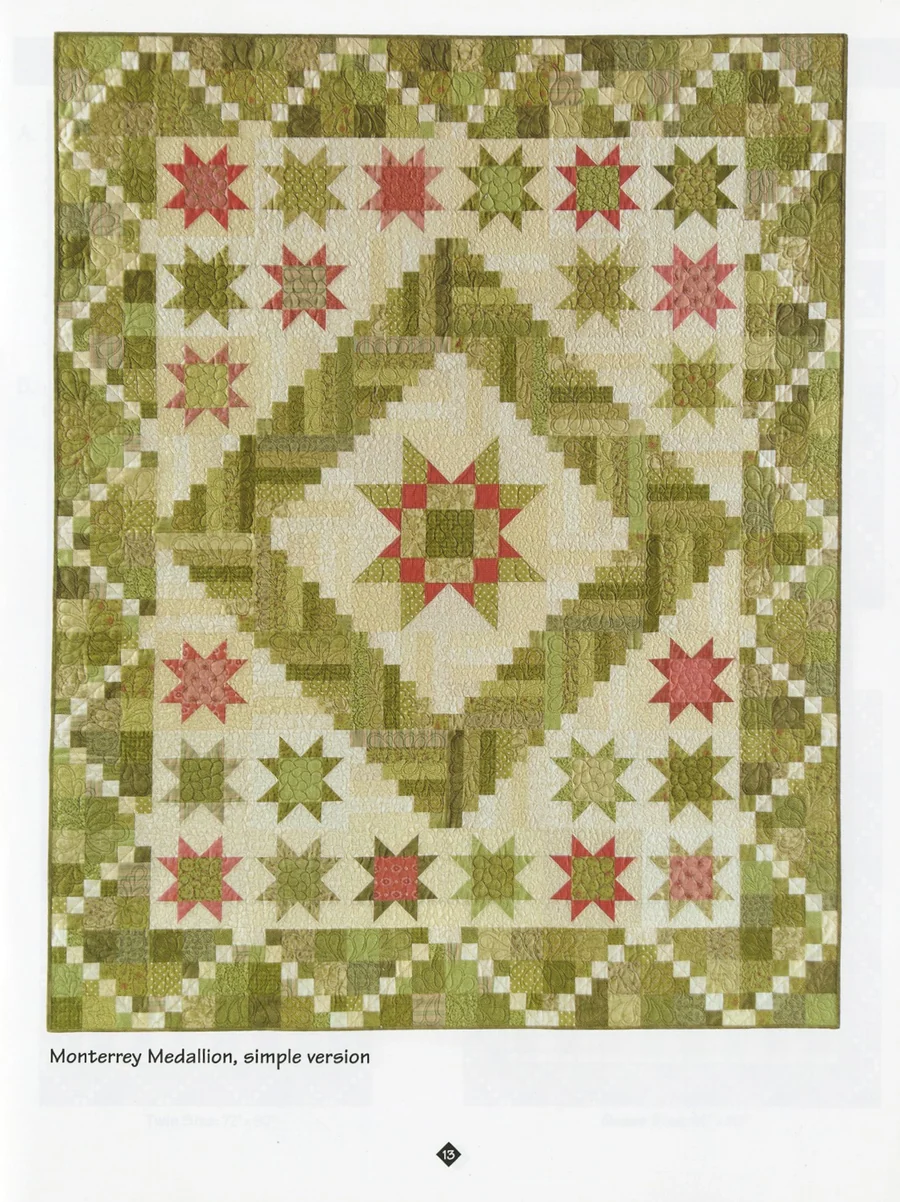
The stepped diamond is a good place for several related prints. A tiny leaf, a fine stripe and a mottled olive can sit beside one another without breaking up the shape. Lay six strips in a short stack before cutting the logs. Let one of your darker greens recur in the stack so the eye has a line to follow through the turn. For the stars, a dusty coral gives a gentler effect, while a warm tomato red brings the small points forward against the cream.
Three variations on a small star
Look at the little stars above the diamond. Some are coral from tip to center, some are green throughout, and others carry coral points around an olive square. They all use the same construction. Once you have sewn one, the next decision is which fabrics to put in its place. A narrow cream frame around each star leaves room for its points before the next block begins.
The framed star makes a good first sample because it checks two things at once. Before adding its frame, measure the star across the center. It should be 9½ inches square. After the side strips and the top and bottom strips go on, it should measure 11 inches. If that first measurement is short, check the quarter-inch seams in the star rows before cutting the frames for the other 23.
Sewing the stepped diamond
The olive diamond looks as though it might require long bias edges. The pattern builds it from six-row blocks. In one block, the olive begins with a single square and grows until it spans the last row. In the companion block, the first row is entirely cream. Keep a sample of each on the sewing table. That one-row difference is easy to overlook in a pile of pieces, and it determines how the inner and outer edges of the diamond meet.
Give the center star its own space on the design wall. Its outer olive points and smaller coral triangles face different directions, so lay out all eight rows before you sew. A photo on your phone is handy here. If a triangle turns while you carry a row to the machine, the picture lets you recover its position without laying out the whole star again.
Check the layout from the foot of the bed
Once the blocks are ready, lay out the quilt and trace the cream chain around all four sides. A border block can be the correct size and still face the wrong direction. Running your finger along the chain is a quick way to catch a missed turn. Next, follow the two edges of the olive diamond back to the top. When both shapes read clearly, label the rows before taking them down.
On a 54 × 75-inch full mattress, this quilt allows a 15-inch drop on each side. The extra 30 inches of length can be shared between the foot of the bed and the pillow area. To picture the fit on your own bed, drape a tape measure 15 inches down one side and see where it falls against the bed frame.
Download the free Garden Medallion quilt pattern
The seven-page PDF includes fabric allowances, cutting measurements, illustrated block guides, the full placement map, and directions for joining and binding the quilt. Keep the map near your design wall and the cutting tables beside your ruler.
When you join the rows, give the corners of the cream chain a little extra attention. Place two rows right sides together and lift the top one like the page of a book. You can see exactly where one cream square should meet the next. Pin that spot first, then match the remaining seams. Once the row is sewn, open it on the table and check the turn while the seam is still easy to adjust.
The broad cream areas give you room to echo the shape of the medallion in your quilting. Lay a clear sheet of plastic over one corner of the quilt top and draw a few quilting lines on the plastic with a washable marker. Try following each little olive step, then sketch a straight diagonal that runs past the steps. Lift the sheet between trials to wipe it clean. Each choice brings out a different detail in the same patchwork.
Download the Garden Medallion quilt pattern
If you are choosing between cream and olive quilting thread, unwind a yard of each and let it curl across a coral star, its cream frame, and the green patchwork beside it. A tightly wound spool can make a color look much stronger than a single strand will appear on the quilt. Look especially at the coral points, where even a short line of contrasting stitches can change how sharply the tip stands out.
For the binding, fold narrow strips of your two favorite fabrics and lay them along one corner so you can see the proposed edge on two sides at once. A deep olive picks up the green in the central diamond, while a dusty coral carries the color of the little stars all the way to the edge. Drape that corner over the side of the bed before you decide. The binding is especially visible at the foot, where it draws the final line across the hanging quilt.