The Duck, Duck, Goose Baby Quilt Pattern is a cheerful and playful project that combines classic patchwork with adorable appliqué details. With sweet ducks, a tall goose, traditional pinwheel blocks, flying geese, soft blue fabrics, and gentle wavy quilting, this design is perfect for creating a charming handmade baby quilt.
What makes this quilt especially fun is the variety of techniques used throughout the project. Instead of repeating one block over and over, you get to work with appliqué, half-square triangles, flying geese, decorative motifs, and several different panel sizes. The finished quilt has a storybook appearance that feels whimsical without losing the traditional character of quilting.
At the end of this article, I will provide the free PDF with the complete Duck, Duck, Goose Baby Quilt pattern and diagrams so you can save it and follow the project more easily.
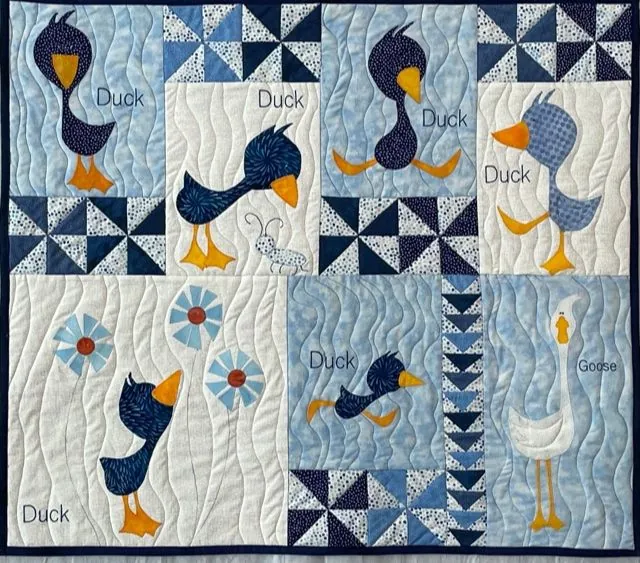
This quilt is designed around a simple modular layout using several 9-inch sections. Different-sized panels are combined to create a finished quilt measuring approximately 45″ × 45″, making it a wonderful size for a baby blanket, nursery quilt, stroller blanket, or handmade baby shower gift.
The design uses a mix of light blue, cream, navy, and orange, but one of the best things about this pattern is how easy it is to personalize.
You could create a soft pastel version with pink, mint, and lavender, a farmhouse version using cream and navy, or even a bright rainbow version for a more playful look.
Finished size: approximately 45″ × 45″
Skill level: Confident beginner to intermediate
Seam allowance: ¼” unless otherwise stated
Techniques Used
This project includes several classic quilting techniques:
- Half-square triangles
- Pinwheel blocks
- Flying Geese units
- Fusible appliqué
- Basic patchwork assembly
- Machine quilting
- Binding
Because the quilt is divided into separate panels, you can work on one section at a time instead of assembling the entire design at once.
This makes the project much more manageable.
Materials You Will Need
To make one Duck, Duck, Goose Baby Quilt, gather approximately:
- 1¼ yards light blue fabric
- 1¼ yards cream or white fabric
- ¾ yard navy blue fabric
- ½ yard medium blue or printed blue fabric
- ¼ yard orange fabric
- Small scraps of yellow, gray, red, and coordinating colors
- Assorted blue and white prints
- Approximately 1 yard lightweight fusible web
- ½ yard fabric for binding
- 49″ × 49″ batting
- Backing fabric
- Coordinating sewing thread
- Appliqué thread
- Quilting thread
Small-scale prints work beautifully in this design.
Dots, florals, swirls, geometric prints, and subtle tone-on-tone fabrics can give each duck and patchwork section a different personality.
Choosing Fabrics
The original style of this quilt works especially well with blue and cream fabrics.
Try combining several shades instead of using only one blue.
For example:
- Pale blue for background panels
- Medium blue for wings
- Navy for duck bodies
- Cream for contrast
- Orange for beaks and feet
Using several blue prints also gives the quilt more movement.
The ducks do not need to match perfectly. In fact, using different prints for each bird makes the quilt feel more handmade and playful.
Quilt Layout
The quilt is built from several rectangular and square panels arranged into three main vertical sections.
The finished top measures approximately 45″ × 45″.
The layout includes:
- Tall duck panel
- Small duck panels
- Large walking duck
- Running duck
- Flower panel
- Large duck and flower panel
- Goose panel
- Five pinwheel blocks
- Flying Geese panel
Each section is sewn separately before the larger quilt sections are joined together.
This construction method helps keep the layout accurate.
Cutting the Background Panels
The main background sections can be cut using the following approximate unfinished measurements:
| Panel | Cut Size | Design |
|---|---|---|
| A | 9½” × 18½” | Tall Duck |
| B | 9½” × 9½” | Small Duck |
| C | 18½” × 18½” | Walking Duck |
| D | 9½” × 9½” | Small Duck |
| E | 18½” × 18½” | Large Duck & Flowers |
| F | 9½” × 9½” | Flower Panel |
| G | 9½” × 18½” | Running Duck |
| H | 9½” × 27½” | Goose |
Alternating cream and pale blue backgrounds helps each appliqué stand out.
Before beginning the appliqué, press every panel carefully.
Making the Pinwheel Blocks
The quilt contains five 9″ finished pinwheel blocks.
Pinwheels are created from half-square triangles.
For each pinwheel, cut:
- 2 dark or medium blue 6″ squares
- 2 cream or pale blue 6″ squares
Place one dark square and one light square right sides together.
Draw a diagonal line from one corner to the opposite corner.
Sew a ¼” seam on both sides of the marked line.
Cut along the marked line.
Press the units open and trim each half-square triangle to 5″ × 5″.
Arrange four units so the triangles rotate around the center.
Sew them into two rows.
Join the rows together.
Your pinwheel should measure approximately 9½” square unfinished.
Make five blocks.
Creating the Flying Geese Panel
The narrow Flying Geese section adds a traditional patchwork detail to the center of the quilt.
For each unit, place a small background square on one end of a navy rectangle.
Draw a diagonal line.
Sew along the marked line.
Trim away the excess fabric.
Press the triangle outward.
Repeat on the opposite side.
Continue until you have enough Flying Geese units to form a vertical column.
Sew the units together vertically and add background strips along the sides.
The completed panel should measure approximately 9½” × 18½” unfinished.
Preparing the Duck Appliqué
One of the most enjoyable parts of this quilt is creating the ducks.
The same basic appliqué shapes can be resized to create different birds throughout the quilt.
Common pieces include:
- Duck body
- Head
- Curved neck
- Wing
- Beak
- Feet
Begin by tracing each template onto the paper side of lightweight fuse web.
If your fuse method reverses the image, remember to trace the templates in reverse.
Rough-cut the shapes.
Fuse them to the wrong side of your chosen fabrics following the manufacturer’s instructions.
Cut precisely along the traced lines.
Remove the paper backing.
Now you are ready to position the pieces.
Arranging the Ducks
Before permanently fusing anything, place all the appliqué pieces on the background panel.
Move the pieces until the proportions look balanced.
Where two pieces meet, allow approximately ⅛” to ¼” of overlap.
This is especially important where the neck joins the body or where the beak meets the head.
Once you are happy with the placement, fuse the appliqué pieces in place.
Stitching the Appliqué
You can finish the edges using several methods.
Popular choices include:
- Blanket stitch
- Small zigzag stitch
- Satin stitch
- Raw-edge straight stitch
A dark blue blanket stitch works beautifully around the blue duck pieces.
Orange or gold thread can be used around the feet and beaks.
For very small details, such as eyes or legs, machine stitching may be easier than cutting tiny appliqué shapes.
Making the Goose
The tall goose panel gives the quilt its distinctive Duck, Duck, Goose theme.
The goose uses the same appliqué technique as the ducks but includes a longer curved neck.
You will need:
- Large body
- Wing
- Long neck
- Head
- Beak
- Legs
- Feet
Position the goose toward the center of the long background panel.
Leave enough space around the edges for your ¼” seam allowance.
The legs can be created using narrow appliqué strips or machine satin stitch.
Adding the Flowers
The flower motifs bring another playful detail to the quilt.
For each flower, you can use:
- 6 petals
- 1 center circle
- Optional stem
- Optional leaves
Flowers measuring approximately 3″ to 3½” across work well.
Arrange several flowers around the large duck panel.
Using red or rust-colored centers against pale blue petals creates a beautiful contrast.
Adding the Words
For another decorative detail, you can add the words:
Duck
beside the duck appliqués and:
Goose
beside the goose.
You can create the lettering with:
- Machine embroidery
- Free-motion stitching
- Satin stitch
- Fabric marker
- Hand embroidery
You can also leave the lettering out completely if you prefer a cleaner design.
Assembling the Left Section
The left side of the quilt includes:
- Tall duck panel
- Pinwheel block
- Small duck panel
- Another pinwheel
- Flower panel
- Large duck and flower panel
Start by joining the upper blocks into matching rows.
Press the seams carefully as you go.
Then join the rows vertically.
The completed left section should measure approximately 18½” × 45½” unfinished.
Assembling the Center Section
The center section includes:
- Large walking duck
- Running duck panel
- Flying Geese panel
- Two pinwheel blocks
Sew the running duck panel and Flying Geese panel side by side.
Join the two lower pinwheel blocks.
Then sew all center sections together vertically.
The completed center section should also measure approximately 18½” × 45½” unfinished.
Assembling the Right Section
The right section includes:
- One pinwheel block
- One small duck panel
- One tall goose panel
Join the three sections vertically.
The right section should measure approximately 9½” × 45½” unfinished.
Free Duck, Duck, Goose Baby Quilt Pattern PDF
To make the project easier to follow, I prepared a PDF containing the diagrams for the quilt layout, pinwheel construction, duck appliqué shapes, and goose appliqué.
Download the complete free pattern below and save it for your next quilting project.
Duck, Duck, Goose Baby Quilt Pattern PDF
The Duck, Duck, Goose Baby Quilt Pattern is a delightful combination of traditional quilting and whimsical appliqué. With playful birds, classic geometric blocks, flowers, and soft wavy quilting, it creates a baby quilt full of personality and handmade charm.
Whether you make it in classic navy and blue or redesign it using your favorite nursery colors, this pattern offers plenty of opportunities to make the finished quilt completely unique.