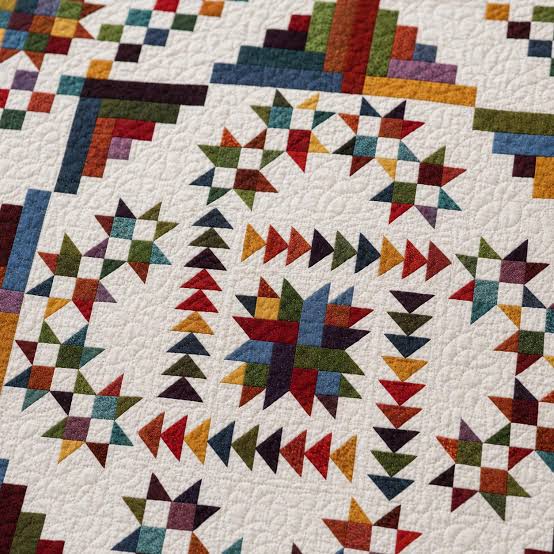
The Northwind Crossroads Quilt Pattern combines colorful stars, diagonal chains, staircase blocks, and flying geese in a balanced square layout. A woven star anchors the center, while the surrounding patchwork repeats outward toward four larger corner stars. The white background gives the individual shapes room to stand out, and a wide navy border frames the entire composition.
In the reference quilt, rust, red, gold, olive, teal, blue, and plum create a rich palette. The fabrics vary throughout the quilt, but repeating these colors across different sections helps the design feel connected. It is a project that offers variety at the sewing machine while bringing familiar patchwork elements together in one coordinated quilt. At the end of this article, you can download our free 16-page construction guide, including cutting charts, diagrams for every block type, rotation maps, and the complete assembly sequence.
A practical way to organize the Northwind Crossroads quilt pattern is to keep a separate work tray for each component. Label the corner stars, diagonal chains, staircase blocks, star paths, and center pieces using the letters in the PDF. Keep a small note with the expected unfinished measurement in each tray. This makes it easier to check completed pieces and identify what still needs sewing.
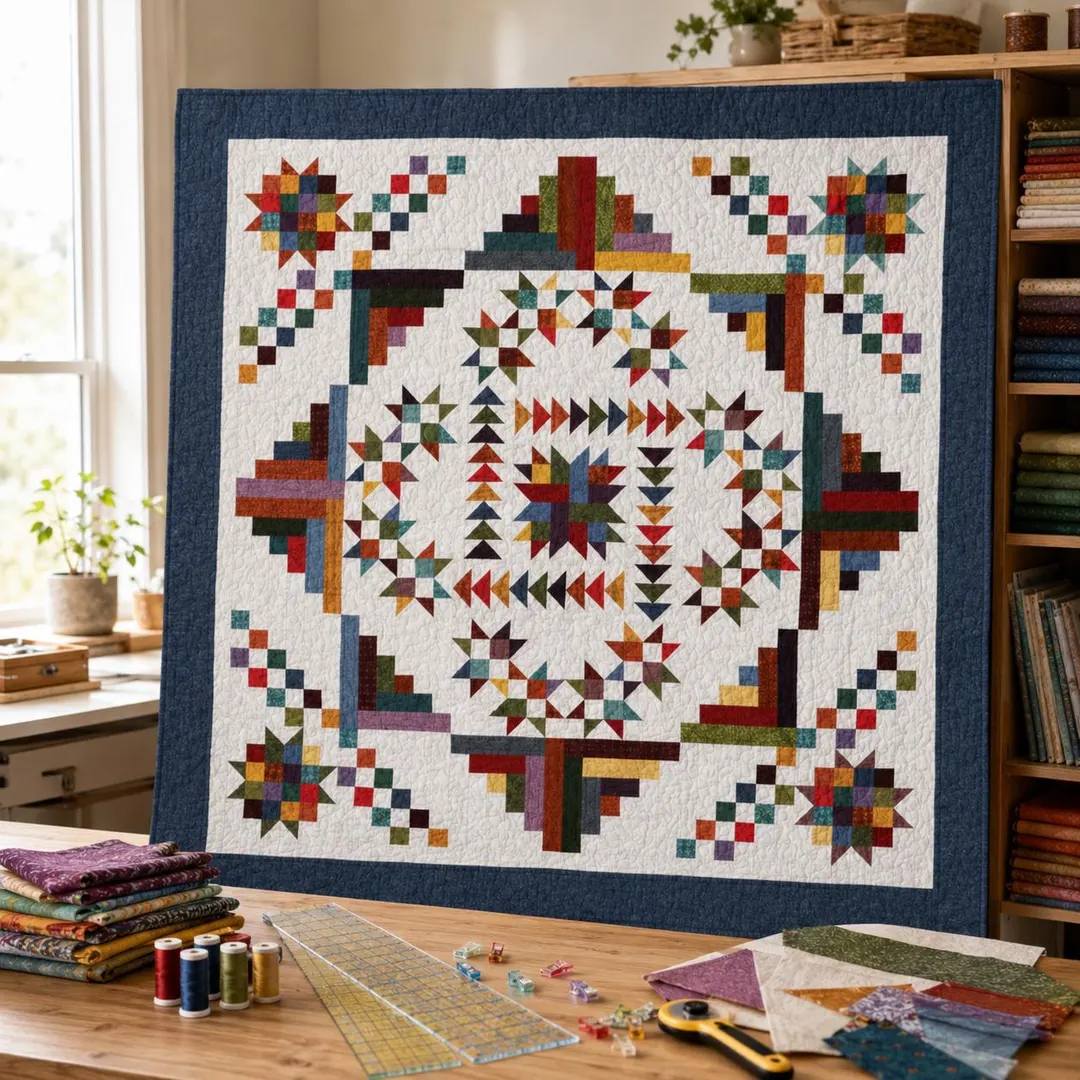
The diagonal chains provide a useful place to repeat accent colors throughout the quilt. A little gold, rust, or teal appearing in several chains can connect distant sections of the layout. Arrange these squares beside the neighboring star fabrics before sewing, checking that the chain remains visible against the background. You can vary individual prints while keeping a few recurring colors across all four corners.
Before joining the nine main units, place removable labels along their top edges and mark their positions in the layout. Photograph the complete arrangement once every rotation is correct, then keep that photograph nearby during assembly. The corner and side units change direction around the center, so preserving their orientation as you move them to the sewing machine helps prevent an otherwise accurate unit from being joined upside down.
Quilt Size and Skill Level
| Project detail | Measurement or description |
|---|---|
| Nominal finished quilt size | 88″ × 88″, approximately 223.5 × 223.5 cm |
| Unquilted top size | 88½″ × 88½″, including the outer seam allowance |
| Finished pieced center | 72″ × 72″ |
| Main assembly | Nine units, each finishing at 24″ square |
| Skill level | Intermediate |
| Standard seam allowance | ¼″ unless otherwise stated |
The main assembly consists of four corner units, four side units, and one center unit. These join in three rows of three. A white border finishing at 2″ wide and a navy border finishing at 6″ wide complete the design. Quilting and binding may slightly change the final measured size.
Materials You Will Need
The accompanying PDF uses the following fabric allowances:
- Assorted prints: 4 yards total, such as eight ½-yard cuts.
- White or cream background: 5 yards, including the inner borders.
- Navy outer border: 1¾ yards.
- Binding: ¾ yard.
- Backing: 3 yards of 108″-wide fabric, or 9 yards of regular-width fabric.
- Batting: At least 98″ × 98″ for the backing plan provided.
You will also need a rotary cutter, cutting mat, quilting ruler, marking pencil, pins, thread, an iron, and a sewing machine. The cutting allocations assume at least 40″ of usable fabric width after removing selvages. Check your fabric after preparation and allow extra if you want to match particular prints.
The guide uses three common abbreviations: HST means half-square triangle, WOF means width of fabric, and RST means right sides together. All cutting measurements are in inches.
Understanding the Patchwork Components
The corner stars have colorful sixteen-patch centers surrounded by triangular points. Diagonal chains lead away from these stars, connecting them visually with the larger arrangement. Each corner unit also contains a staircase cabin block, whose alternating strips form a stepped edge against the white background.
The side units combine two rotated staircase blocks with an interlocking star path beneath them. These small stars share some of their triangle units, so the path is constructed as a complete rectangle. Following the row diagrams prevents the extra fabric and sizing problems that would result from making separate complete stars.
At the center, four small quarters join to form the woven star. Thirty-six flying geese surround it, pointing in four directions. The PDF divides these geese into six panels so the center can be assembled in ordinary rows without partial seams.
Assembly Overview
- Prepare and organize the cuts. Read the master cutting chart before beginning. Its totals already include the squares used for HSTs and stitch-and-flip corners, so you do not need to add those quantities again.
- Make the individual components. Piece the corner stars, diagonal chains, staircase blocks, and interlocking star paths. Check their unfinished measurements before combining them.
- Assemble the larger units. Make four corner units and four side units, using the rotation diagrams to position the staircase blocks. Build the woven star and goose panels, then join the center in three rows.
- Arrange the quilt center. Lay out all nine units and compare their directions with the full quilt diagram. Sew the units into rows, then join the rows. There is no sashing between these sections.
- Add borders and finish. Measure the assembled center, attach the white borders followed by the navy borders, then prepare the backing and batting. Quilt and bind using the finishing instructions in the PDF.
Choosing Colors and Keeping the Points Clear
A consistent light background helps the stars and chains remain readable. Spread your darkest fabrics across the quilt rather than concentrating them in one corner, and repeat a few warm colors near the center and outer edges. Small prints and textured solids can provide variety without hiding the narrow strips and triangle shapes.
Make a practice HST, flying goose, and staircase block before cutting the entire fabric collection. The PDF specifies a one-at-a-time HST method, so its starting squares should not be used with a different method without recalculating the cuts. Press gently, measure at the checkpoints, and preserve the seam allowance beyond each point.
Download the Free Northwind Crossroads PDF
The Northwind Crossroads quilt offers several distinct piecing tasks within a single project. Working through one component at a time gives you a clear way to organize the sewing, and the larger nine-unit layout makes it easier to see how the separate motifs connect.
Download the free Northwind Crossroads Quilt Pattern PDF below for the complete cutting lists, block diagrams, center-panel instructions, border measurements, and finishing guide. Keep the full layout nearby as you work so you can check every rotation before joining the sections.
Northwind Crossroads Quilt Pattern | Free PDF Guide
The white background offers space to make the quilting texture part of the finished design. Gentle curves can soften the stepped blocks and pointed stars, while lines that echo the patchwork can emphasize its geometry. Sketch a few possibilities on a copy of the layout before choosing a quilting plan. Maintain reasonably consistent quilting density across the center and borders, following the requirements for your batting.
When finishing the quilt, consider how the binding will relate to the wide navy border. Matching navy binding creates a continuous frame, while a narrow edge in rust or gold repeats one of the colors from the patchwork. Lay folded fabric strips along the quilt’s edge to compare the effect before cutting the binding. Even this small finishing choice can noticeably change how the outer frame looks.