Some quilt designs make you notice the fabric first. Others draw you in with movement. The BQ5 Missouri Quilt Pattern brings those qualities together: generous squares give floral and botanical prints room to shine, while contrasting frames and diagonal corners lead the eye across the quilt.
In the version shown here, rich reds, soft sage greens and charcoal prints sit against ivory and black. The combination feels warm and traditional, yet the shifting frames give it a lively, graphic character. It is a lovely choice when you want a quilt that looks coordinated without making every block identical.
Below, you will find ideas for choosing fabrics, planning the layout and preparing to sew. A downloadable PDF construction guide is available near the end of the article, before the conclusion.
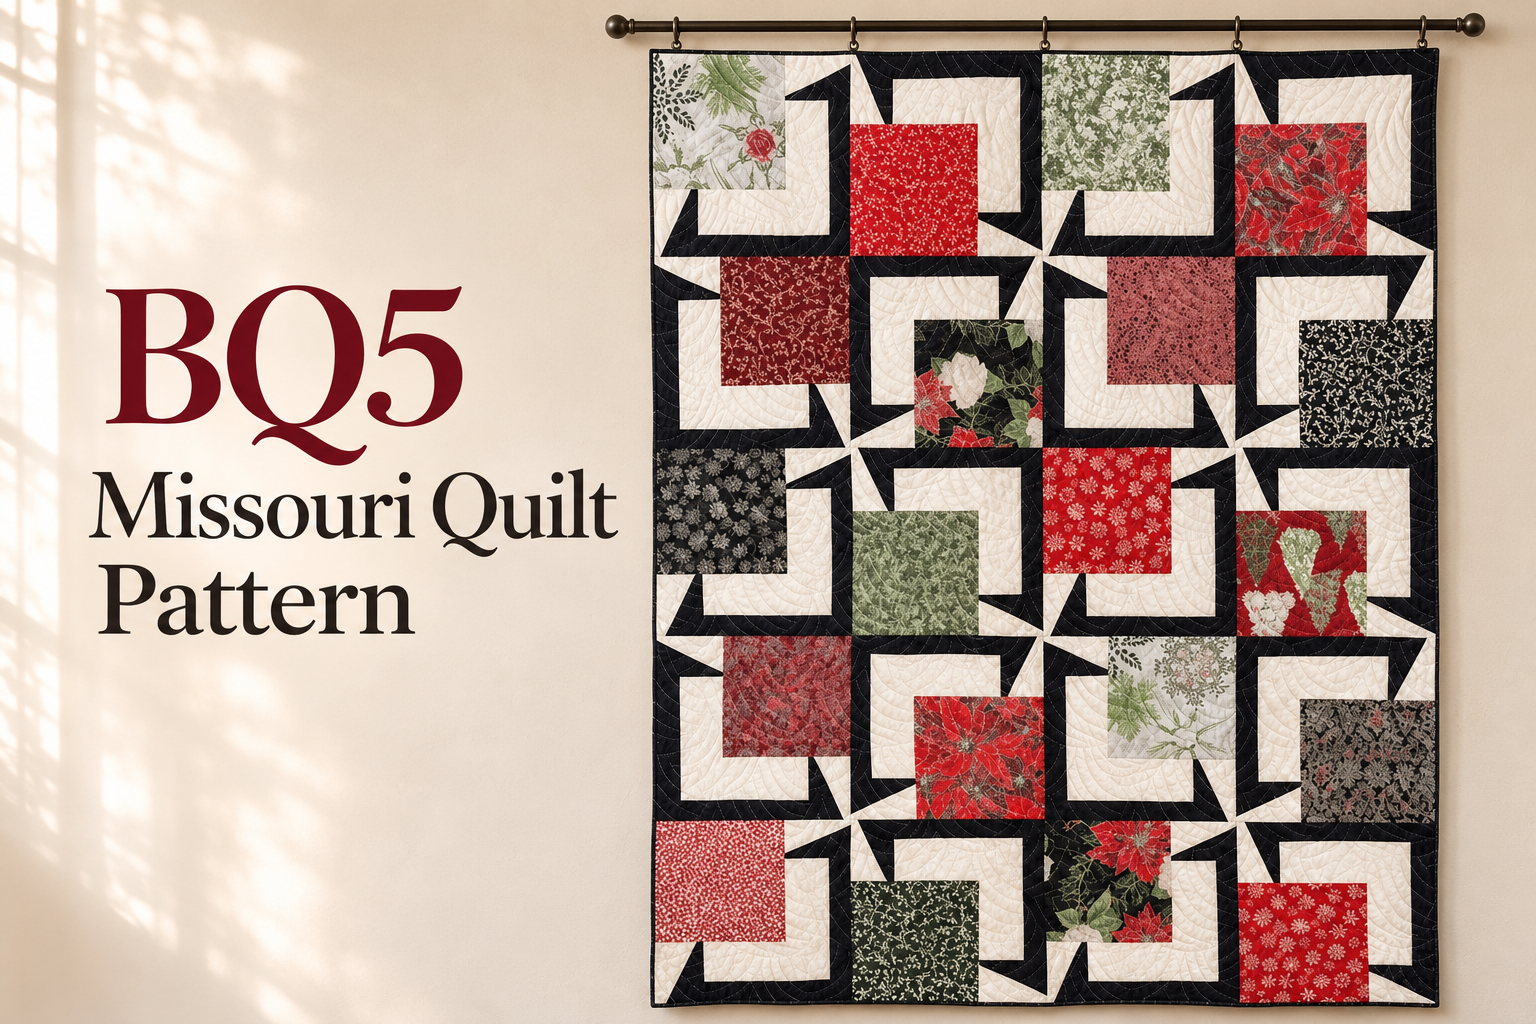
The large focus square sits toward one corner of each block rather than in the middle. A broad light rail and a narrower dark rail wrap around it, creating an open frame. Small diagonal corner units interrupt that frame and add the pinwheel movement visible between the blocks.
Rotation changes the effect of the same block. Turn one block and the focus square shifts to a different corner; repeat those changes across the quilt and a new arrangement emerges. That is why checking the layout matters just as much as choosing the fabrics. The movement comes from the relationship between neighboring blocks.
Quilt Size and Layout
The accompanying guide develops the photographed arrangement as a 20-block quilt, with four blocks across and five rows down.
- Nominal finished quilt size: 54″ x 67 1/2″, approximately 137 x 171 cm.
- Finished block size: 13 1/2″ square.
- Unfinished block size: 14″ square, including seam allowances.
- Focus squares: cut at 9 1/2″ square to finish at 9″.
- Construction seam allowance: 1/4″.
The top measures 54 1/2″ x 68″ before quilting and binding, because its outside seam allowances are still present. Keeping finished and unfinished measurements separate makes the checkpoints in the PDF much easier to follow.
Choosing Fabrics That Work Together
Start with the prints you want to feature in the large squares. Florals with recognizable blossoms, leafy botanicals and small trailing vines all suit this arrangement. Mix their scale: a few larger motifs give the eye somewhere to pause, while smaller prints connect the stronger blocks.
To follow the photograph’s palette, combine several red and burgundy prints with sage, pale green and charcoal. Spread the darker squares throughout the layout instead of concentrating them in one corner. The lighter green squares provide a useful pause among the richer reds.
The frame fabrics need a clear difference in value. An ivory print with subtle texture can work beautifully beside a deep black or near-black fabric. Lay a sample of each beside your focus prints before cutting. If the frame disappears against too many squares, choose a lighter light fabric or a darker dark fabric.
For a special floral motif, use a transparent ruler to preview the 9″ finished area inside the larger cutting square. Remember that the block will rotate in the final layout. A flower can look attractive from any direction, but birds, lettering and other directional designs need more planning.
Understanding the Construction
Each block uses one focus square, light and dark frame pieces, and two diagonal corner units. The construction sequence in the PDF builds a right-hand wing and a bottom band before joining them to the focus square. Working in these smaller sections gives you clear places to stop, press and measure.
The diagonal units use rectangular paper foundations. These keep the angle consistent and provide a trimming boundary. If foundation paper piecing is new to you, make one corner of each shape first. Check the fabric front against the illustration before preparing the remaining units.
Once those first units are correct, make a complete test block. It should measure 14″ square with the outside seam allowances included. A careful test at this stage is more useful than discovering a repeated seam error after assembling the whole top.
Arrange the Blocks Before Joining Them
Lay out all twenty blocks on a design wall, a clean floor or another flat surface. Follow the rotation chart in the PDF, then step back and look at the color distribution. A quick photograph can help you notice a cluster of similar reds or several dark squares sitting too close together.
If you move a block to improve the color balance, check its rotation again. You can change the position of a print while preserving the placement of the focus square within that space. Labeling the rows before taking the blocks to the sewing machine helps keep the arrangement intact.
A Few Preparation Tips
- Print the foundation page at 100% or Actual size and measure its 1″ calibration square.
- Use the cutting measurements as written; their seam allowances are already included.
- Press each small assembly before measuring it, without pulling the diagonal edges.
- Keep the light and dark pieces labeled so similar rectangles do not get mixed up.
- Check each row’s orientation before joining it to the next.
Quilting and Binding Ideas
The strong frames give this quilt plenty of structure, so the quilting can be gentle. Flowing curves soften the angular piecing, while evenly spaced straight lines can emphasize its graphic character. Choose a design and spacing that suit your batting and the amount of texture you want.
A narrow dark binding continues the look of the outer rails and gives the edge a tidy finish. Before binding, check the quilt for loose threads and remove any remaining foundation paper. Square the quilt carefully while preserving the outside block seams.
The illustrated PDF brings the preparation and construction information together in one place. It includes a fabric list, cutting tables, labeled block diagrams, assembly steps, a row-by-row rotation chart, finishing instructions and full-size corner foundations with a scale check.
Design credit and guide note: The BQ5 reference design is by Debbie Bowles of Maple Island Quilts, pattern MIQ825. The designer’s website lists the original pattern. The free PDF accompanying this article is an independently reconstructed, photo-based construction guide with new diagrams and wording. Its measurements have been checked arithmetically, but the reconstructed version has not been sewn as a test quilt. Make one complete test block before cutting all your fabrics.
Download the BQ5 Missouri Quilt Pattern
This quilt gives favorite prints a generous place to be seen, with contrasting frames that bring the collection together. Thoughtful fabric placement, accurate seams and a checked block rotation will help you preserve the movement that makes the photographed arrangement so appealing.
Choose the prints you most enjoy, begin with one measured test block and let the layout grow from there. The combination of bold squares and turning frames offers plenty to enjoy at every stage, from the first fabric choices to the final binding stitches.