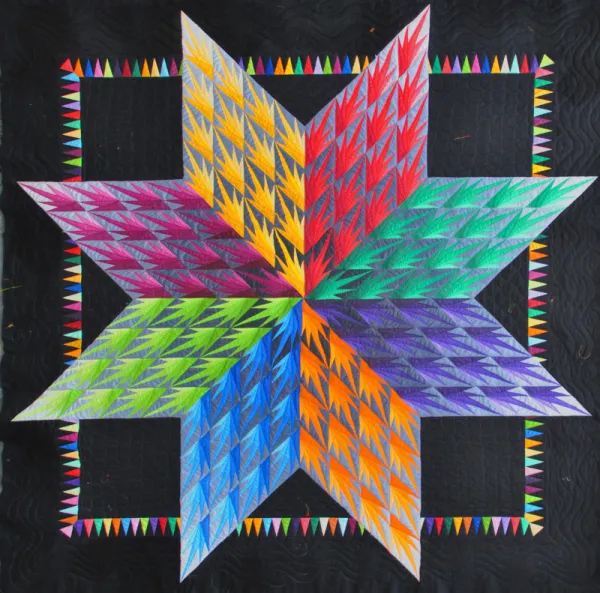
Some quilts invite you to look twice. The Lone Star Recognition Pattern does it with eight brilliant color rays, slender feathered shapes, and a deep black background that gives every point room to shine. Small rainbow triangles appear near the corners and between the rays, echoing the colors of the central star without competing with it.
The close-up reveals the detail behind that first impression: each small diamond contains nine foundation-pieced sections. Repeat those diamonds across the eight rays, and the feathered texture grows into a bold, balanced star.
This article introduces a 56-inch square version independently drafted from the supplied reference photos. The original dimensions and construction instructions were not available. The accompanying PDF provides new 45-degree foundations, measured starter cuts, assembly diagrams, and a setting that attaches the pieced star to a black background with turned-edge applique. Make a complete test diamond before cutting fabric for the entire quilt.
Finished Size and Skill Level
| Project detail | This version |
|---|---|
| Planned finished quilt | 56 × 56 inches, approximately 142 × 142 cm |
| Skill level | Advanced |
| Small foundation diamonds | 128 total; 16 in each ray |
| Sections in each diamond | Nine |
| Main star | Eight rays in eight color families |
| Rainbow frame | 168 small applique triangles |
| Piecing seam allowance | ¼ inch |
The finished measurement is the drafted size before quilting and laundering. Quilting take-up and fabric shrinkage may reduce it slightly.
This is a rewarding project for quilters comfortable with foundation paper piecing, precise seam intersections, bias edges, and applique. The PDF breaks the work into small stages, but the eight-way center and pointed edges still require care.
Choosing Fabrics for the Lone Star Recognition Pattern
The reference uses yellow, red, teal green, violet, orange, blue, lime, and magenta. Read clockwise from the upper-left ray to follow the color map in the PDF.
Within each family, choose a main color, a deeper shade, and a lighter shade. The long middle spike uses the main color, while the side spikes use the deeper and lighter fabrics. A consistent gray or blue-gray separates those shapes and makes the feathered pattern easier to see.
Keep the background black or similarly dark if you want the star to have the contrast shown in the reference. Solids, tonal fabrics, and small prints keep the slender patches readable.
Materials
These generous quantities assume 40 inches of usable width of fabric (WOF) and the starter rectangles listed in the PDF.
| Material | Amount |
|---|---|
| Main ray colors | ⅜ yard in each of eight colors; 3 yards total |
| Deeper ray shades | ½ yard in each color family; 4 yards total |
| Lighter ray shades | ½ yard in each color family; 4 yards total |
| Gray or blue-gray | 5¼ yards |
| Black background | 3½ yards |
| Binding | ¾ yard |
| Ordinary-width backing | 4 yards |
| Alternative wide backing | 2 yards of 108-inch-wide fabric, instead of ordinary-width backing |
| Batting | At least 64 × 64 inches |
| Paper-backed fusible web | 1 yard, at least 17 inches wide, for the small triangles |
| Frame triangle fabrics | Leftovers from the eight ray color families |
You will also need foundation paper, a printer, a rotary cutter, rulers, a cutting mat, pins, an iron, thread, and hand or machine applique supplies. Check your quilter’s backing and batting requirements before preparing the quilt sandwich.
The yardage allows room for foundation-piecing waste. The listed rectangles are starter cuts, rather than finished patch sizes; each must cover its numbered region and the required allowance after it is flipped open.
How the Quilt Comes Together
1. Print and Check the Foundation
Print the full-size diamond foundation at Actual Size or 100%, with Fit and Shrink disabled. Measure both sides of the one-inch calibration square. Check the triangle template separately when you reach the frame.
The finished diamond has four-inch sides and a true 45-degree acute angle. Eight matching angles are needed for the star to close. The paper-side foundation is mirrored so the fabric-side result follows the numbered close-up.
2. Sew One Nine-Section Test Diamond
Foundation paper piecing (FPP) uses the printed lines to guide each seam. Begin with section 1 on the unprinted side of the paper, then add sections 2 through 9 in numerical order.
Before sewing each new patch, flip-test it to confirm that it will cover the whole section and its allowances. Sew from the printed side, open the fabric, and press without stretching. Trim the completed unit on the outside line and mark the finished corner dots.
The test unit should measure four inches along every finished edge, from dot to dot. Check it before repeating the process 128 times.
3. Assemble Sixteen Diamonds into Each Ray
Arrange sixteen matching units in a four-by-four diamond grid. Keep the feathered shapes pointing toward the ray’s outward tip. Join the units into rows, then join the rows, matching the seam intersections carefully.
Each large ray has sixteen-inch finished sides. Make eight rays and keep their color groups labeled until the star is assembled.
4. Join the Eight Rays
Lay out the complete color map before sewing. Join neighboring rays into pairs, join the pairs into two halves, then join the halves at the center.
Use the marked seam-intersection dots. A sharp raw tip extends farther than a quarter inch beyond its finished corner, so measuring back from that tip will not locate the joining point correctly. Keep the perimeter allowances free at the valleys, and support the center while pressing the radial seams open.
5. Prepare the Background and Rainbow Frame
Join two black panels, each 28½ × 56½ inches, along their long edges with a quarter-inch seam. The result is a 56½-inch raw square. Mark its center and a centered 42-inch square for the triangle bases.
The frame has four sides of 42 triangles, for a total of 168. Cut 21 triangles from each ray color family. Each has a one-inch base and a height of 1¼ inches, with no seam allowance. Arrange the bases edge to edge along the full length of each side of the marked square. Continue a repeating eight-color sequence around the frame, pointing the triangles away from the center.
Check the star over the arrangement, then lift it away. Fuse and edge-stitch the small triangles before attaching the main star. The star overlaps parts of the frame, leaving rainbow accents visible near the corners and in the gaps between rays.
6. Applique the Star
Remove the foundation papers gently. Turn the star’s outside quarter-inch allowance along the finished boundary, forming each outer point at its marked dot. Clip the free allowance at inward valleys only as needed, stopping short of the finished point and preserving the radial joining seams.
Center the star, pin its tips and valleys, and baste it flat. Secure the folded edge with small hand applique stitches or a suitable machine applique stitch. This setting keeps the black background in one square behind the star.
7. Quilt and Bind
Prepare backing and batting at least 64 inches square, or to your quilter’s requirements. Baste the layers and quilt with balanced density across the star and background.
Seven 2½-inch binding strips cut across 40-inch usable WOF provide enough length for the drafted quilt after diagonal joins. Finish the binding and check the final shape and measurements.
The printable guide includes the fabric amounts, section-by-section starter cuts, color map, foundation-piecing sequence, ray assembly, background and frame placement, finishing notes, and two full-size templates.
Read the complete guide and sew one test diamond before bulk cutting. Its geometry and quantities have been checked digitally; a sewn sample of this independently drafted version has not been tested.
The Lone Star Recognition Pattern turns a small, nine-section diamond into a striking rainbow quilt. Its feathered detail comes from repeating that unit with consistent color values and careful orientation. Start with one well-measured diamond, build one accurate ray, and carry that same care through the center and applique edges. Each stage brings the eight-color star into focus.