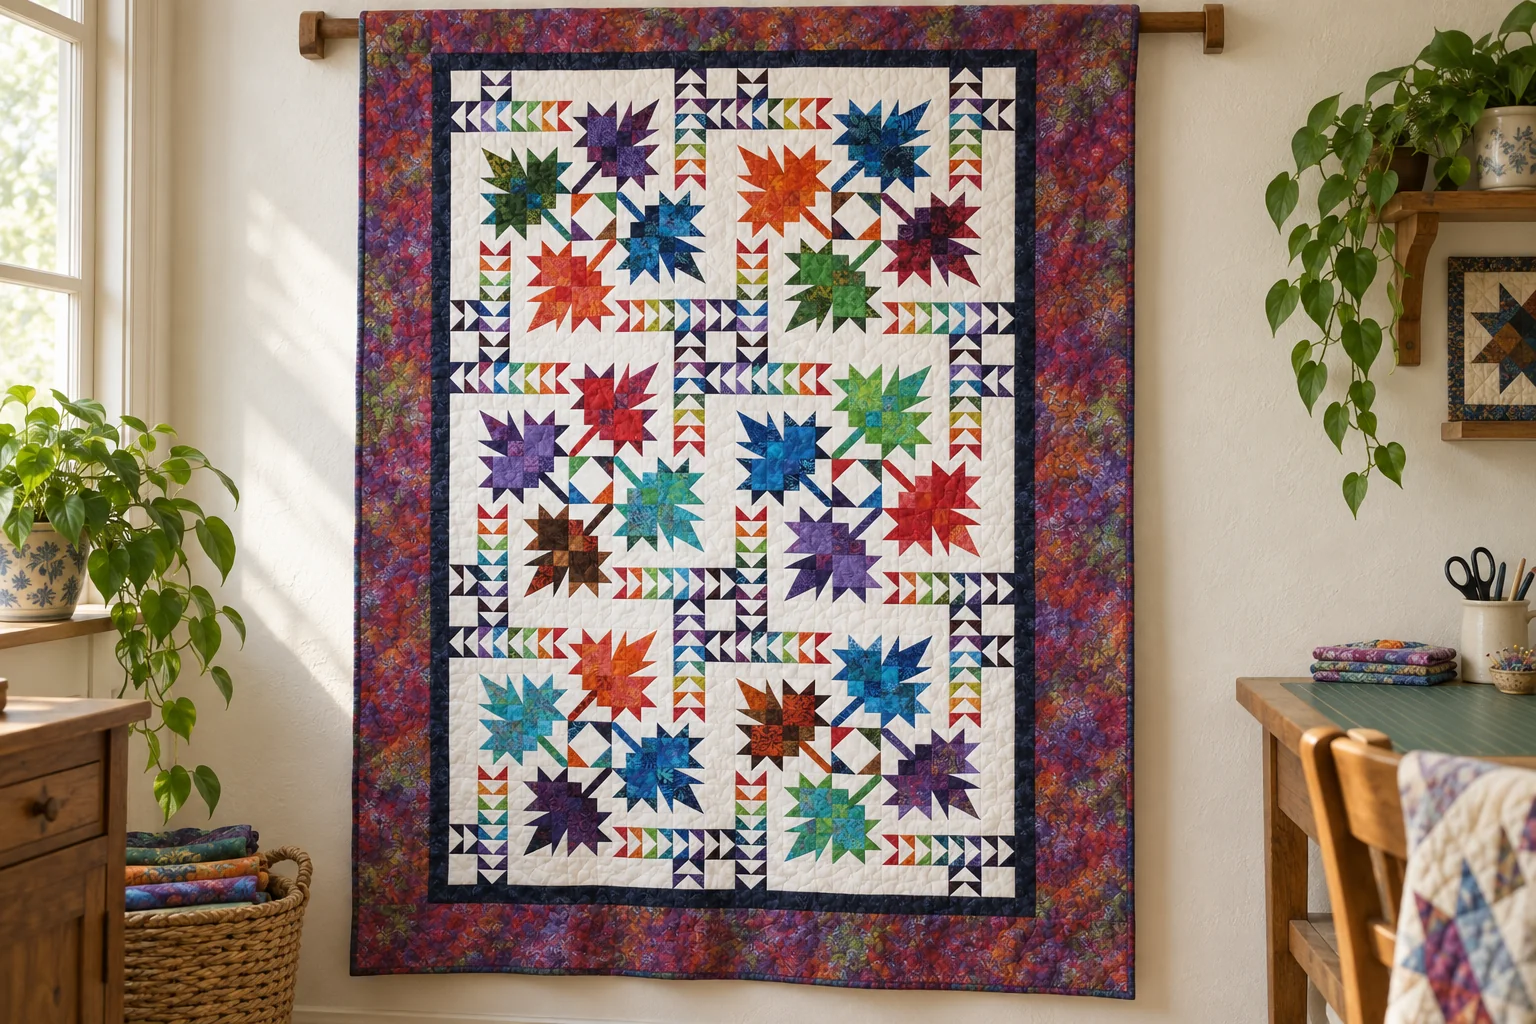
The Northern Neighbours Quilt Pattern brings together colorful, pointed leaves, flowing lines of flying geese, and a bright background that gives every fabric room to shine. Deep blues, rich purples, warm oranges, and leafy greens turn the repeated blocks into a lively arrangement. A narrow dark border frames the patchwork, while a wider multicolor border carries those colors to the edge.
If you enjoy quilts that reveal more detail the longer you look at them, this project has plenty to explore. Four leaves turn around a small white diamond in each feature block. The surrounding triangles continue through the sashing, creating connections between neighboring blocks. Although the finished quilt looks intricate, its construction becomes easier to follow once you separate it into the individual units.
At the end of this article, you will find a free PDF for the measured reconstruction featured here, including cutting charts, colored assembly diagrams, full-size paper foundations, and size checkpoints.
This downloadable version was independently drafted from the reference image. Its dimensions and sewing instructions belong to this reconstruction; it is not the original designer’s instruction booklet. The measurements have been checked, but the project has not been test-sewn, so begin with one complete leaf and one feature block before cutting all your fabric.
A Closer Look at the Design
The quilt contains 24 leaves arranged into six feature blocks. Each block uses four different leaf palettes, making it a good opportunity to combine fabrics that share a color family while still showing contrast. A turquoise accent might brighten a green leaf, for example, while a dark plum square can give a violet leaf more depth.
One particularly interesting detail is the direction of the flying geese. In this version, the center triangles are white and the smaller corner triangles are colored. Those white points form the directional shapes. Paying attention to the white triangles makes it much easier to orient each strip correctly during assembly.
The sashing is part of the patchwork design, too. Small pairs of flying geese sit at the ends of the white sashing strips. When the rows are joined, these pieces extend the movement between the larger blocks. Plain white cornerstones provide breathing space at the intersections.
Finished Size and Skill Level
The reconstructed quilt finishes at approximately 70 × 95½ inches, or 177.8 × 242.6 cm, before any reduction from quilting and washing.
| Component | Finished size |
|---|---|
| Individual leaf | 9 × 9 inches |
| Four-leaf feature block | 22½ × 22½ inches |
| Sashing strip | 3 × 22½ inches |
| Pieced center | 54 × 79½ inches |
| Inner border | 2 inches wide |
| Outer border | 6 inches wide |
This project is best suited to confident intermediate and advanced quilters. It combines half-square triangles, flying geese, foundation paper piecing, and partial seams. The PDF breaks these techniques into smaller steps, but a consistent quarter-inch seam and careful pressing will be especially helpful.
Materials You Will Need
For the version shown in the PDF, prepare:
- 5 yards of white or near-white fabric for the background and sashing.
- 24 coordinating fat quarters, each with at least 18 × 20 usable inches, for the leaves and additional colored patches.
- 1½ yards of dark navy fabric for the inner border and binding combined.
- 1¾ yards of non-directional multicolor fabric for the outer border.
- 6 yards of regular-width backing fabric, assuming at least 40 usable inches, or 3 yards of 108-inch-wide backing.
- Batting measuring at least 78 × 103½ inches.
- Thread, rotary cutter, cutting mat, quilting rulers, pins, an iron, and foundation-piecing paper.
The cutting charts use inches. All listed regular cut sizes include quarter-inch seam allowances, while foundation patches are identified as oversized rough cuts. Read the complete schedule before cutting so you can set aside fabric for the geese, center corners, and binding.
Choosing Colors for Your Leaves
Batik fabrics suit this arrangement because their shifting colors add interest within each leaf. You can follow the reference with blue, purple, green, orange, red, and brown, or choose a smaller palette for a quieter result. Keep enough difference between neighboring leaves that their pointed outlines remain easy to see.
A useful starting point is to choose four fabrics for each feature block and lay them around a white square. View the arrangement from a few steps away. If two leaves blend together, change the value of one fabric rather than simply choosing another print in the same shade.
The outer border can help you select the entire palette. A multicolor print containing several of your chosen leaf colors will tie the quilt together. Check its scale beside the patchwork before committing: the border should frame the leaves without making their smaller pieces difficult to notice.
Helpful Abbreviations
| Term | Meaning |
|---|---|
| HST | Half-square triangle |
| FPP | Foundation paper piecing |
| WOF | Width of fabric, excluding selvages |
| Finished size | Size after the seam allowances are sewn into the quilt |
| Unfinished size | Trimmed size before a unit is joined to its neighbors |
How the Quilt Comes Together
1. Sew a Test Leaf
Each leaf is assembled from four quadrants: a pointed section, two lobe sections, and a stem corner. The pointed section combines a paper-pieced beam with two narrow diagonal units. The lobes use small HSTs around larger colored squares, while the stem is formed with a separate paper foundation.
Check each quadrant at 5 inches square unfinished. After joining the four quadrants, the leaf should measure 9½ inches square unfinished. Making this first leaf carefully gives you a chance to adjust your seam allowance before repeating the process.
2. Make the Flying Geese
The complete project uses 212 flying-geese units: 144 for the feature blocks and 68 for the sashing. Each begins with a white rectangle and two colored corner squares. The PDF illustrates the stitch-and-flip construction and the direction of the white center triangle.
Work in small batches and check the first few units before continuing. Each goose should measure 2 × 3½ inches unfinished. Preserve the quarter-inch allowance above the white point so the point remains visible after the next seam is sewn.
3. Build the Leaf Arms
Join six geese into a strip, add a narrow white spacer, and attach one completed leaf. This creates an arm measuring 9½ × 14 inches unfinished. Make four arms in different leaf colors for each feature block.
Construct the arms in the same starting orientation, then rotate the completed pieces into position. This keeps the cutting process consistent and helps prevent accidentally reversing an individual leaf or goose strip.
4. Assemble the Four-Leaf Blocks
The four arms surround a small square with colored corners and a white center diamond. A partial seam lets the arms fit around that center using straight seams. The illustrated sequence in the PDF shows which seam to start, which arms to add next, and where to complete the opening.
After pressing, each feature block should measure 23 inches square unfinished. Arrange all six blocks on a design wall or a clear floor before assembling the rows. This is the best time to check color balance and leaf direction.
5. Add Sashing and Borders
Make the sashing with a white middle and a pair of flying geese at each end. Horizontal and vertical strips use the same basic construction, with the completed sash rotated as directed. White cornerstones complete the narrow rows between the feature blocks.
Once the pieced center is assembled, check it at 54½ × 80 inches unfinished. Add the navy inner border, followed by the wider multicolor border. Measure through the center of the top before cutting each border pair; pin the ends, center, and intermediate points to distribute the fabric evenly.
Pressing and Quilting Tips
Press each seam as you work rather than waiting until a full block is complete. Use a lifting motion with the iron around small triangles and diagonal edges. If several seams meet in one area, pressing selected seams open can reduce bulk and make the intersection easier to quilt.
Remove the foundation paper before layering the quilt. Check the back of the top for loose threads and any paper caught at seam intersections. Taking a little time here helps prevent scraps from remaining beneath the finished quilting.
For the quilting itself, gentle curves can soften the sharp geometry of the leaves. An allover design is one option; outlining the leaf shapes and adding a different texture in the white background is another. Choose the spacing according to your batting’s guidance and the amount of texture you want.
Download the Free PDF
The Northern Neighbours Quilt PDF for this measured reconstruction includes 16 pages with fabric requirements, complete cutting charts, individual leaf diagrams, flying-geese instructions, partial-seam assembly, sashing placement, border measurements, and printable foundations.
Print the foundation pages at 100% or Actual Size, and measure the one-inch test square in both directions. Keep a master copy of the templates so you can print additional pages without changing their scale.
Northern Neighbours Quilt Pattern
With its turning leaves and connected lines of triangles, this quilt offers a satisfying way to explore color one small unit at a time. Start with a favorite group of fabrics, take the construction in stages, and let each finished leaf bring the larger arrangement into view.