
Quilting is a timeless craft that allows for endless creativity and expression. Among the myriad of quilt patterns, the Up and Down Quilt stands out as a captivating design that seamlessly blends simplicity with sophistication. In this tutorial, we’ll delve into the charm and versatility of the Up and Down Quilt Pattern, guiding both beginners and experienced quilters through the process of creating their own stunning masterpiece.
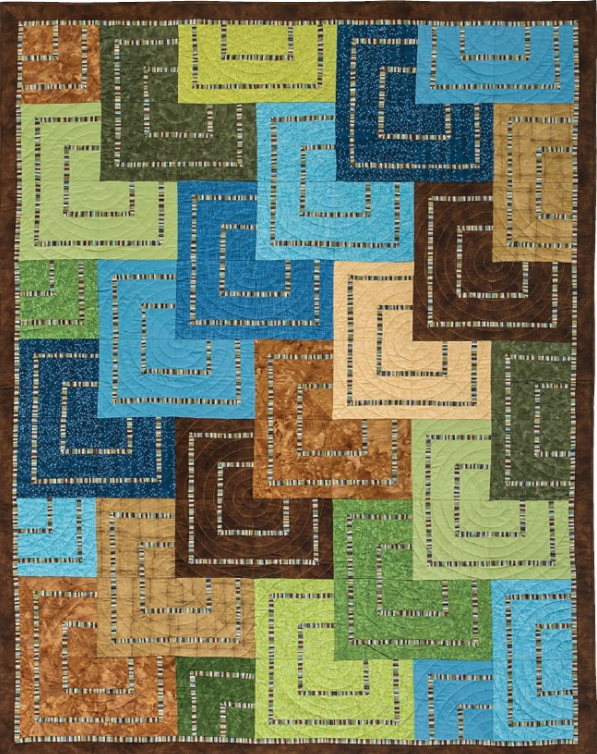
The Up and Down Quilt Pattern is characterized by its alternating vertical stripes, creating a visually appealing effect of movement and depth. This pattern can be adapted to suit various styles and color schemes, making it a versatile choice for quilters of all levels. Whether you prefer bold and contrasting colors or a more subtle and monochromatic palette, the Up and Down Quilt Pattern can be tailored to suit your personal taste.
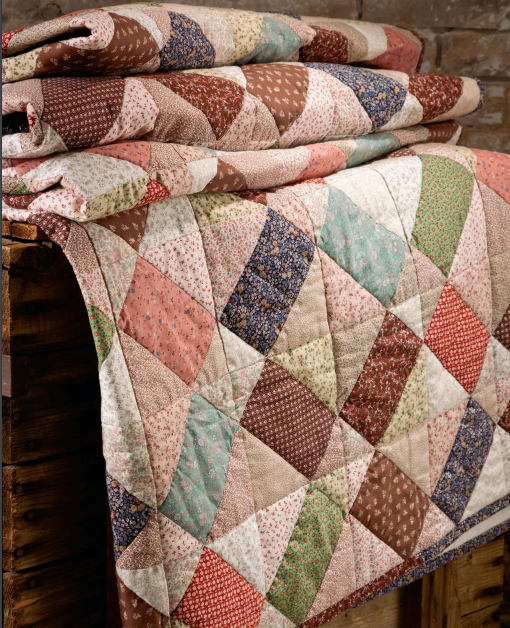
Dive into the world of quilting with the mesmerizing Up and Down Quilt pattern. This three-color quilt brings together the artistry of fabric selection and precise cutting techniques to produce a visually stunning masterpiece. In this step-by-step guide, we’ll explore the materials needed, cutting instructions, and construction process to help you craft your own version of this captivating quilt.
Materials Needed: Before embarking on your quilting journey, gather the following materials:
- Dark Brown: 1½ yards
- Medium Brown: ⅞ yard
- Medium/Light Brown: ⅞ yard
- Light Brown: ⅝ yard
- Dark Blue: ⅞ yard
- Medium Blue: ⅝ yard
- Medium/Light Blue: ⅞ yard
- Light Blue: ⅞ yard
- Dark Green: ⅞ yard
- Medium Green: ⅝ yard
- Medium/Light Green: ⅞ yard
- Light Green: ⅞ yard
- Stripes (Variegated): 1¾ yards
- Binding: ⅝ yard
- Backing: 69˝ × 85˝
- Batting: 69˝ × 85˝
Cutting Instructions: Follow these cutting instructions to prepare your fabric pieces:
Construction:
Now let’s move on to the construction of the Up and Down Quilt:
Make the Blocks:


Following the guidance in the “Slicing with a Ruler” section, diagonally slice each 9˝ × 9˝ square into two triangles.
TIP: Maintain the unity of each sliced block to preserve fabric design placements, especially if there is a specific design in the fabric. This ensures the correct orientation of the design.
Arrange two triangles from one square as illustrated. Maintain this triangle positioning and use a ruler to make two slices in each triangle, measuring precisely from the edges of each triangle as demonstrated.
Keep each triangle in its designated position and follow the indicated measurements while slicing.
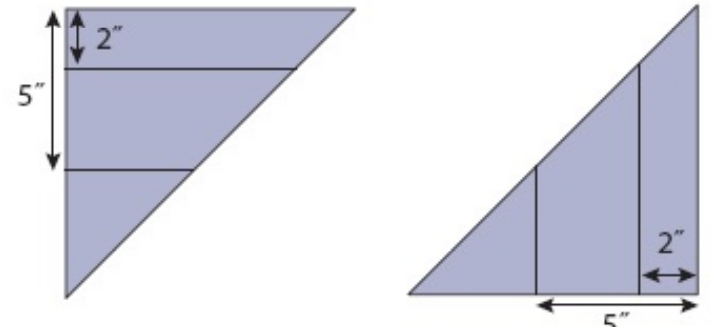
Sew the 1˝ × 8½˝ striped strips onto the 2˝ slices, and attach the 1˝ × 5½˝ striped strips onto the 5˝ slices. Trim the strips to align evenly with the triangles.
Seam the strips onto the triangles, ensuring a neat and precise fit.

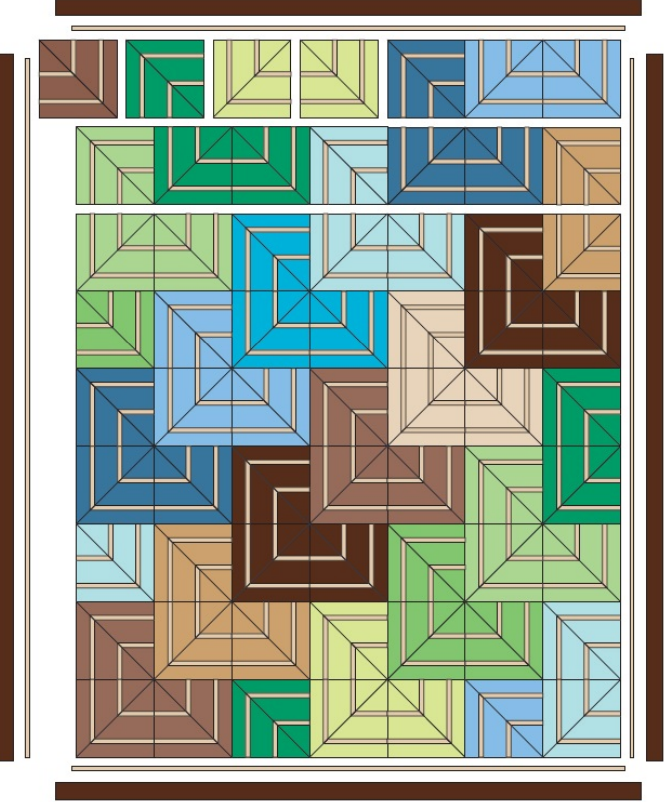
Combine the pairs of triangles to form a block. If necessary, trim the block to a size of 8½˝ × 8½˝.
Assemble the triangles into pairs and stitch together to create the final block. Adjust the block size to 8½˝ × 8½˝ if needed.
Assemble the Quilt Top:
Arrange blocks in rows according to the quilt layout diagram.
Sew blocks into rows, pressing seams in alternate directions for nesting.
Join the rows together to complete the quilt center.
Inner Border:
Sew striped 1˝ × WOF strips together for the inner border.
Cut and sew strips to the sides, top, and bottom of the quilt center.
Outer Border:
Sew dark brown 2½˝ × WOF strips together for the outer border.
Cut and sew strips to the sides and top and bottom of the quilt.
Finishing Touches:
Layer, quilt, and bind the quilt according to your preferences.
Congratulations on completing your Up and Down Quilt! This dynamic pattern, with its illusion of overlapping squares, showcases your creativity and quilting skills. Experiment with color combinations and fabric choices to make this design uniquely yours. Embrace the joy of quilting as you create a beautiful and timeless piece to be cherished for years to come. Happy quilting!
1 Comment
Your opinion is a fresh look at an old issue. Thanks! I will be sharing this!