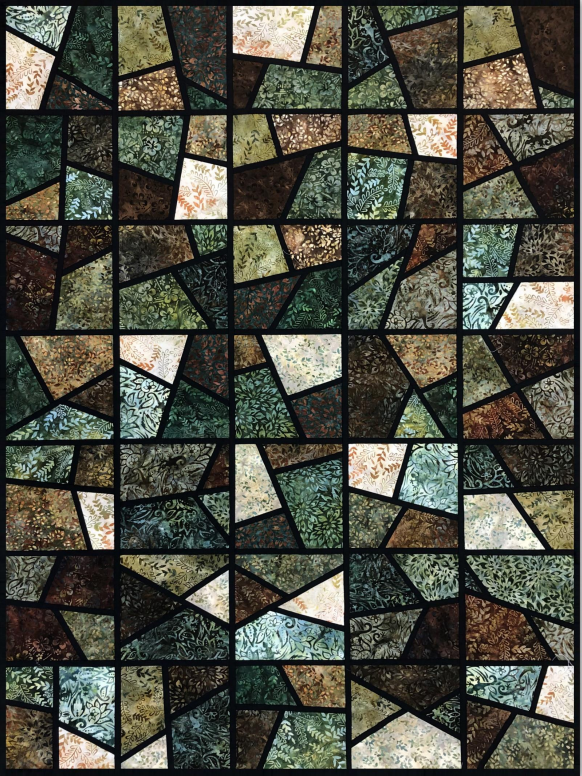
Welcome, quilting enthusiasts of Missouri! Today, we embark on a creative journey to explore the captivating world of mosaic quilting. Mosaic quilts are a delightful fusion of art and fabric, allowing you to transform simple squares into stunning visual masterpieces. In this tutorial, we’ll guide you through the process of creating your very own mosaic quilt, turning your passion for quilting into a work of art.
Fabric requirements:
36 Layer Cake 10” Squares
Accent – 7/8 yard
Optional Sashing – 5/8 yard
Binding – 1/2 yard
Backing – 3 yards
Select a range of fabrics that complement each other. Consider your overall theme and the mood you want to convey with your mosaic quilt. Whether it’s a vibrant rainbow or a soothing monochromatic palette, let your creativity guide you.
Tutorial:
Take two layer cake squares with different fabrics and stack them with right sides up and raw edges aligned. Cut across at a slight angle, then exchange the resulting pieces to create two blocks with a mix of fabrics.
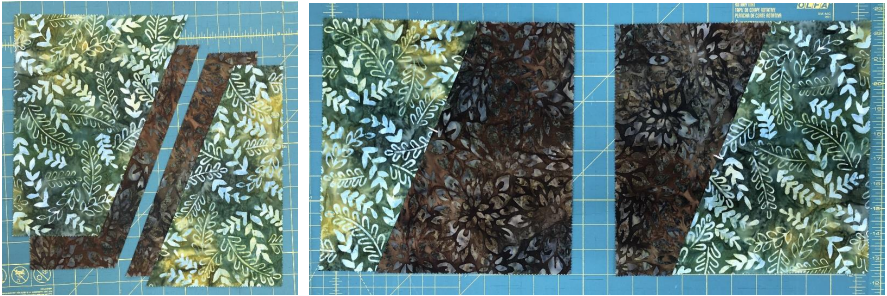
Using a chalk pencil, mark each side of your cut near the block’s center. Take an accent strip and draw a chalk line across its back. Stitch the accent strip onto one cut side of the block with a ¼” seam, ensuring the chalk marks align. Finger-press the seam allowance away from the accent, then stitch the remaining block section onto the accent, once again aligning chalk marks and pressing seam allowance away from the accent. Repeat for all layer cake blocks.

Stack two different blocks, both with right sides up and raw edges even. Make a cut at a slight angle, trade pieces to create two new blocks, and repeat the accent addition process.
Press the seam allowances toward the accent and trim each block down to 9 ½” square.
Arrange the blocks in a 5 x 7 layout. Stitch them into rows, then stitch the rows together, alternating the direction of the pressed seam allowances.
For optional sashing, cut 1 strip at 9 ½” WOF. Sub-cut to 28 – 1 x 9 ½” pieces. Stitch between the blocks in each row. Cut 8 strips at 1” WOF, stitch into one long piece, and sub-cut to 6 – 1 x 47 ½” pieces. Stitch between the rows.
Quilt, bind, and savor your creation!
For larger quilts:
- 72-layer cake squares make an 8 x 9 block quilt (72 x 81”).
- Accent: 1 7/8 yards – cut 4 strips @15” WOF. Sub-cut to 144 – 1 x 15”.
- Binding: 5/8 yards.
- Optional sashing: 1 1/8 yards – quilt finishes at 75 x 85”.
- 108-layer cake squares create a 9 x 12 block quilt (81 x 108”).
- Accent: 2 ¾ yards – cut 6 strips @15” WOF. Sub-cut to 216 – 1 x 15”.
- Binding: ¾ yard.
- Optional sashing: 1 5/8 yards – quilt finishes at 85 x 114”.
- 143-layer cake squares yield an 11 x 13 block quilt (99 x 117”).
- Accent: 3 ½ yards – cut 8 strips @15” WOF. Sub-cut to 288 – 1 x 15”.
- Binding: 7/8 yards.
- Optional sashing: 2 1/8 yards – quilt finishes at 104 x 123”.
Discovering the joy of quilting with our Mosaic Quilt Tutorial is just a click away! If you prefer a more portable and printable version, you can access the pattern in PDF format below. Happy quilting!
You’ve just created a stunning mosaic quilt that reflects your unique style and artistic vision. Mosaic quilting is a fantastic way to explore color, shape, and texture in your quilting projects. We hope this tutorial has inspired you to dive into the world of mosaic quilting and create your own beautiful works of art.
pattern inspired by jordanfabrics.com
1 Comment
I enjoyed making this one, I really had to stay focused though. The colours are almost exact.