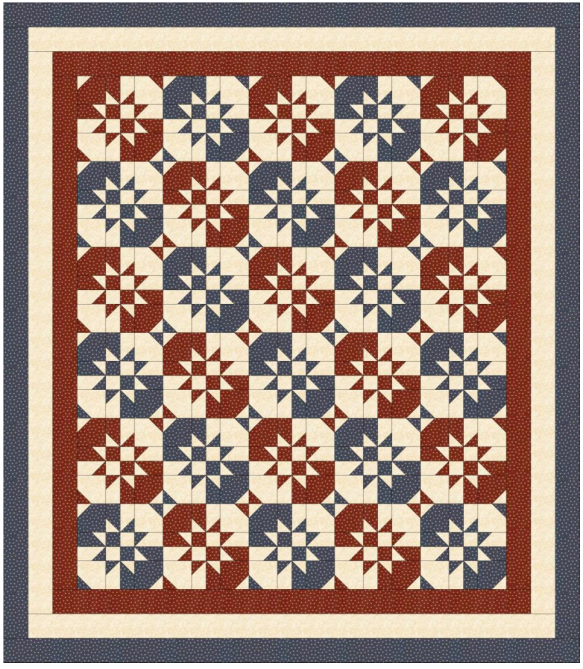
The Disappearing Hourglass Quilt is one of those magical patterns that never fails to impress. At first glance, it looks intricate and complex almost like a carefully engineered mosaic of movement and symmetry. But once you understand the process behind it, you’ll discover that it’s surprisingly approachable, even for confident beginners.
What makes this quilt so special is the transformation. You begin with a classic hourglass block simple, structured, and familiar. Then, with a few strategic cuts and rotations, the block “disappears” into a completely new design full of motion, depth, and visual interest. It’s the kind of technique that reminds us why quilting is both an art and a craft.
This particular version of the Disappearing Hourglass Quilt is thoughtfully redesigned to improve accuracy and ease of construction. Unlike some traditional approaches that place fabric bias along the outer edges (which can stretch and distort), this method uses half-square triangles (HSTs) constructed in a way that keeps the straight grain on the outside edges. This results in cleaner blocks, better alignment, and a more enjoyable sewing experience.
Finished Quilt Details
Finished Quilt Size: 71” x 81”
Finished Block Size: 10 ½” x 10 ½”
This size makes it perfect for a cozy throw, a Quilt of Valor, or a beautiful bed topper.
Materials and Fabric Requirements
To create this quilt, you’ll need a balanced combination of background, contrast, and border fabrics:
Fabric Requirements
- Background Fabric: 3 ½ yards
- Red Fabric: 2 ¼ yards
- Blue Fabric: 2 ¼ yards
Cutting Guide
From your fabrics, cut:
- Background:
- 14 squares – 13 ½” x 13 ½”
- 4 squares – 6 ¾” x 6 ¾”
- 8 strips – 3 ½” (middle border)
- Red and Blue Fabrics:
- 7 squares each – 13 ½” x 13 ½”
- 2 squares each – 6 ¾” x 6 ¾”
- Border strips as indicated
Step 1: Creating Half-Square Triangle (HST) Units
Start by pairing one background square with one red or blue square, right sides together.
- Draw two diagonal lines corner-to-corner on the back of the background square.
- Stitch ¼” away from both sides of each drawn line.
- Cut along the lines to create 8 half-square triangle units from each set .
This method is efficient and ensures consistent, uniform HSTs.
Step 2: Squaring and Assembling the Hourglass Block
- Trim each HST to 6 ¼” square for accuracy .
- Arrange four HSTs into a classic hourglass layout.
- Sew together to form a block measuring 12” unfinished .
Take your time here—precision at this stage makes a big difference later.
Step 3: The “Disappearing” Magic
Here’s where the transformation happens.
- Make four cuts:
- Measure 2 inches from the center seams
- Cut vertically and horizontally through the block
You’ll now have nine smaller sections.
Step 4: Rearranging the Pieces
This is the step that creates the stunning effect:
- Rotate each outer section 180 degrees
- Rotate the center section 90 degrees
Suddenly, the original hourglass disappears and a dynamic new block emerges.
Step 5: Reassembling the Block
- Sew the nine sections back together carefully.
- Your finished block should now measure 11” unfinished .
Repeat this process to create:
- 15 red-based blocks
- 15 blue-based blocks
Step 6: Quilt Layout
Arrange your blocks in:
- 6 rows of 5 blocks each
- Alternate red and blue blocks for a balanced design
This alternating layout enhances the illusion of movement and keeps the quilt visually engaging.
Step 7: Adding Borders
Borders frame your quilt and give it a polished, finished look.
Border Construction
- Inner Red Border
- Side strips: 63 ½”
- Top/Bottom: 59”
- Background Border
- Side strips: 69 ½”
- Top/Bottom: 65”
- Outer Blue Border
- Side strips: 75 ½”
- Top/Bottom: 71”
Attach borders in order, pressing carefully between each step.
Tips for Success
1. Accuracy is Everything
Precise cutting and trimming ensure your blocks align perfectly.
2. Press, Don’t Iron
Lift and press your seams to avoid stretching—especially important when working with triangles.
3. Chain Piecing Saves Time
Speed up your workflow by sewing multiple units continuously.
4. Play with Color Placement
Try different fabric combinations:
- Modern: black, white, and gold
- Soft: pastels and creams
- Bold: jewel tones
Why Quilters Love the Disappearing Hourglass
This pattern is beloved for several reasons:
- Visual complexity with simple steps
- Versatility in fabric choices
- Perfect balance of tradition and modern design
- Great for layer cakes or fat quarters
It’s also an excellent project for building confidence in cutting, piecing, and layout design.
The Disappearing Hourglass Quilt is a beautiful reminder that quilting is full of surprises. What starts as a simple geometric block evolves into something dynamic and intricate all through a few clever cuts and rotations.
To make your quilting experience even easier, you can access the complete step-by-step pattern here:
Disappearing Hourglass Quilt tutorial PDF
Whether you’re making this quilt as a gift, a keepsake, or a personal project, it’s sure to become one of your favorites. The rhythm of piecing, cutting, and reassembling creates a satisfying flow, and the final result is nothing short of stunning.
Take your time, enjoy the process, and don’t be afraid to experiment with colors and layouts. Each version of this quilt tells its own story.