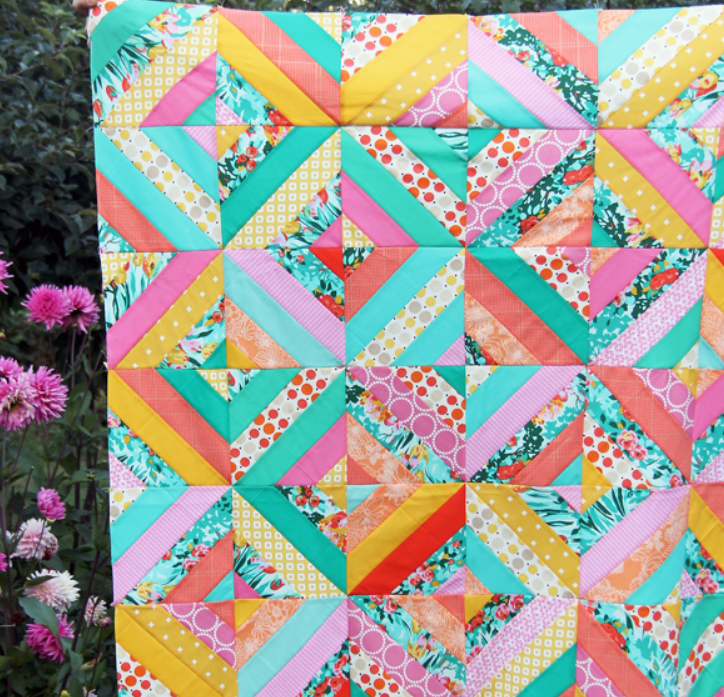
There is something undeniably captivating about a quilt that plays with direction and movement, and the Diagonal Strip Quilt is a perfect example of this dynamic design approach. Unlike traditional straight-set strip quilts, this technique introduces a sense of flow and energy by placing strips at an angle, creating visual interest that feels both modern and timeless. Whether you are an experienced quilter or just beginning your journey, this tutorial will guide you through every step with clarity and confidence.
One of the greatest advantages of a diagonal strip quilt is its versatility. You can use precut strips, leftover fabric scraps, or carefully curated color palettes to achieve completely different effects. From bold, high-contrast layouts to soft, harmonious gradients, this pattern adapts beautifully to your creative vision. It is also an excellent project for improving your strip piecing skills while exploring layout techniques that elevate your quilting craftsmanship.
In this tutorial, you’ll learn how to construct a stunning diagonal strip quilt from start to finish. We will cover fabric selection, cutting, piecing, layout planning, and finishing techniques. By the end, you’ll not only have a beautiful quilt top but also a deeper understanding of how directional design can transform a simple pattern into a striking masterpiece.
Materials
To complete this quilt, you will need:
- 2.5” fabric strips (jelly roll or cut from yardage)
- Rotary cutter and cutting mat
- Large square ruler with a 45° line
- Sewing machine
- Thread (neutral or coordinating)
- Iron and pressing surface
- Pins or clips
- Batting
- Backing fabric
- Binding fabric
Understanding the Tube Method
The tube method is the heart of this pattern. Instead of sewing individual diagonal pieces, you:
- Sew strips into panels
- Join panels into a tube
- Cut diagonally to create blocks
Each tube produces 6 quilt blocks, making it a highly efficient technique .
Step 1: Prepare Your Strips
Start with:
- 6 strips measuring 2½” x width of fabric
Jelly roll strips work perfectly for this pattern and ensure consistency in size.
Step 2: Sew Strip Sets
- Divide your 6 strips into two sets of 3 strips each
- Sew each set together lengthwise
- Press seams open for better accuracy
Pressing seams open reduces bulk and helps your blocks lie flatter later.
Step 3: Create the Tube
Place the two strip sets right sides together, aligning edges.
- Sew along the top and bottom edges
- This forms a closed fabric “tube”
This step is what makes the technique so unique and efficient.
Step 4: Cutting the Diagonal Blocks
Now comes the transformation step:
- Align the 45° line on your ruler with the seam line
- Cut along the edge of the ruler
- Move the ruler to the opposite seam line
- Repeat the process, alternating top and bottom
Continue until the entire tube is cut.
👉 Each tube yields 6 triangular units (blocks)
Step 5: Open and Press Blocks
Carefully open each triangle to reveal the block:
- Press seams open or to one side
- Handle gently—edges are cut on the bias, making them stretchy
Each finished block measures approximately 8¼” square (unfinished)
Step 6: Layout Your Design
Lay out your blocks and experiment with placement:
- Rotate blocks to create zigzag or chevron effects
- Alternate directions for dynamic movement
- Balance colors across the quilt
This is where your creativity truly shines.
Step 7: Assemble the Quilt Top
- Sew blocks together row by row
- Pin at seam intersections for accuracy
- Be gentle with edges to avoid distortion
Don’t worry if some seams don’t align perfectly—the final quilt hides small imperfections beautifully .
Step 8: Stabilize the Edges
A professional tip from the original tutorial:
- Add stay stitching around the entire quilt top
- This prevents stretching during finishing
This step is especially important due to the number of bias edges.
Step 9: Quilt and Finish
Create your quilt sandwich:
- Backing (right side down)
- Batting
- Quilt top
Quilting ideas:
- Straight lines following the strips
- Diagonal echo quilting
- Free-motion for texture
Finish with binding for a polished look.
Quilt Sizes and Requirements
According to the chart in your PDF (page 20):
- Baby: 38½” x 46½” (30 blocks)
- Crib: 46½” x 54½” (42 blocks)
- Small Throw: 54½” x 69½” (63 blocks)
- Large Throw: 62” x 77½” (80 blocks)
- Twin: 69½” x 85” (99 blocks)
Each tube produces 6 blocks, so plan accordingly when cutting your strips.
Important Tips for Success
- Always use a precise ¼” seam allowance
- Press carefully—don’t stretch bias edges
- Use a large ruler with a clear 45° marking
- Work slowly during cutting for accuracy
- Don’t skip stay stitching
The Diagonal Strip Quilt is a perfect combination of efficiency and visual impact. With the tube method, you can create multiple blocks quickly while achieving a sophisticated, modern design. Although the bias edges require a bit of extra care, the final result is absolutely worth the effort.
This pattern is ideal for showcasing colorful fabrics, jelly rolls, or even scrap collections, making it both practical and inspiring for quilters who love bold designs.