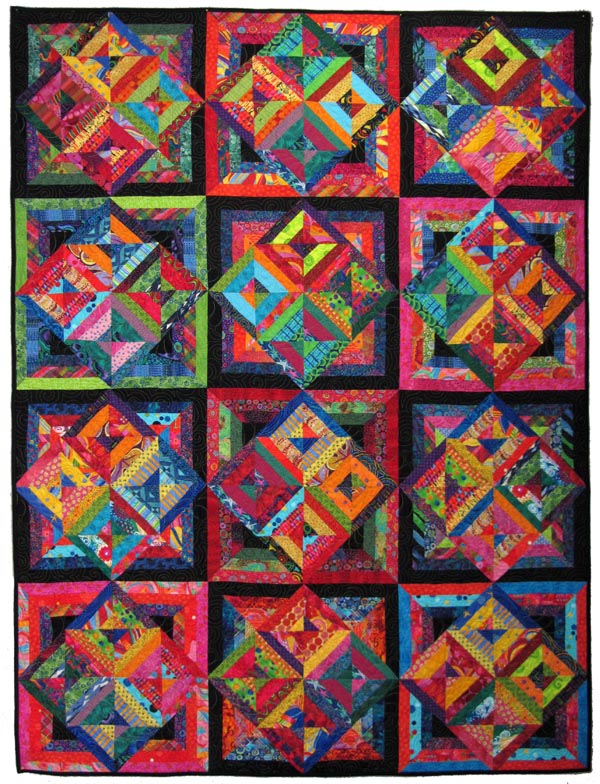
A bright scrap quilt can bring an entire bedroom to life, and the Bouillabaisse quilt is a wonderful example of that effect. Diagonal strips, nested corner shapes, and bold diamonds create a surface full of movement. From a distance, the large geometric shapes stand out. Up close, every small piece of fabric adds another detail to enjoy.
This double-bed adaptation celebrates that lively appearance with a practical, repeated block structure. Each block combines colorful string piecing with dark outer strips, giving the fabrics room to shine while keeping the overall design easy to read. If you have collected batiks, jewel-toned cottons, or favorite printed scraps, this is a project that lets them share the same quilt.
At the end of this article, you will find a place to download the free English PDF guide, including the cutting charts, construction diagrams, quilt layout, and actual-size templates for this version.
The guide accompanying this article is a photo-based adaptation, with independently drafted measurements and instructions. It follows the visual structure of the reference quilts rather than reproducing the original commercial pattern. Fabric placement is intentionally flexible, so your finished quilt will have its own character.
The design uses four rotated quadrants to create each large block. A bright string-pieced square sits toward the block center, two triangular pieces extend the diagonal movement, and a larger log-strip triangle fills the outside corner. The last two strips in that corner are dark, creating a frame that repeats across the quilt.
The pattern has been checked digitally for geometry and quantities, but this adaptation has not been sample sewn. Make one complete test block before cutting all your fabric. That first block is the best opportunity to check your seam allowance, pressing, and printer settings.
Finished Size and Double-Bed Layout
This version uses 20 blocks arranged in four columns and five rows. The nominal finished design measures 80 x 100 inches, or approximately 203 x 254 cm, before allowing for changes caused by quilting and washing.
| Pattern detail | Measurement or quantity |
|---|---|
| Nominal finished design | 80 x 100 inches |
| Approximate metric size | 203 x 254 cm |
| Finished block | 20 x 20 inches |
| Block before joining | 20 1/2 x 20 1/2 inches |
| Block arrangement | 4 across x 5 down |
| Total blocks | 20 |
| Added borders or sashing | None |
On a 54 x 75 inch full mattress, the design gives approximately 13 inches of drop on each side. On a 138 x 188 cm mattress, the side drop is approximately 32.6 cm. Mattress height and your preferred amount of overhang will affect how it looks on the bed, so take those measurements before starting.
The assembled top measures 80 1/2 x 100 1/2 inches before quilting, including the outer seam allowance used for binding. Keeping finished measurements and working measurements separate helps prevent accidental trimming at the final stage.
Choosing Fabrics That Keep the Diamonds Visible
You can include many colors in this quilt, but value contrast gives the design its structure. Deep black, charcoal, or very dark navy works well for the two outside logs. Against those dark strips, turquoise, gold, red, lime, purple, and coral become especially noticeable.
Start by laying out several warm fabrics beside several cool fabrics. Include a mixture of small prints and quieter pieces so every strip does not compete at the same intensity. A busy print can become more useful when it is placed beside a simple tonal fabric that gives the eye somewhere to rest.
You do not need to make every block match. Repeating a few colors throughout the quilt is often enough to connect the composition. For example, a little turquoise in each block can tie together an otherwise varied collection of scraps. The dark corner logs then provide a second, stronger repeated element.
Use quilting cottons of similar weight and remove selvages before measuring. The PDF includes a generous fabric allowance for its oversized string-piecing cuts. Irregular scraps can produce more cutting waste than neatly cut yardage, so review the full cutting chart before deciding whether your collection is large enough.
Understanding the String-Pieced Units
String piecing builds a larger fabric surface from narrow strips. For this adaptation, strips are sewn diagonally over a temporary paper square. The paper supports the fabric while the strips are added and gives you a clear boundary for trimming.
The guide starts with 160 working blanks, each measuring 6 1/2 inches square. Half become the center squares, which are trimmed to 5 1/2 inches before assembly. The other half are cut diagonally to supply the triangular arm pieces.
The triangle trimming step deserves particular attention. A triangle that finishes with two 5 inch perpendicular legs needs extra fabric along its diagonal seam. Cutting a 5 inch triangle, or simply halving a 5 1/2 inch square, will not provide the correct shape for this construction. Use the actual-size T template in the PDF and keep its marked seam endpoints.
For a lively result, change the color sequence between blanks while keeping their strip direction consistent. Variation in color creates the scrappy appearance; consistent geometry allows the pieces to fit together.
Building the Dark-Framed Corners
The larger outside triangle uses foundation paper piecing. Its printed sewing lines control the finished shape as you add a small seed triangle and successive logs. The final two logs are dark and create the distinctive framed corners.
Read the foundation from the printed side and place the fabric against the unprinted side. Before sewing each new strip, flip it into its final position to make sure it covers the entire numbered area and the seam allowance at the perimeter. This quick check helps prevent a short strip from leaving a gap near an acute point.
The large foundation prints on two sheets. Join the paper sheets on their marked registration line before adding fabric. This is a paper assembly step: the finished fabric triangle is sewn as one continuous section.
From Four Quadrants to One Block
After the bright triangle and the outside triangle are joined, each completed quadrant should measure 10 1/2 inches square. Four quadrants rotate around the center to form a 20 1/2 inch unfinished block.
Check the placement before stitching. The dark logs belong at the four outside corners of the block, while the colorful center squares meet in the middle. Turning just one quadrant incorrectly changes the diamond effect, so a quick photograph of your layout can be useful before you carry the pieces to the machine.
Sew the two top quadrants together, then the two bottom quadrants. Join those rows, matching the center and the diagonal point intersections. Press with care and measure the block before making the remaining nineteen.
Arranging and Finishing Your Quilt
Lay out all 20 blocks before joining them into rows. Look for areas where several very light, very dark, or strongly warm blocks sit together. Moving one or two blocks can distribute those areas more evenly without making the quilt feel overly planned.
There are no separate black sashing strips in this version. The framing is already part of the blocks. Adding extra strips between them would change the planned measurements and the way the shapes connect.
For quilting, a loose allover curve or meander can suit the busy surface. Echoing selected large diamonds is another option, provided the stitching does not pull on the diagonal seams. Follow the spacing requirements of your chosen batting, and keep the layers supported as you work.
A dark binding gives the edge a clear finish and repeats the framing inside the quilt. The PDF includes binding calculations, backing options, and a checklist to help you move from the completed top to the finished quilt.
Download the Free Bouillabaisse Quilt PDF
Ready to plan your own colorful double-bed quilt? The free English PDF contains 22 pages with:
- Fabric allowances and a complete cutting schedule for this adaptation.
- Diagrams for string piecing, triangular units, quadrants, and blocks.
- A numbered layout for all 20 blocks.
- Actual-size foundation and trimming masters with 1 inch scale checks.
- Backing, batting, binding, troubleshooting, and project-tracking information.
Print the template pages at 100% / Actual Size, with automatic fitting and shrinking disabled. Measure the test squares with a ruler before cutting fabric, then make your test block to confirm the construction.
Download the Free Bouillabaisse Quilt PDF
The pleasure of a Bouillabaisse-style quilt is in the relationship between small fabric choices and large geometric shapes. A narrow strip that seems ordinary on its own can become the accent that makes a diamond stand out. As those small decisions repeat across the bed, the quilt develops a rich and personal appearance.
Take your time with the first block, keep the measurements beside your machine, and enjoy arranging the colors. With accurate trimming and a thoughtful balance of bright fabrics and dark corners, this adaptation offers a clear plan for turning a varied fabric collection into a generous quilt for a double bed.