The Boho Starburst Quilt Pattern brings together the precision of star piecing and the richness of floral fabric. A small star shines at the center, surrounded by diamonds, framed flowers and long cream points. Turquoise and navy give the design depth, while touches of red and gold carry the eye around the quilt.
Look closely, and the arrangement reveals several layers. The framed floral squares seem to float between the points, and the dark background helps each light shape stand out. It is a quilt with enough detail to reward a second look, whether displayed on a wall or spread across a bed.
Boho Starburst was designed by Patti Carey of Patti’s Patchwork. The reference quilt features Northcott’s Boho Blooms fabrics. You can find the designer’s original pattern through Patti’s Patchwork. The illustrated guide offered near the end of this article is an independent reconstruction based on the supplied images.
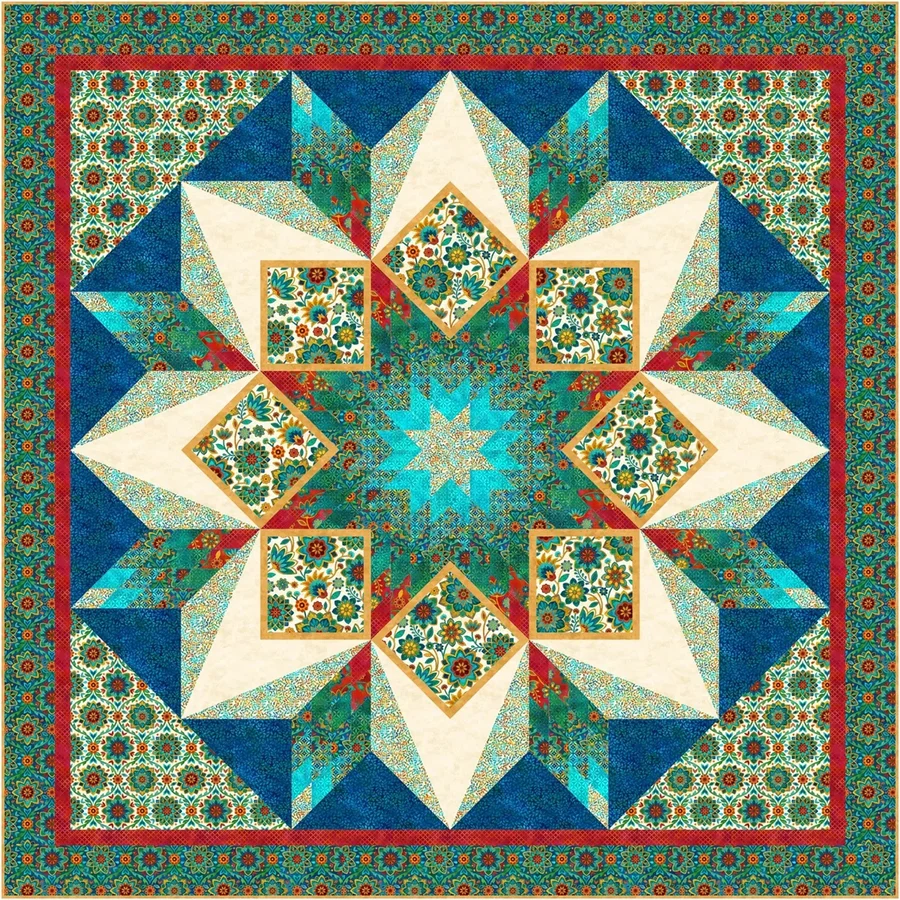
The center draws on the familiar appeal of a Lone Star: small diamonds repeat in a planned color sequence, creating bands that radiate outward. Here, that movement continues through a ring of floral squares and split diamonds, giving the star a more elaborate outline.
Eight gold-framed floral blocks provide resting places among the angled seams. Their alternating orientations add rhythm, while the cream points create clear paths through the busier prints. Navy setting triangles and floral corners bring the composition back to a square before the borders are added.
This balance explains why fabric placement matters. The light points define the star, the dark settings separate its edges, and the floral blocks give the eye something recognizable to return to.
Quilt Sizes and Skill Level
The design is presented in three square sizes. Patti’s Patchwork
| Version | Nominal finished size | Possible use |
|---|---|---|
| Wall | 46 × 46 inches | Wall display |
| Throw | 70 × 70 inches | Sofa quilt or generous lap quilt |
| King | 114 × 114 inches | Large bed quilt |
For a bed quilt, measure the mattress and decide how much drop you want before choosing a size. A size name alone cannot determine the fit.
This is an intermediate to advanced quilting project. Diamond piecing, bias edges and inset seams require careful marking and a steady sewing pace. The smaller version uses less fabric, but its smaller pieces still call for accurate work.
Choosing Fabrics That Preserve the Design
Start with the relationship between light and dark. Cream points against navy settings give this quilt much of its definition. If those two areas become too similar in value, the star’s outer shape can be harder to read.
Next, choose a focus floral for the eight framed blocks. Preview a cut-size window over the fabric before cutting: a flower that looks beautiful across the yardage may land awkwardly inside a smaller square. If you want the same motif centered in every block, allow extra fabric for the repeat.
The diamond units bring several coordinating fabrics into the composition. Arrange them in the planned order and photograph the selection before sewing. A grayscale view can help you notice where neighboring fabrics blend together, although the final decision should also account for their colors and print scales.
Gold frames and a narrow red inner border echo details from the floral fabrics. Keeping these accents relatively consistent helps connect the center, focus blocks and outer border.
How the Piecing Comes Together
The accompanying reconstruction uses sixteen gradient diamond units, each containing a four-by-four arrangement of small diamonds. Eight units form the central star, and eight sit farther out in the design. Together, they contain 256 small diamonds.
Making these repeated units as a separate stage helps keep the work organized. Label the completed pieces and check their orientation against the placement map. In the guide, the pale ends point inward on the central units and outward on the outer units.
The eight floral centers are framed before they enter the star. The cream points are also prepared separately: each split diamond combines two large triangles, and left and right versions must follow the diagrams.
Once those units are ready, the quilt grows outward in stages. The framed squares enter the central bays, followed by the split points, outer diamond units, navy settings and floral corners. This order gives each inset seam a clear place in the assembly.
Preparing for Accurate Diamond Piecing
Print the templates at 100% or Actual Size, then measure the one-inch test square. Check it before tracing or cutting fabric. The long triangle templates span several sheets, which must be joined using their printed trim frames.
The guide’s templates already include a quarter-inch seam allowance. Transfer the sewing dots to the wrong side of every angled piece; those dots identify where the sewing lines meet. Long raw tips can extend beyond them, so matching the tips alone will not establish an accurate seam.
Make one gradient unit and one split unit first. Check their sewing dimensions and compare their orientation with the diagrams before cutting the remaining fabric. A small adjustment at this stage is easier to manage than an error repeated throughout the quilt.
Handle the angled edges gently during sewing and pressing. Support the fabric on the ironing surface and lift the iron between positions to limit distortion.
Working Through the Inset Seams
The inset seams allow squares and diamonds to fit into the spaces around the star. The key is to sew to the marked junction while keeping the neighboring seam allowances free.
Sew one arm of the junction, stop at the dot and reposition the fabric for the next arm. Fold the completed section away so it cannot become caught in the new seam. Check the front for a tuck or gap before continuing.
Give crowded intersections extra attention. Pin through the sewing dots first, then align the edges. If a unit does not fit its space, check its dimensions and seam placement before trying to ease it into position.
Borders, Quilting and Finishing
After the corners are attached and the center is squared, the narrow inner border gives the star a clear frame. The wider floral border repeats the character of the focus blocks and carries color to the quilt’s edges.
Measure through the center when fitting border strips. In this reconstructed version, the outer border begins oversized and is trimmed evenly to reach the selected top size. Follow the guide’s checkpoints, since these calculated border measurements belong to its construction method.
When planning the quilting, consider how the stitching will support the dense piecing and framed flowers. Choose a spacing suitable for the batting and distribute it across the quilt. Gold binding can repeat the block frames and complete the border.
Download the Illustrated PDF Guide
The 28-page Boho Starburst Quilt PDF Guide includes fabric quantities, cutting charts, a labeled placement map, assembly diagrams and full-size templates for the Wall, Throw and King versions. It also explains the marked-seam method, inset junctions, borders and finishing.
This is an independent, image-based reconstruction with calculated measurements. Its geometry has been checked, and it has not yet been sewn as a physical test quilt. Use the yardages supplied in this guide for its template-cut method, and make sample units before cutting the full project.
Download the Boho Starburst Quilt PDF
The appeal of the Boho Starburst Quilt Pattern lies in the way its details work together: small diamonds create movement, floral blocks introduce recognizable motifs, and cream points give the star its shape.
Approach the quilt one group of units at a time. Careful labeling, checked dimensions and patient work at the junctions will help you keep track of the design as the star grows outward.