A row of pointed hats, soft ivory beards, and slender birch trees makes this Christmas gnome quilt pattern a cheerful project for the holiday season. Cranberry red and evergreen fabrics give the woodland scene a traditional Christmas palette, while pale backgrounds keep each little gnome easy to see. The cropped motifs along the side edges make the forest appear to continue beyond the quilt.
The Christmas Gnome Forest design measures 56 × 72 inches and combines foundation paper piecing with fusible raw-edge appliqué. Its six rows follow a numbered layout, so you can work on one block at a time and still keep the whole composition organized. You will find the free PDF pattern at the end of this article, including cutting sizes, full-size foundations, tree templates, and assembly instructions.
This version was reconstructed from the supplied reference photographs and recolored for Christmas. The construction and templates were newly drafted; they are not the original designer’s instructions. The measurements and template geometry have been checked digitally, but the project has not been sample-sewn. Make one gnome and one tree before cutting all your fabrics.
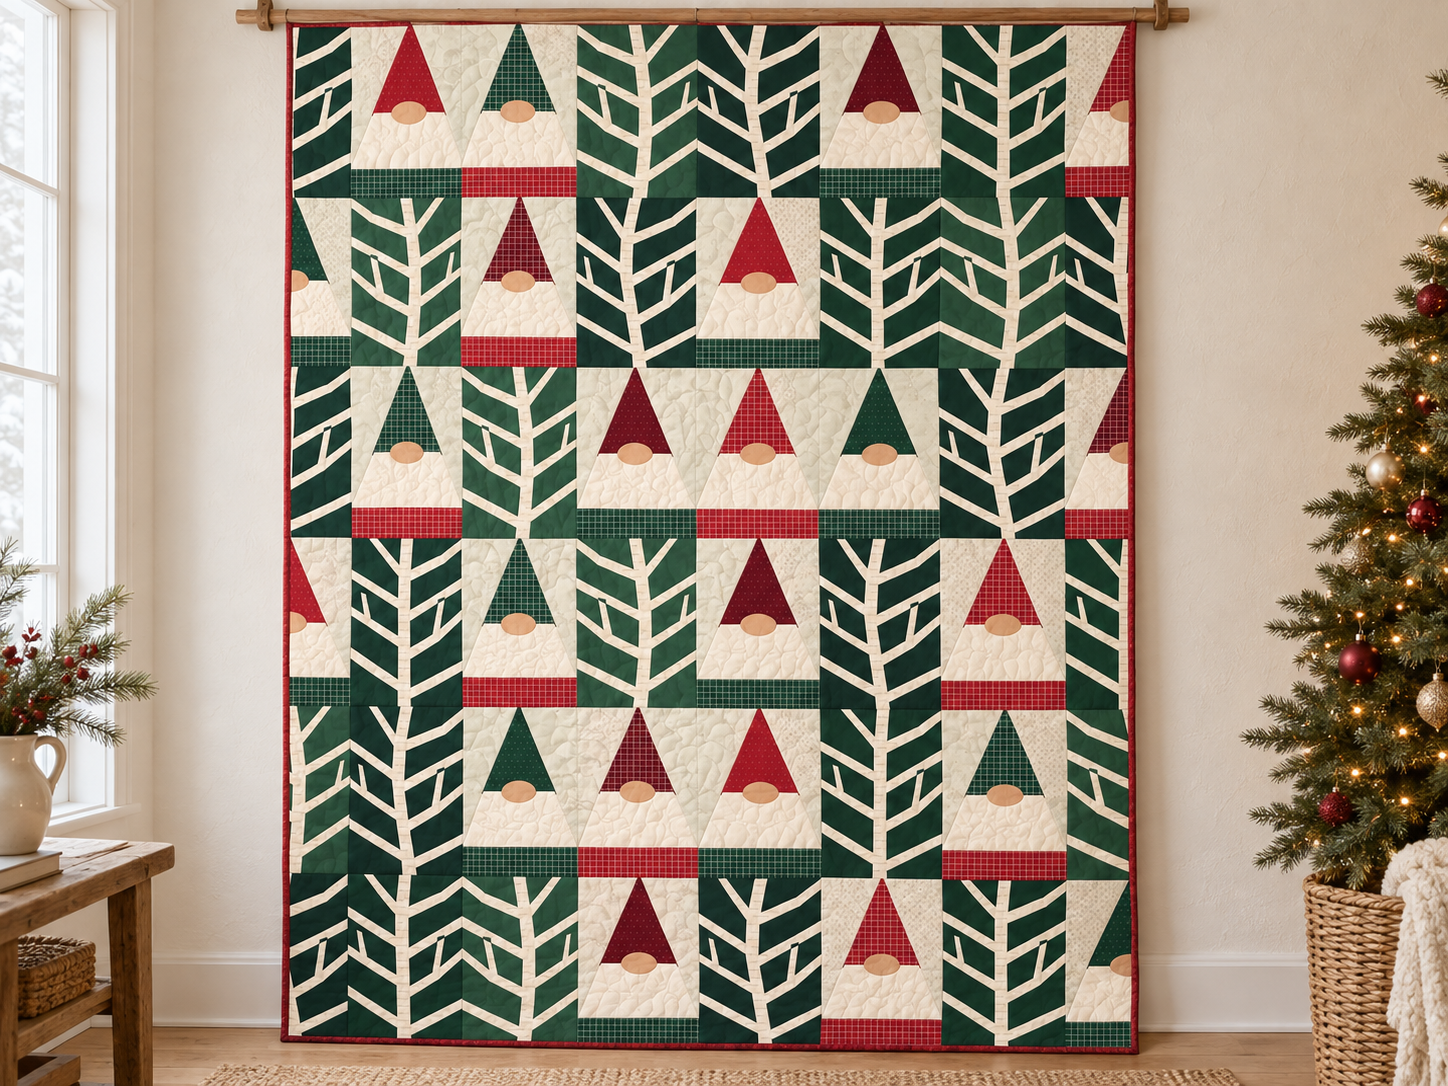
The design uses two different kinds of blocks. The gnomes have tall triangular hats, simple trapezoid beards, oval noses, and rectangular body bands. The trees are bare cream birches against rich green backgrounds. Keeping the tree silhouettes light gives the quilt contrast without adding another bright color.
For the hats, repeat cranberry, forest green, and burgundy. Small dots, quiet checks, and tiny seasonal prints work well at this scale. Use green and red checks for the body bands, then choose ivory beard fabrics with subtle texture. A pale sage background adds a little separation around the beards while staying within the Christmas palette.
The birch blocks are just as important as the gnomes. Their branching lines create movement between the figures, especially where two trees sit together. Cream prints with small tan markings can suggest birch bark without requiring extra fabric pieces. You can also add a few short stitches to the trunks after appliquéing them.
Quilt Size and Skill Level
| Feature | Measurement or detail |
|---|---|
| Design grid | 56 × 72 inches / approximately 142.2 × 182.9 cm |
| Assembled top before quilting | 56½ × 72½ inches, including the outer seam allowances |
| Full block | 8 × 12 inches finished; 8½ × 12½ inches unfinished |
| Cropped edge block | 4 × 12 inches finished; 4½ × 12½ inches unfinished |
| Blocks made before cropping | 23 gnomes and 25 birches |
| Layout | Six rows, with six full blocks and two half-width edge blocks in each row |
| Techniques | Foundation paper piecing, fusible appliqué, straight-seam assembly |
| Suggested experience | Confident beginner with some foundation paper piecing practice |
The 56 × 72 inch figure describes the planned design rectangle. After quilting, trim to that size if enough fabric remains. Quilting and washing can reduce the final dimensions, so record the actual finished size rather than stretching the quilt to meet a target.
Materials
The fabric allowances below assume at least 40 inches of usable width after removing selvages. Foundation patches are intentionally generous, and the edge blocks are made at full size before cropping. Allow additional fabric for shrinkage, directional prints, or large repeats.
| Fabric or supply | Amount |
|---|---|
| Pale sage or light cream gnome background | 2½ yards |
| Evergreen tree backgrounds | 2¾ yards total |
| Cream birch fabrics | 2¾ yards total |
| Ivory beard fabrics | 1 yard |
| Hat fabrics | 1½ yards total: ½ yard each of cranberry, forest green, and burgundy |
| Red and green body-band fabrics | ⅝ yard total |
| Peach or tan nose fabric | ¼ yard |
| Cranberry binding fabric | ¾ yard |
| Backing fabric, 40 inches usable width | 4¾ yards |
| Batting | 64 × 80 inches |
| Lightweight paper-backed fusible web | 3 yards at 36 inches wide, or 5 yards at 18 inches wide |
| Foundation paper | 23 copies each of the hat and beard foundations |
You will also need piecing thread, matching appliqué thread, an iron, a pressing sheet, a rotary cutter and mat, an accurate ruler, pins, and a removable fabric marker. Choose a lightweight fusible web because the trees cover a substantial part of their background blocks.
Abbreviations and Pattern Notes
- FPP: foundation paper piecing.
- WOF: usable width of fabric after removing selvages.
- RST: right sides together.
- Finished: the design area after adjoining seam allowances are taken up.
- Unfinished: the raw measurement before a block is sewn into the quilt.
Use a ¼ inch seam allowance unless a step specifies otherwise. Fabric cuts in the chart already include the required allowances. Do not add seam allowance to the nose or tree templates. The tree ends that meet a block boundary already extend through the block’s outer ¼ inch margin.
Cutting Overview
| Piece | Quantity | Cut size |
|---|---|---|
| H1 hat patch | 23 | 7 × 8 inches |
| H2/H3 hat background patches | 46 | 5½ × 8 inches |
| B1 beard patch | 23 | 9 × 5 inches |
| B2/B3 beard background patches | 46 | 3½ × 5 inches |
| D body band | 23 | 8½ × 2½ inches |
| Tree background | 25 | 8½ × 12½ inches |
| Cream tree silhouette | 25 | Trace from the joined templates within an 8½ × 12½ inch fabric area |
| N nose | 23 | Trace the 2¼ × 1½ inch oval template |
| Binding strips | 8 | 2½ × 40 inches usable |
| Backing lengths | 2 | 40 × 80 inches |
Make nine Birch A silhouettes, eight Birch B silhouettes, and eight Birch C silhouettes. The PDF includes a cutting plan and lists every block by number so you can keep the variants in order.
Step 1: Print and Check the Templates
Print the foundations and appliqué masters at 100% or Actual Size. Do not use Fit to Page or Shrink Oversized Pages. The hat, beard, and tree pages are landscape; the nose and calibration page are portrait. Use the page’s orientation when printing.
Measure the one-inch calibration line before printing multiple copies. The PDF also includes a one-inch square and a two-inch line. If a measurement is wrong, correct the printer settings first. Changing the seam allowance will not correct a scaled template.
Each tree master occupies two pages. Join its upper and lower tiles at the red registration line, matching the two crosshairs and the outline. The overlap is for alignment and does not add to the tree’s height. The completed raw footprint must measure 8½ × 12½ inches.
Step 2: Piece the Gnome Hats
Start with the H foundation. Place the hat fabric against the unprinted side, with its wrong side facing the paper. It must cover H1 and extend sufficiently beyond the sewing boundaries. Add the two pale background patches in the printed order: H1, H2, H3.
Before sewing each new patch, temporarily flip it across its seam and hold the paper to the light. Check that the fabric will cover its entire numbered section and its allowances. Return it to the sewing position, sew on the printed line, and press it open without pulling on the fabric.
Trim only after all three sections are attached. The completed hat unit should measure 8½ × 6½ inches, using the outer solid rectangle on the foundation. The inner dashed rectangle marks the finished seam lines.
Step 3: Add the Beard and Body Band
Make the B unit in the same way, starting with the ivory beard and then adding the two matching background patches. Trim it to 8½ × 4½ inches. Keep the background fabric consistent between the hat and beard sections so the two units read as a single block.
Join the hat unit to the beard unit, matching the center marks and both diagonal seam intersections. The combined unit should measure 8½ × 10½ inches. Check from the front that the hat’s outer slopes continue smoothly into the sides of the beard.
Add an 8½ × 2½ inch body band to the bottom. The full gnome block now measures 8½ × 12½ inches. Remove the foundation paper carefully while supporting the stitches. Make all 23 gnomes at full size, including those that will become cropped edge blocks.
Step 4: Place the Oval Noses
Trace the nose onto the paper side of fusible web, fuse it to the wrong side of peach fabric, and cut on the outline once it has cooled. Follow the fusible manufacturer’s pressing instructions.
Center each nose over the hat-to-beard seam. Measured from the raw block’s upper-left corner, its center is 4¼ inches across and 6¼ inches down. The oval is 2¼ inches wide and 1½ inches high. Fuse it in place, then stitch around the exposed edge with a small blanket stitch or narrow zigzag.
Add a whole nose to every gnome before cropping. This keeps the half-noses at the outside edges aligned with the rest of the design.
Step 5: Make the Birch Blocks
The supplied birch cutting masters are already mirrored for tracing onto fusible paper. Trace the joined silhouette, fuse it to the wrong side of cream fabric, and cut it as one connected shape. Support the thinner branches while removing the paper backing.
Position the tree on its evergreen background. The trunk and branch ends that reach the perimeter align with the background’s raw edges. The dashed finished-block box on the master sits ¼ inch inside that perimeter.
Fuse carefully and stitch all exposed internal edges. Branch ends that touch the raw perimeter will be enclosed by a seam or the binding; baste them close to the raw edge to keep them secure while handling. Check that each completed tree block remains 8½ × 12½ inches.
Step 6: Crop the Edges and Sew the Rows
The PDF identifies the twelve edge blocks. For a block on the quilt’s left edge, retain the right-hand 4½ inches of the raw block. For a block on the quilt’s right edge, retain the left-hand 4½ inches. In both cases, remove exactly four inches from the opposite side.
Do not cut the full block exactly in half. Half of an 8½ inch block is only 4¼ inches, which would make the row too short. The retained width needs the additional allowance at the new outside edge.
Arrange the pieces using the numbered row map. Sew each row with accurate ¼ inch seams. A completed row should measure 56½ × 12½ inches. Join the six rows in order to create a top measuring 56½ × 72½ inches before quilting. Match the block grid; the irregular branches do not have to connect across the row seams.
Step 7: Quilt and Bind
Join the two backing lengths along their 80 inch edges using a ½ inch seam, press that seam open, and trim the backing to 64 × 80 inches. Layer it with the batting and quilt top, then baste from the center outward.
Quilting along the block seams first can help stabilize the layout. Add gentle curves to the beards, echo lines near the hats, or relaxed vertical lines in the green tree backgrounds. Keep the quilting density reasonably balanced and follow the batting maker’s maximum spacing requirements.
After quilting, square the piece to 56 × 72 inches if enough fabric remains. Otherwise, square to the largest true rectangle available. Join the eight binding strips with diagonal seams, press the strip in half lengthwise, and attach it with a ¼ inch seam. Miter the corners, join the ends, and secure the folded binding to the back.
Making the Quilt Your Own
You can vary the prints while keeping the same contrast: pale gnome backgrounds, ivory beards, cream birches, and deep green forest panels. That light-dark relationship makes the figures readable even when the quilt is viewed across a room. If you use busy Christmas prints, reserve them for the hats and body bands, where a small amount of detail is enough.
For a softer holiday look, choose faded cranberry, muted evergreen, and warm cream. For a brighter version, use clear Christmas red and a deeper green. Keep the oval noses in a shade that stands apart from the beards; a little contrast helps preserve the gnomes’ simple faces.
Once finished, the quilt can bring a woodland theme to a reading corner, guest room, or seasonal wall display. A room with plain cushions and simple greenery lets the repeating trees and little hats remain the focus. The pattern’s narrow binding gives the busy forest a neat finish without adding another large frame.
Christmas Gnome Quilt Pattern PDF
The 24-page PDF includes the fabric requirements, complete cutting chart, Christmas color plan, numbered row map, FPP instructions, full-size hat and beard foundations, nose template, three tiled birch masters, quilting guidance, and troubleshooting notes.
Begin with a test gnome and a test tree, check your template scale, and work through the numbered blocks at a comfortable pace. The repeated units make it easy to divide the project into small sewing sessions as your Christmas forest takes shape.