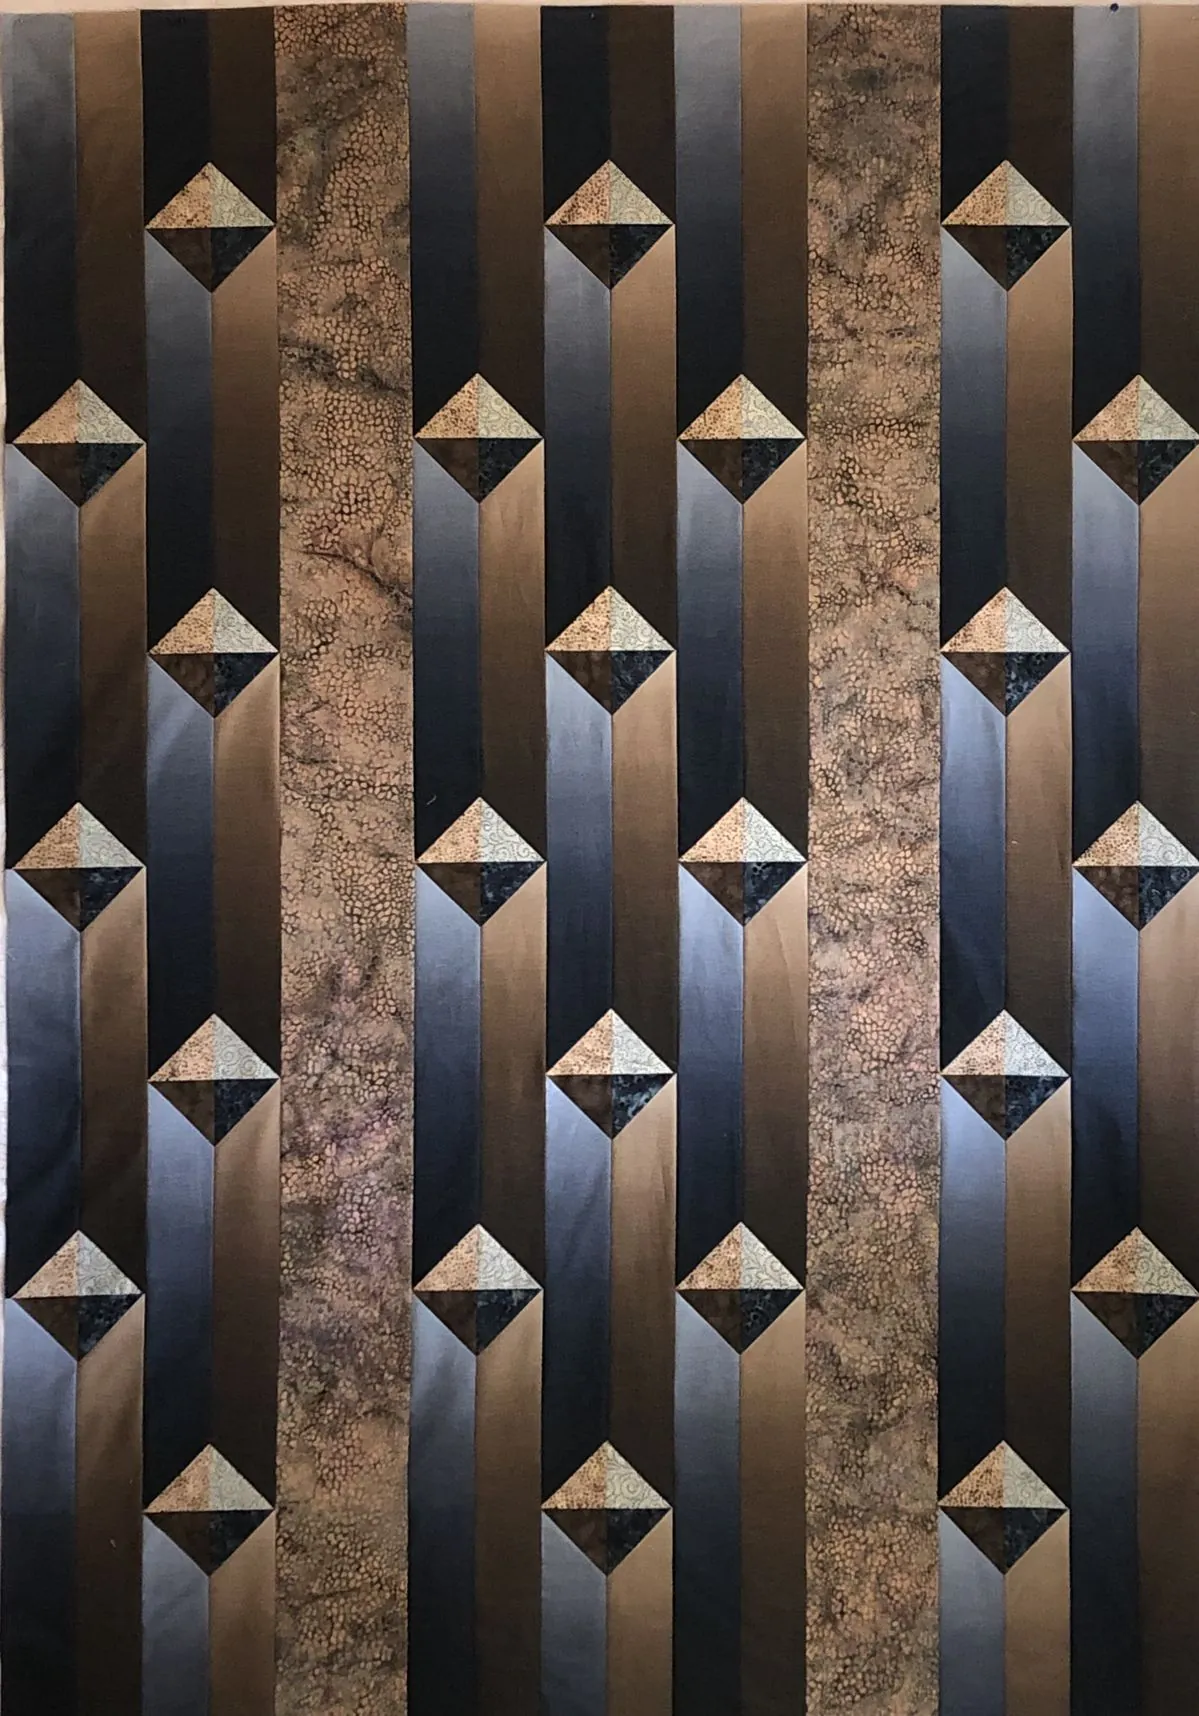
The Gentlemen’s Quilt Pattern combines elegant vertical stripes with carefully placed diamond blocks to create a sophisticated and modern design. The neutral palette of brown, charcoal, camel, cream, gray, and mottled prints gives the quilt a warm, masculine appearance, but the layout can easily be adapted to other color combinations.
Despite its detailed appearance, this quilt is constructed with straight seams and half-square triangles. No templates, paper piecing, or difficult Y-seams are required. The quilt top is assembled in horizontal bands, making it easier to maintain the continuous vertical stripes and position the floating diamonds accurately.
This project is suitable for confident beginners who understand basic rotary cutting, accurate quarter-inch seams, and half-square triangle construction.
At the end of this article, you can download the free Gentlemen’s Quilt Pattern PDF, which includes the complete cutting chart, block diagrams, row maps, full-color quilt layout, assembly instructions, and planning sheet.
Gentlemen’s Quilt Details
- Pattern name: Gentlemen’s Quilt Pattern
- Skill level: Confident beginner
- Finished size: Approximately 54″ × 78″
- Unfinished quilt top: 54½” × 78½”
- Diamond block size: 6″ finished
- Number of diamond blocks: 24
- Diamond rows: 7
- Construction: Horizontal bands
- Main techniques: Strip piecing and half-square triangles
- Seam allowance: ¼” throughout
The finished dimensions make this quilt an excellent throw for a sofa, reading chair, guest room, or single bed.
Materials and Fabric Requirements
The following fabric estimates are based on approximately 40″ of usable fabric width and include a small cutting allowance.
Quilt Fabrics
- ¾ yard light gray fabric
- ¾ yard camel or golden-tan fabric
- ¾ yard charcoal fabric
- ¾ yard brown fabric
- 1½ yards mottled feature print
- ½ yard cream print for the upper diamond sections
- ⅓ yard dark brown fabric for the lower-left diamond sections
- ⅓ yard slate-gray fabric for the lower-right diamond sections
- ½ yard binding fabric
- 5 yards backing fabric
- Batting measuring at least 60″ × 84″
If you are using directional fabrics, an ombré print, or a fabric with a large repeat, consider purchasing additional yardage.
Recommended Quilting Tools
- Sewing machine
- Quarter-inch presser foot
- Rotary cutter
- Self-healing cutting mat
- Long acrylic quilting ruler
- Square ruler measuring at least 6½”
- Fabric marking pencil
- Neutral cotton thread
- Pins or sewing clips
- Iron and pressing surface
- Design wall or another large layout surface
Abbreviations Used in the Pattern
- HST: Half-Square Triangle
- RST: Right Sides Together
- WOF: Width of Fabric
All measurements include seam allowances unless the instructions specifically state that a measurement is finished.
Choosing Fabrics for the Gentlemen’s Quilt
The original color palette relies on warm neutrals and strong value contrast. The background is created from narrow light gray, camel, charcoal, and brown strips. A wider mottled print separates the repeated stripe groups.
The diamond blocks introduce three additional fabrics:
- A light cream print for the upper half
- A dark brown fabric for the lower-left section
- A slate-gray fabric for the lower-right section
For the clearest result, make sure the cream fabric is lighter than the surrounding stripes. The two lower diamond fabrics should also be different enough from each other to keep the divided diamond shape visible.
Solid fabrics, subtle textures, tonal prints, batiks, and small-scale patterns are all excellent choices. Avoid using several busy prints together, as they may make the diamond points difficult to see.
Understanding the Quilt Layout
The Gentlemen’s Quilt is 54″ wide and contains three repeated vertical sections.
Each section finishes at 18″ wide and contains:
- One 3″ light gray stripe
- One 3″ camel stripe
- One 3″ charcoal stripe
- One 3″ brown stripe
- One 6″ mottled feature stripe
The complete sequence is repeated three times across the quilt.
The quilt’s 78″ length is divided into diamond rows and spacer bands. Seven diamond rows are separated by six internal spacer bands. Wider spacer bands are added at the top and bottom to frame the design.
This construction keeps the background stripes continuous while allowing the pieced diamonds to appear as if they are floating across the quilt.
Making the Half-Square Triangles
The 24 diamond blocks are constructed from a total of 96 HST units. Each finished diamond block contains four HSTs.
To make two matching HST units:
- Place two 4″ fabric squares right sides together.
- Draw a diagonal line from one corner to the opposite corner on the wrong side of the lighter square.
- Sew a quarter-inch seam on both sides of the marked line.
- Cut directly along the marked diagonal line.
- Open the two units and press the seams toward the darker fabric.
- Trim each HST to exactly 3½” square.
Trimming is an important step. Even a small difference between HST sizes can affect the diamond points and make the horizontal rows difficult to join accurately.
Assemble the Diamond Blocks
Each diamond block finishes at 6″ and measures 6½” square before being sewn into the quilt.
The four HST units are arranged as follows:
- Two cream-print triangles form the upper diamond
- One dark brown triangle forms the lower-left section
- One slate-gray triangle forms the lower-right section
- The exterior corner triangles match the background stripes surrounding that particular block
The pattern uses three background variations:
- 6 diamond blocks with light gray and camel background corners
- 12 diamond blocks with charcoal and brown background corners
- 6 diamond blocks with mottled-print background corners
To assemble each block:
- Arrange the four HST units according to the block diagram.
- Join the two upper HSTs.
- Join the two lower HSTs.
- Press the center seams in opposite directions.
- Nest the seams and join the upper and lower halves.
- Press the completed block carefully.
- Confirm that the block measures 6½” square unfinished.
The cream section should always point upward. The dark brown section should point toward the lower left, and the slate-gray section should point toward the lower right.
Construct the Diamond Rows
There are two different diamond-row arrangements in the pattern.
Row X
Row X contains three diamond blocks positioned within the charcoal and brown stripe pairs.
Make four identical Row X bands. These will become diamond rows 1, 3, 5, and 7.
Row Y
Row Y contains four diamond blocks. Two are positioned within light gray and camel stripe pairs, while two use the mottled-print background.
Make three identical Row Y bands. These will become diamond rows 2, 4, and 6.
Each row is assembled from nine units measuring 6½” square before sewing. When completed, every diamond row should measure approximately 54½” × 6½” unfinished.
Use the detailed Row X and Row Y diagrams in the PDF to check the placement of every block.
Make the Spacer Bands
The spacer bands continue the vertical stripe arrangement between the diamond rows.
For every spacer band, repeat the following sequence three times:
- Light gray strip
- Camel strip
- Charcoal strip
- Brown strip
- Wide mottled-print strip
Make:
- Two spacer bands measuring 6½” high for the top and bottom
- Six spacer bands measuring 4½” high for the internal spaces
After sewing, these bands finish at 6″ and 4″ high.
Press the vertical seams consistently and verify that each completed band measures 54½” wide before continuing.
Assemble the Quilt Top
Arrange the horizontal bands from top to bottom in the following order:
- Top 6″ spacer
- Diamond Row X
- Internal 4″ spacer
- Diamond Row Y
- Internal 4″ spacer
- Diamond Row X
- Internal 4″ spacer
- Diamond Row Y
- Internal 4″ spacer
- Diamond Row X
- Internal 4″ spacer
- Diamond Row Y
- Internal 4″ spacer
- Diamond Row X
- Bottom 6″ spacer
Before sewing, stand back and inspect the complete arrangement. Make sure the stripe colors continue vertically through each band and that every cream diamond section points upward.
Pin at the vertical stripe seams and at the diamond points. Sew the bands together with an accurate quarter-inch seam allowance.
Press the long horizontal seams toward the spacer bands whenever possible.
The completed quilt top should measure approximately 54½” × 78½” unfinished.
Tips for Accurate Results
- Make one test HST before chain piecing all the units.
- Trim every HST to 3½” square.
- Label the three diamond block variations separately.
- Mark Row X and Row Y immediately after assembling them.
- Keep the full-color diagram near your sewing machine.
- Check that the vertical stripe order remains consistent.
- Pin carefully where the stripe seams intersect.
- Press the fabric instead of moving the iron back and forth.
- Measure each completed band before joining the quilt top.
- Correct small measurement differences before adding the next row.
Quilting Suggestions
Straight-line quilting is especially effective for this pattern because it reinforces the long vertical movement of the background stripes.
You could quilt:
- Vertical lines spaced 1″ apart
- Lines centered inside each stripe
- Gentle wavy lines running from top to bottom
- Echo quilting around the diamond shapes
- A simple geometric grid
- An all-over meandering design
- A subtle woodgrain quilting motif
For a softer and more traditional appearance, use a neutral thread that blends with all the fabrics. For a modern finish, choose a contrasting thread that emphasizes the vertical quilting lines.
Binding and Finishing
Once the quilting is complete:
- Trim the batting and backing even with the quilt top.
- Join seven 2½” binding strips with diagonal seams.
- Press the binding strip in half lengthwise, wrong sides together.
- Attach the binding to the front of the quilt using a quarter-inch seam.
- Miter each corner carefully.
- Fold the binding over the raw edges.
- Finish the binding by hand or machine.
Add a quilt label containing the pattern name, maker’s name, location, and completion date.
Alternative Color Ideas
The striped construction makes this pattern easy to personalize.
Consider using:
- Navy, denim blue, gray, and cream
- Forest green, olive, brown, and beige
- Burgundy, charcoal, tan, and black
- Rust, gold, chocolate, and ivory
- Black, white, silver, and gray
- Deep purple, taupe, cream, and plum
- Scrappy flannels in coordinating neutral shades
The design can also work with brighter colors. Turquoise, orange, lime green, and navy would create a playful contemporary version.
A planning sheet is included in the free PDF so you can record your fabric selections before cutting.
Final Thoughts
The Gentlemen’s Quilt is an excellent choice for anyone who enjoys modern geometric designs with clean lines. Its continuous vertical stripes create visual height, while the floating diamond blocks add movement and contrast.
Download the free Gentlemen’s Quilt Pattern PDF for the complete fabric requirements, cutting chart, HST instructions, diamond block diagrams, Row X and Row Y maps, full-color quilt layout, finishing directions, and project planning sheet.
The construction is much easier than the finished quilt suggests. By dividing the design into horizontal bands and using clearly labeled diamond rows, you can assemble the entire top with standard straight seams.
Choose fabrics with good contrast, trim the HSTs carefully, and check each row against the complete diagram. These simple steps will help you produce crisp diamond points and beautifully aligned stripes.