Sunbonnet Sue, Calendar Girl Quilt Pattern

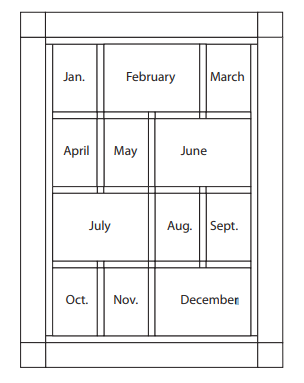
Quilting enthusiasts and history buffs alike are drawn to the timeless charm of the Sunbonnet Sue quilt pattern. This beloved design has stood the test of time, and when paired with the Calendar Girl theme, it becomes a truly enchanting project that captures the essence of bygone eras. In this tutorial, we’ll explore the rich history of Sunbonnet Sue and guide you through creating your very own Calendar Girl quilt.

Sunbonnet Sue, a character whose origins can be traced back to the late 19th century, is a classic quilt design that has captivated generations of quilters. The character is typically portrayed wearing a sunbonnet and a simple dress, exuding a sense of innocence and nostalgia.

Over the years, Sunbonnet Sue has taken on various forms and styles, making her a versatile muse for quilters seeking to infuse their projects with a touch of vintage charm.

Sunbonnet Sue, Calendar Girl Quilt Pattern

FABRIC REQUIREMENTS

Assorted fabrics with seasonal themes
Fat quarters (18″ x 22½″) or fat eights of 12
different black and white prints for block
backgrounds
⅜ yard black print for sashing strips
Assorted bright scraps for border corner stones
and sashing squares
¼ yard colorful stripe for first border
1 yard bright print for second border and binding
1⅜ yards fabric for backing
Batting larger than 36″ x 48″

Cutting Background and Sashing Pieces:

To begin your quilt project, cut the background and sashing pieces according to the following dimensions. The eight small rectangles should be cut to 6½″ x 9½″, while the four large rectangles should measure 13½″ x 9½″. Consider cutting the background pieces slightly larger and trim to the exact size later for precision.

For the sashing strips, cut 1½″ wide strips. Prepare 12 horizontal strips measuring 1½″ x 6½″ and 8 vertical strips measuring 1½″ x 9½″. In the areas where the sashing strips intersect, you can either use 1½″ squares to match or opt for alternate colors for added visual appeal.

Even if you cut all background fabrics and sashing strips at once, it’s recommended to fuse one section at a time before joining them together.

Diagram

Fusing Instructions:

For fusing, we recommend using Shades’ SoftFuse, known for its soft and pliable nature. Follow these steps:

  1. Draw patterns on the paper side of the paper-backed fuse web, leaving at least ¼″ to ½″ between pieces. Note that the finished images will face the opposite direction from what is drawn.
  2. Following the manufacturer’s instructions, fuse all shapes to the wrong side of the appropriate fabric.
  3. Cut out the shapes along the drawn lines.
  4. Arrange the Sue and Sam shapes on the background rectangles. Tracing the positioning diagrams on a see-through gridded non-woven fabric can be helpful.
  5. When joining the units and sashing strips, you may choose to fuse some images to overlap onto the sashing strips.
  6. Once satisfied with the block’s appearance, remove the paper backing and permanently fuse the pieces in place. Consider stitching around the outside edge of the dress with contrasting quilting or decorative machine stitching thread before fusing the Sleeve or Bonnet.

Finishing the Quilt:

Follow these steps to complete your quilt:

  1. Join the blocks and sashing strips as illustrated.
  2. Measure the interior of your quilt and adjust the border measurements accordingly.
  3. For the first border, use two 1½″ x 39½″ strips for the sides and two 1½″ x 27½″ strips for the top and bottom.
  4. Add the second border using two 3¼″ x 29½″ strips for the top and bottom, two 3¼″ x 41½″ strips for the sides, and four 3¼″ corner squares.
  5. The final border, if directional, should be cut with attention to the fabric grain for uniform motif direction. Attach the top and bottom borders on the crosswise grain and the side borders on the lengthwise grain.
  6. Attach the borders, layer, and quilt as desired.
  7. Finally, cut binding strips and add them using your preferred method. Enjoy the delightful journey of creating your Sunbonnet Sue, Calendar Girl quilt!

Unlock the full tutorial experience with all patterns by accessing the complimentary PDF linked below. Dive into the detailed guide and bring your Sunbonnet Sue, Calendar Girl quilt to life effortlessly. Click now for creative inspiration!

FREE TUTORIAL PDF

The Sunbonnet Sue, Calendar Girl quilt pattern is a delightful project that brings together the charm of a timeless character with the ever-changing beauty of the seasons. As you embark on this quilting journey, let your creativity flourish, and enjoy the process of crafting a quilt that not only warms your body but also your heart with memories of days gone by. Happy quilting!

2 Comments

  1. I ‘m sure that you might be trying to be PC with your topic, but please remind yourself that the jucier musings always start a awesome debate when argued respectfully..and it is your site so allow your content rule here!

Leave a Reply

Your email address will not be published. Required fields are marked *