With the eerie whispers of autumn winds and the rustling of leaves, it’s time to delve into the world of quilting with a spine-chilling twist. As the harvest moon casts its glow upon the landscape, let’s journey into the realm of All Hallows Quilt Block Pattern – a design that adds a touch of Halloween spirit to traditional quilting projects.
The All Hallows Quilt Block Pattern is a delightful and whimsical design that captures the essence of Halloween in a quilt block. It typically incorporates traditional quilting techniques with elements inspired by the spooky and magical themes associated with All Hallows’ Eve.
One of the most striking features of the All Hallows Quilt Block Pattern is its versatility. Quilters have the freedom to interpret the theme in various ways, whether it’s through fabric selection, block size, or the choice of motifs. Common motifs found in All Hallows quilt blocks include pumpkins, witches, bats, spiders, haunted houses, and other iconic symbols of the Halloween season. These motifs can be appliquéd, pieced, or even embroidered onto the block, allowing quilters to showcase their skills and creativity.
Creating an All Hallows quilt block provides a wonderful opportunity for quilters to experiment with colors, textures, and embellishments. While traditional Halloween colors like orange, black, and purple are popular choices, quilters can also add unexpected twists by incorporating metallics, glow-in-the-dark fabrics, or even subtle nods to vintage Halloween imagery.
Additionally, the All Hallows Quilt Block Pattern is suitable for quilters of all skill levels. Beginners can start with simpler designs and gradually work their way up to more intricate blocks as they gain confidence and experience. Meanwhile, experienced quilters can challenge themselves with complex piecing techniques or elaborate appliqué designs to create truly stunning works of art.
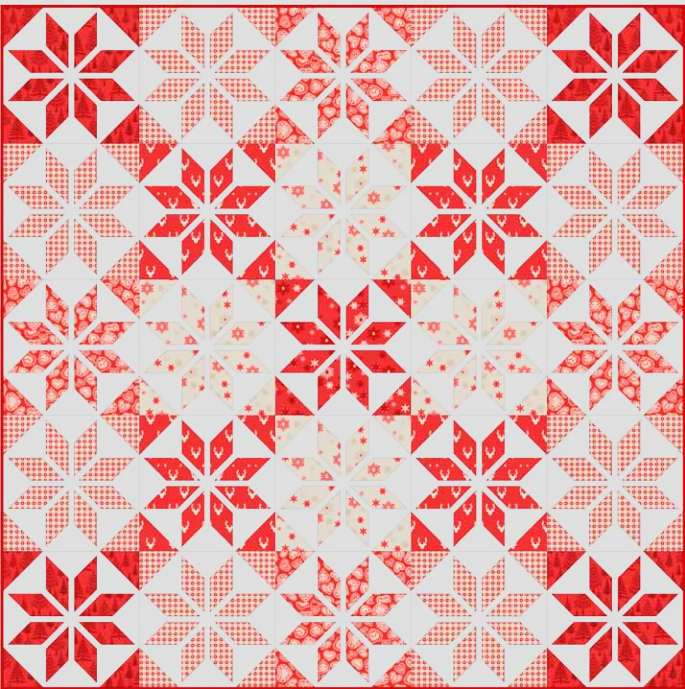
Furthermore, All Hallows quilt blocks can be used in a variety of ways. They can be combined to create larger quilts with a Halloween theme, used as accents in seasonal home decor projects, or even turned into festive table runners, wall hangings, or throw pillows. The possibilities are endless, and quilters are encouraged to let their imagination run wild when incorporating All Hallows quilt blocks into their projects.
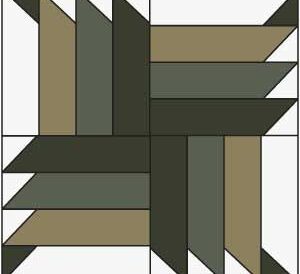
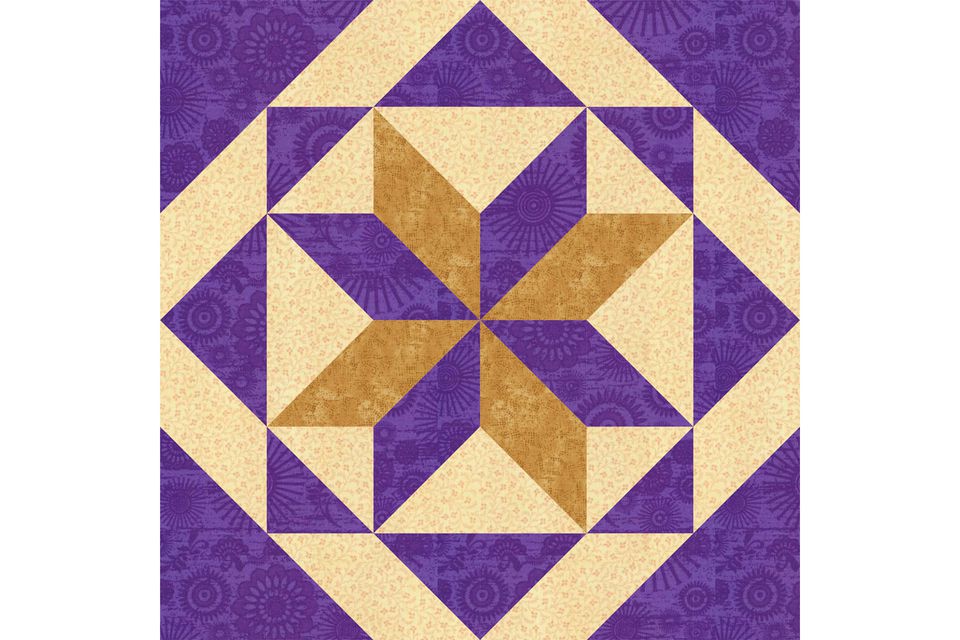
Use the All Hallows quilt block pattern to make star quilt blocks that finish at either 12″ or 24″ square. 12″ or 24″ square.
The block in the fabric is sewn with just three fabrics. Combine colors in different ways and use as many additional fabrics as you like. All Hallows works wonderfully in scrap quilts.
24″ x 24″ Quilt Block Cutting Instructions
Dark Fabric: about 1/2 yard
- (2) 8-7/8″ x 8-7/8″ squares; cut each in half once diagonally
- (4) 4-1/2″ x 8-1/2″ rectangles
- (6) 4-7/8″ x 4-7/8″ squares
Medium Fabric: 1/3 yard
shown as lighter floral print
- (8) 4-7/8″ x 4-7/8″ squares
- (8) 4-1/2″ x 4-1/2″ squares
Light Fabric: 5″ x 32″ strip
behind center star
- (6) 4-7/8″ x 4-7/8″ squares
12″ x 12″ Quilt Block Cutting Instructions
Dark Fabric: about 1/4 yard
- (2) 4-7/8″ x 4-7/8″ squares; cut each in half once diagonally
- (4) 2-1/2″ x 4-1/2″ rectangles
- (6) 2-7/8″ x 2-7/8″ squares
Medium Fabric: 1/4 yard
shown as lighter floral print
- (8) 2-7/8″ x 2-7/8″ squares
- (8) 2-1/2″ x 2-1/2″ squares
Light Fabric: 3″ x 20″ strip
behind center star
- (6) 2-7/8″ x 2-7/8″ squares
Make Patchwork for the All Hallows Quilt Block Pattern
All of the patchwork used in the All Hallows quilt block can be quick pieced.
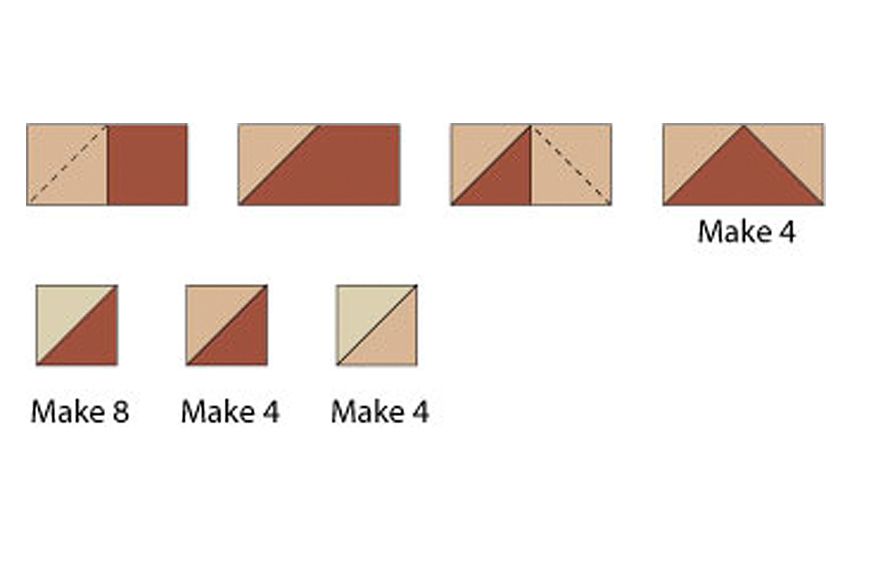
Flying Geese Units
Flying Geese are used for the dark/medium patchwork units at each midpoint along the quilt block’s perimeter.
Gather the four dark rectangles and the eight smaller medium squares (size ends in -1/2″).
Use a quick pieced flying geese instructions to make four flying geese units from the components.
Make Half Square Triangle Units
Gather the remaining squares (all sizes should end in -7/8″). Use the quick pieced half square triangle unit tutorial to make the following pairs: make the following pairs:
Four dark/four light
Two dark/two medium
Two medium/two light
Measure the Units After Assembly
units for the large block should measure 4-1/2″ square when complete
units for the smaller block should measure 2-1/2″ square when complete
More Construction Options
Try the no waste flying geese method to make several geese at once.
The Magic 8 half square triangle method explains how to construct eight identical units at one time.
Finish Sewing the All Hallows Quilt Block
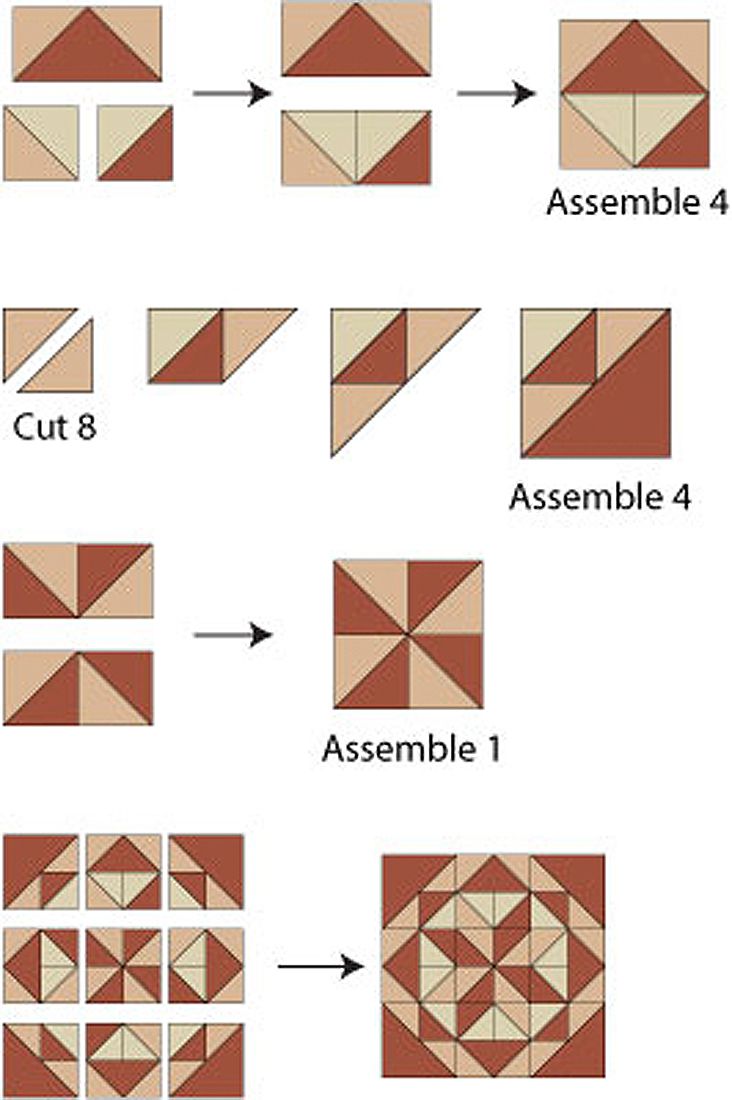
Finish the All Hallows Quilt Block
Assemble the All Hallows quilt block by sewing its units together into groups before creating rows. Colors don’t match the original image but methods are the same.
When complete, grouped units for the large block should measure 8-1/2″ square. Units for the smaller block should measure 4-1/2″ square.
Start at the top of the illustration and move downwards.
Outer midpoint units. Arrange a flying geese unit as shown, with medium/light and light/dark triangle square units under it. Sew the triangle units together and press the seam allowance either way. Your accuracy will improve if you press to set seams before pressing allowances in one direction.
Sew to the bottom of the flying geese unit and press seam allowance towards the flying geese. Make three more.
Corner units. Cut all remaining medium squares in half once diagonally. Sew one of the triangles to the top right side of a light/dark triangle square unit as shown. Press seam allowance towards the medium triangle.
Sew a medium triangle to the bottom edge of the unit as shown. Press seam allowance towards the triangle.
Center and sew a dark triangle (cut previously) to the unit you just made. Press the seam allowance towards the dark triangle. Make three more identical units.
Star center. Sew four medium/dark triangle square units into two rows as shown. Press seams in rows in opposite directions. Join rows.
Assemble the Rows
Arrange the units into three rows as shown, each row containing three combo units.
Check placement carefully, and then sew the components of each row together.
Press new seams in adjoining rows in opposite directions. Join the rows, matching seams carefully for a perfect fit.