Band Together Denim Tote Pattern

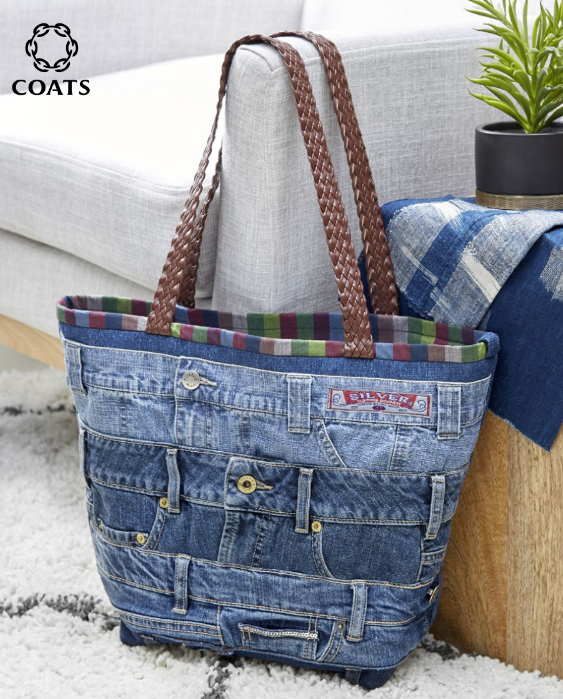
Looking to transform your old jeans into something fashionable and functional? The Band Together Denim Tote, designed by the talented Linda Turner Griepentrog, is a fantastic way to repurpose denim and create a casual yet trendy bag.

This sewing project, suitable for intermediate crafters, not only showcases the unique texture of denim but also adds a touch of creativity by featuring waistbands as a prominent design element. Let’s dive into the details of this exciting tutorial!

Continua após a publicidade..

Materials:

Before you start, gather the following supplies:

  • Coats Dual Duty XP® All-purpose thread
  • 4-6 pairs of assorted denim jeans with a waist circumference of at least 20” (50.80cm)
  • 1/2 yd (45.72cm) denim, 60” (152.40cm) wide
  • 1/2 yd (45.72cm) striped fabric for lining
  • 1 3/4 yds (1.60m) medium-weight fusible interfacing, 20” (50.80cm) wide
  • 1 1/3 yds (1.22m) faux leather strapping, 1” (2.54cm) wide
  • Swivel hook, 3/4” (1.91cm)
  • Size 100 topstitching or denim machine needles
  • Zipper foot
  • Spring clips
  • Pattern tracing paper
Band Together Denim Tote Pattern
Continua após a publicidade..

Preparation:

Begin by tracing the bag body pattern onto pattern tracing paper and cutting it out.

Cutting:

From the denim, cut:

  • (2) bag body
  • (1) strip, 2 1/2” x 5” (6.35cm x 12.70cm), for the key fob

From the lining, cut:

  • (2) bag body

From the fusible interfacing, cut:

  • (4) bag body

Apply Interfacing:

Following the manufacturer’s instructions, fuse a bag body interfacing piece to the wrong side of each denim and lining bag body piece.

Bag Front Embellishment:

  1. Chalk-mark a line 1” (2.54cm) from the upper bag front edge.
  2. Position the top of the first waistband along the marked line and stitch in place along the upper edge, using a zipper foot for better access around rivets and closures.
  3. Position the top of the second waistband parallel to the first band, overlapping at least 1/4” (.64cm) minimum, and stagger the position of the zipper opening to avoid bulk. Stitch the upper edge in place, skipping over the zipper teeth if they are present.
  4. Repeat steps 2 and 3 to cover most of the bag front. When nearing the lower bag, cut a pair of jeans to cover the remaining bag bottom. Stitch the lower waistband in place.
  5. Baste around the bag front shape close to the edges and trim off excess waistband overhang.

Assembling the Bag:

  1. With right sides together, place the bag back over the bag front, matching all edges. Use spring clips to hold the layers together. Sew both sides and the bag bottom.
  2. Press the seams open and pound flat if needed.
  3. To box the lower corners, place the side seam over the bottom seam and sew across the straight edge. Repeat for the second corner. Note: be cautious, as this can be thick, so sew carefully.

Assembling the Key Fob:

  1. Press the denim key fob strip in half, then unfold and press both edges to the middle. Press in half again. Topstitch both long edges.
  2. Zigzag finish one end of the folded strip and slide it through the loop of the swivel hook for 1/2” (1.27cm). Stitch in place by hand or machine.
  3. Attach the key fob to the tote front, just in front of the side seam, with right sides together and raw edges matching.

Attaching the Handles:

  1. Mark the bag front and back upper center. Measure 1/2” (8.89cm) from the center on each side and mark.
  2. Cut the faux leather strapping in half and, with right sides together, adjust the cut ends to the marked strap location.

Assembling the Bag (Continued):

  1. Construct the lining by sewing the bag front and back side seams using a 5/8” (1.59cm) seam allowance. Then sew the bottom seam, leaving a 6” (15.24cm) opening for turning.
  2. To box the lower corners, place the side seam over the bottom seam and sew across the straight edge. Repeat for the second corner.
  3. With right sides together, place the lining over the bag and sew around the top edge, keeping the handles straight and between the layers. Press the seam toward the upper edge.
  4. Turn the bag right side out through the lining opening. Sew the opening closed.
  5. Push the lining into the bag and firmly press the top edge, allowing the lining to extend over the seam allowance to mimic binding. Stitch in the ditch around the upper bag, leaving the handles free.
  6. Fold the handles up and hand-stitch them to the extended stripe edges.
  7. Fold the key fob into the bag and hand-stitch it in place at the upper edge.

Dear Quilt Missouri Tutorials enthusiasts,

Excited to start crafting the Band Together Denim Tote designed by Linda Turner Griepentrog? Good news! For your convenience, we’ve prepared a free PDF pattern that you can access below.

FREE PATTERN PDF

Congratulations, you’ve just created a stylish and eco-friendly Band Together Denim Tote! This intermediate-level project not only showcases your sewing skills but also contributes to sustainable fashion by repurposing old denim. With a bit of creativity and Linda Turner Griepentrog’s fantastic design, you’ve now got a unique tote that’s perfect for casual outings. Enjoy your new bag and get ready to turn heads with your trendy, recycled creation!

Leave a Reply

Your email address will not be published. Required fields are marked *