A Poinsettia Quilt Block brings the color and shape of a holiday flower into patchwork. Pointed forms radiate from the center, creating a design that can read as both a blossom and a star. In rich reds, leafy greens and a light background, it makes a cheerful focal point for Christmas sewing.
Its character changes with the fabric selection. Burgundy and warm cream suggest a traditional holiday setting, while pink, white or cool blue can give the flower a softer or more contemporary appearance. A single block can become a small seasonal accent, and a group of blocks can create a quilt filled with repeating blooms.
In this article, you’ll find fabric ideas, practical preparation tips and ways to use the block in your holiday projects. The complete PDF pattern will be available near the end, before the conclusion, so you can keep the project instructions together while you sew.
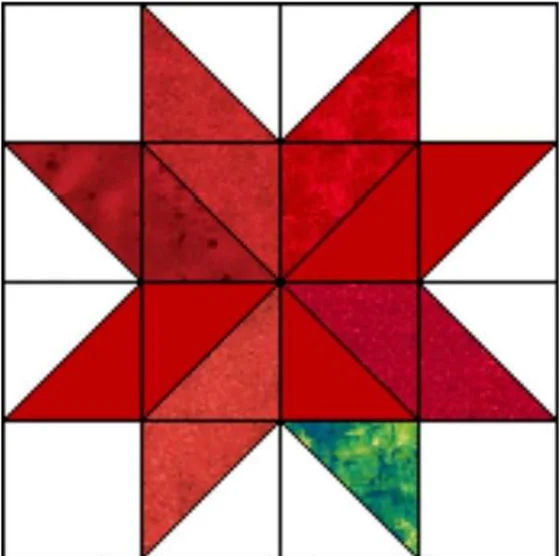
The appeal of a poinsettia-inspired block comes from the relationship between its center and the shapes surrounding it. Clear points suggest overlapping petals, while a contrasting center draws the eye inward. The background gives the flower room to stand out.
Fabric value matters as much as color. If the flower and background are too similar in lightness, the outline may become difficult to see. A darker red against ivory, for example, creates a clear silhouette. Two related reds can add depth within the flower when the pattern provides separate areas for them.
The exact layout depends on the pattern. Some poinsettia designs use foundation piecing, so the block’s name alone does not identify its construction method. Follow the method and assembly sequence in the PDF for your chosen version.
Choosing Fabrics for a Beautiful Holiday Flower
Begin with the main flower fabric, then place possible backgrounds beside it. Look at the fabrics from a few steps away. This helps you judge the overall shape before small print details influence your decision.
For smaller pieces, consider solids, subtle textures or small prints that remain readable after cutting. A large floral print may look attractive on the cutting table but lose much of its motif inside a narrow point. Save a favorite large-scale print for a border, backing or a larger area of the project.
These palettes offer several directions to explore:
| Style | Flower colors | Supporting colors and background |
|---|---|---|
| Classic Christmas | Red and deep crimson | Forest green, gold and ivory |
| Vintage holiday | Burgundy and muted rose | Olive green and warm cream |
| Winter elegance | White and pale gray | Deep green with restrained gold accents |
| Contemporary floral | Blush pink and raspberry | Sage green and soft white |
Treat these combinations as starting points. Lay out your actual fabrics together, since undertones can change how well a palette works.
If you choose metallic accents, keep their placement deliberate. A small amount around the center or in a border can draw attention without competing with every part of the flower.
Prepare Before Cutting
Read through the PDF before cutting your fabric. Identify the finished block size, the cutting measurements and whether any templates include seam allowances. Finished and unfinished measurements serve different purposes, so keep those labels visible as you work.
If the pattern includes full-size templates, print them using the specified settings and check any scale marker before tracing. Avoid automatically adding a seam allowance until you have confirmed what the pattern already includes.
Gather your fabric, cutting tools, marking tool, pins and pressing supplies. Label cut pieces by their pattern letters or section names. This small step becomes especially useful when several pieces have similar shapes or when two shades of red appear in the same block.
For a project with repeated blocks, complete one test block first. It gives you a chance to check fabric placement, sewing accuracy and the final appearance before cutting the whole quilt.
Quilting and Finishing Ideas
Choose quilting that supports the piecing and suits the batting’s recommended spacing. A busy print may show texture more clearly than individual stitches, while a plain background gives quilting lines more room to be seen.
Consider echoing the flower’s outline or using a simple background texture. Keep the stitching distributed across the project so that large open areas receive support alongside the more densely pieced sections.
Binding offers one final color decision. Repeating a flower color creates a clear frame; matching the background gives a quieter edge. Preview a folded strip beside the finished top before making the choice.
Download the Complete Poinsettia Block PDF
Ready to plan your own version? The complete Poinsettia Block pattern is available in the PDF below.
Download it before beginning, and use its project-specific measurements, cutting directions and assembly sequence as your sewing reference. Keep a copy beside your workspace so you can check each stage as the flower takes shape.
The Poinsettia Quilt Block offers a satisfying way to bring floral shapes and festive color into your quilting. Its pointed outline can look bold, delicate or richly traditional depending on the fabrics you choose.
Start with a palette you enjoy, make one block carefully and let the result guide the rest of the project. Whether it becomes a cushion, a runner or a full quilt, the flower can provide a welcoming handmade detail for the holiday season.