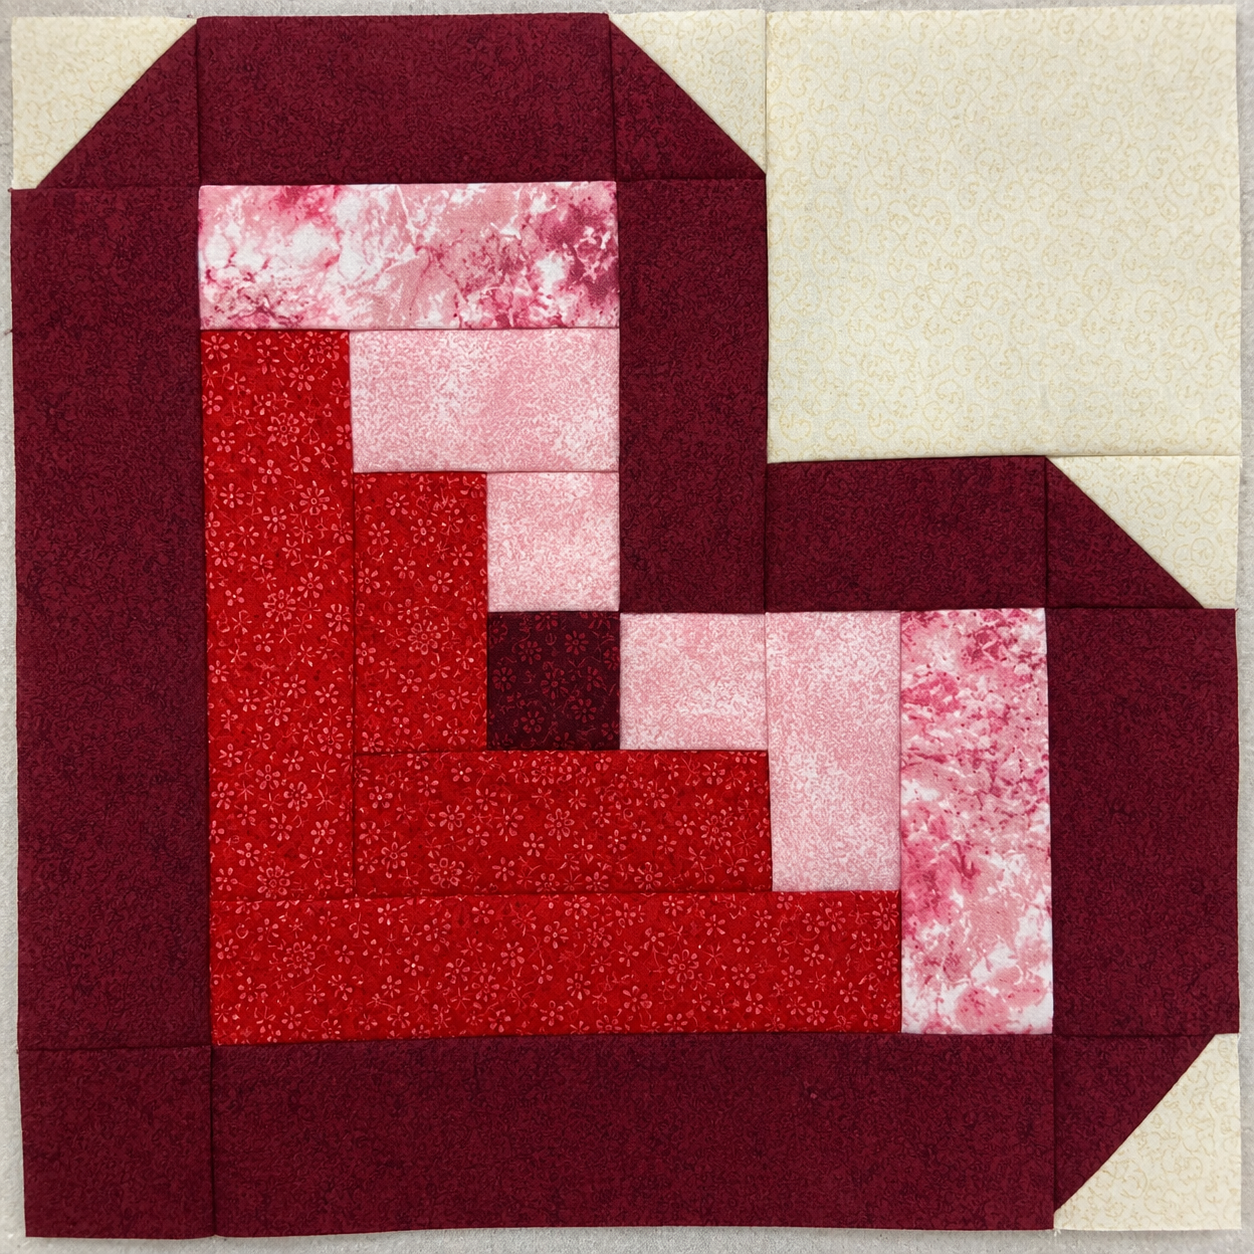
The Log Cabin Heart Block is a beautiful variation of the classic Log Cabin design, combining traditional strip piecing with the universally loved heart motif. Whether you’re making a heartfelt gift, decorating for Valentine’s Day, celebrating a wedding, or simply adding a touch of warmth to your quilt collection, this block is both meaningful and enjoyable to sew.
One of the reasons quilters adore this pattern is its versatility. It works wonderfully as a single feature block, repeated across an entire quilt, or mixed with other traditional blocks to create a sampler quilt. The structured log cabin construction also makes it beginner-friendly while still offering plenty of opportunities for creative fabric choices.
In this guide, you’ll discover everything you need to know about the Log Cabin Heart Block, including fabric suggestions, construction tips, color inspiration, and ideas for turning your finished blocks into stunning quilting projects. At the end of this article, you’ll find a free downloadable PDF pattern to help you start sewing right away.
What Is a Log Cabin Heart Block?
The Log Cabin block is one of quilting’s oldest and most recognizable patterns. Traditionally, strips of fabric called “logs” are sewn around a center square, creating a geometric design with endless layout possibilities.
The Log Cabin Heart Block takes this timeless construction and arranges the strips and color placement so that a heart shape appears within the block. The result is a design that feels both modern and traditional, making it suitable for quilts of every style.
This pattern is perfect for:
- Wedding quilts
- Baby quilts
- Anniversary gifts
- Valentine’s Day decorations
- Mother’s Day projects
- Memory quilts
- Wall hangings
- Pillow covers
- Table runners
Finished Size
- 12½” x 12½” unfinished
- 12″ x 12″ finished in a quilt
Skill Level
Intermediate
This project is suitable for confident beginners who already understand quarter-inch seam allowances and basic Log Cabin construction.
Materials
Background Fabric
Cut:
- 1 square — 4½” x 4½”
- 4 squares — 2½” x 2½”
Heart Fabrics
Choose 14 different fabrics:
- 13 prints in similar color families (reds, pinks, blues, purples, autumn colors, etc.)
- 1 background fabric
Cut:
- 4 squares — 2½” x 2½”
- 4 strips — 2½” x 4½”
- 2 strips — 2½” x 6½”
- 2 strips — 2½” x 8½”
- 1 strip — 2½” x 12½”
Before You Begin
Since this is a scrappy project, arrange all of your fabrics on a design wall or table before sewing.
Seeing every print together allows you to:
- Balance light and dark fabrics
- Prevent similar prints from touching
- Create a pleasing flow of color throughout the heart
Because several strips are the same size, you can easily swap them before sewing if another arrangement looks better.
Important Construction Notes
Throughout the project:
- Use a ¼” seam allowance
- Press seams toward the newly added strip
- After every few additions, square up the unit before continuing
This trimming step is extremely important. Keeping the block square as you build it prevents distortion and helps the finished heart lie perfectly flat.
Step 1 – Prepare the Background Corners
Draw a diagonal line from corner to corner on the wrong side of each of the four 2½” background squares.
These will become the heart’s outside corners.
Attach them to:
- both ends of one 8½” strip
- one 8½” strip end
- one 12½” strip end
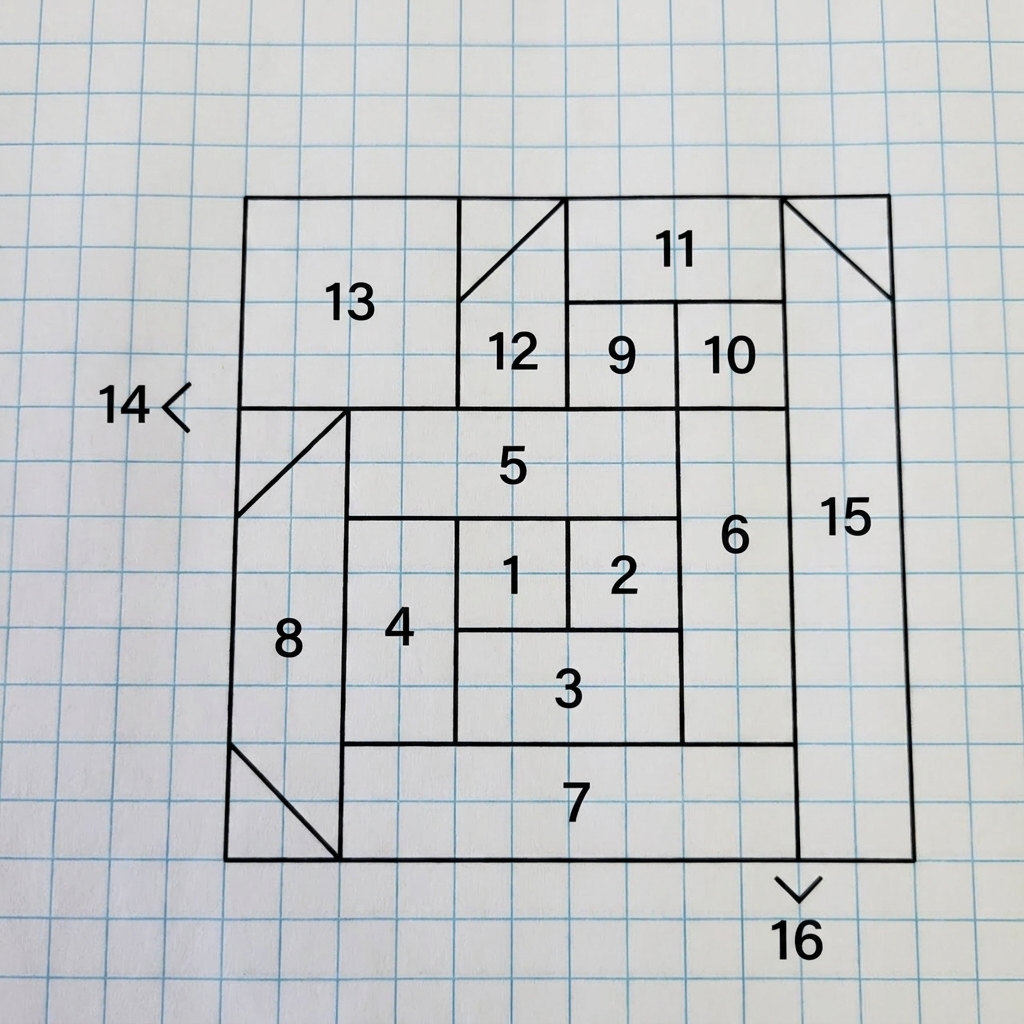
Position each square so the drawn line matches the diagonal shown in the block layout.
Sew directly on the marked line.
Trim away the excess fabric, leaving a ¼” seam allowance.
Press toward the strip.
Repeat for all four corners.
Set these strips aside until needed.
Step 2 – Build the First Heart Chamber
Begin with the two 2½” center squares.
These form the center of the first half of the heart.
Continue adding strips in Log Cabin fashion, always working around the center.
After each strip:
- Sew
- Press toward the new strip
- Square the unit
- Trim if necessary
At this stage the section should measure approximately 2½” wide before the next additions.
Step 3 – Continue Growing the Block
Add the next strips one at a time, continuing around the center just as you would with a traditional Log Cabin.
As the block grows:
- keep checking measurements
- maintain square edges
- trim whenever necessary
After the next two strips are added, square the section to 6½”.
Continue adding strips until the first heart chamber measures 8½”.
Step 4 – Add the First Diagonal Corner Strip
Now attach the prepared strip with the diagonal background corners.
If you did not sew the background corners earlier, prepare them now before attaching the strip.
Check once more that the entire unit remains square.
If one edge is slightly short after trimming, simply compensate by easing the next strip slightly while maintaining your quarter-inch seam.
Small corrections during construction prevent larger problems later.
Step 5 – Build the Second Heart Chamber
The second side of the heart is constructed exactly the same way.
Begin with its two center squares.
Add the remaining strips following the same process:
- Sew
- Press
- Square
- Trim
Continue until this section measures 4½” square.
Attach the prepared strip with the diagonal corner.
Finally sew the 4½” background square onto this section.
Press well.
Step 6 – Join Both Heart Sections
Place both completed heart chambers right sides together.
Carefully align the center seam.
Because the seams press in the same direction rather than nesting, pin carefully before sewing.
Start by pinning:
- both ends
- the center
- any remaining intersections
Sew using a consistent quarter-inch seam.
Press the seam according to your preferred method.
At this point, the heart shape is clearly visible.
Step 7 – Add the Final Strip
The final 12½” strip completes the outside edge of the heart.
Attach the strip.
Again, pin carefully because the seams will not nest.
Press toward the final strip.
Square the entire block to:
12½” x 12½”.
Your Scrappy Log Cabin Heart Block is now complete.
Helpful Tips
- Keep every strip exactly 2½” wide throughout construction.
- Trim frequently instead of waiting until the end.
- Use fabrics with good contrast to make the heart stand out.
- Press after every seam for the flattest possible block.
- Laying the fabrics out before sewing greatly improves the final appearance.
- Scrappy fabrics create movement, while a consistent background keeps the heart crisp and defined.
Color Ideas
This versatile block looks beautiful in many color combinations.
Some favorite palettes include:
- Traditional red and cream
- Soft pinks and ivory
- Patriotic reds, whites and blues
- Christmas reds and greens
- Autumn oranges, golds and browns
- Lavender and purple florals
- Rainbow scraps
- Low-volume prints with a bold heart
- Reproduction fabrics
- Modern solids
Ways to Use the Block
The Scrappy Log Cabin Heart Block can become much more than a single quilt block.
Try using it for:
- Valentine’s Day quilts
- Wedding quilts
- Anniversary gifts
- Baby quilts
- Wall hangings
- Pillow covers
- Table runners
- Memory quilts
- Sampler quilts
- Charity quilts made from fabric scraps
The Scrappy Log Cabin Heart Block is a wonderful reminder that even the smallest fabric scraps can come together to create something truly meaningful. Its unique two-center construction gives a fresh twist to the traditional Log Cabin while forming a beautiful heart that symbolizes love, friendship, and handmade care.
Whether you make one special block or an entire quilt full of colorful hearts, this pattern is a satisfying way to celebrate your favorite fabrics and improve your piecing skills.
Happy quilting!